In this product update for ShareGate, we’ve made it easy to automatically apply custom-fit security settings to each team based on its level of sensitivity—so you can protect your organization’s information without hindering productivity or collaboration.
Related reading: Teams governance best practices for secure collaboration
Users create teams in Microsoft Teams for all sorts of reasons; they’re a great way to collaborate with colleagues and people outside your organization on shared projects, whatever those projects may be.
Ideally, you want to give users the freedom to create new resources as they see fit, thereby leveraging the power of self-service features to drive productivity and adoption.
But you don’t want that freedom to come at the cost of creating a security risk for your business!
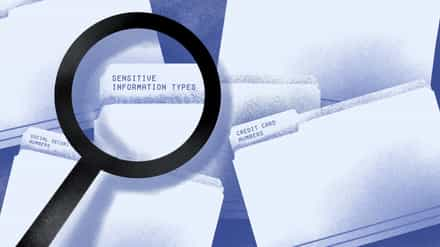
It’s probably not a big deal if John shares beer tasting notes with Sam from the ad agency. But Emma in Finance should definitely not be allowed to add external users to a team containing highly confidential company information.
So, how can you loosen security requirements for some teams while enforcing stricter rules for others?
Configuring a team’s security settings in Microsoft 365 according to its level of sensitivity is not an easy feat. To apply settings at the team level, you need to either shut down self-service and put a complex provisioning process in place, or you need to have an Azure Active Directory Premium license.
What if you want to customize each team’s security settings without having to do either? That’s the problem we set out to tackle when developing the new features in this release.
Watch ShareGate’s “Group sensitivity” feature in action
Introducing ‘Group sensitivity’ in ShareGate
ShareGate now enables you to automatically apply custom security settings to your teams and Microsoft 365 groups depending on each one’s level of sensitivity.
In combination with ‘Group purpose‘—our feature that helps you understand why owners create their teams—you’ll now also be able to assess how much of a security risk that team poses to your business. That way, you can apply the appropriate controls from the moment the team is created and ensure the right people have access to the right things.
In this release:
- Manage your teams’ security settings directly in ShareGate
- Set up group sensitivity labels to automatically control your teams’ security settings
- Collect group sensitivity information from owners with ShareGate’s chatbot for Microsoft Teams
- Correct sensitivity mismatches to enforce your security policies
Manage your teams’ security settings directly in ShareGate
You can now manage a Microsoft 365 group or team’s individual security settings directly in ShareGate! Not only is this an incredible time saver (no need to go to the Microsoft 365 admin center or write a new script), it’s also the foundation of our new ‘Group sensitivity’ capability.
ShareGate enables you to manage privacy status, external sharing, and guest access at the team level, giving you more granular control over each team’s security settings. This comes in handy, since some of these settings in Microsoft 365 can only be controlled at the organization level or with an Azure AD Premium license—which you won’t be needing here.
With ShareGate, you can turn on external sharing for your organization, but still restrict it for specific high-risk teams and groups.
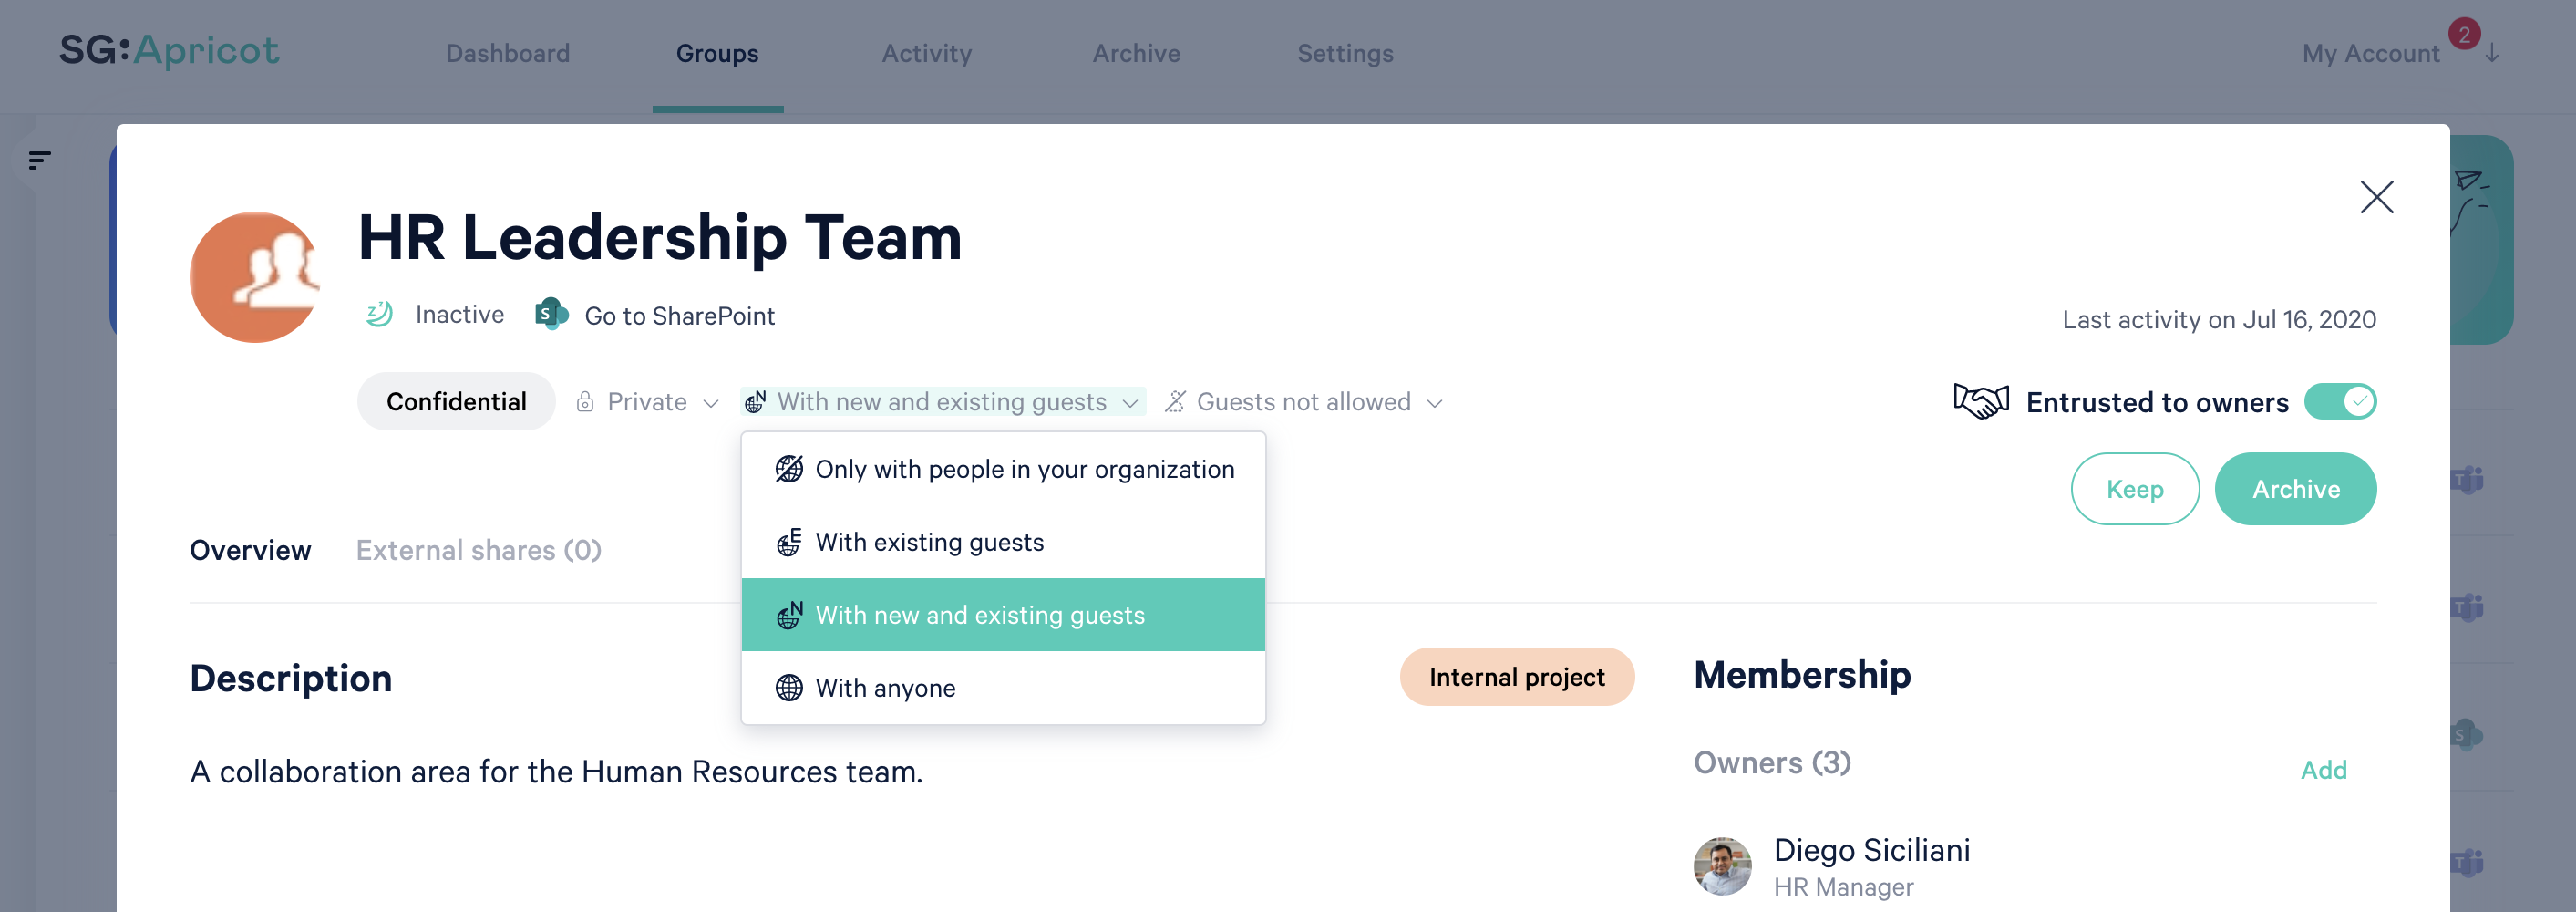
Edit security settings at the group/team level.
Within the app, you can manually edit and overwrite the following security settings:
- Privacy status: Set to ‘Private’ or ‘Public’
- External sharing: Set to ‘Anyone’, ‘New and existing guest’, ‘Existing guests’, or ‘Only people in your organization’
- Guest access: Set to ‘Guests allowed’ or ‘Guests not allowed’
Head to our support documentation for more details on how to manage the security settings of a Microsoft 365 group or team.
Set up group sensitivity labels to automatically control security settings at the team-level
Ok, we know what you’re thinking: ‘Micromanaging the security settings of each team is convenient, but what if I have a ton of teams? Sounds time consuming!’
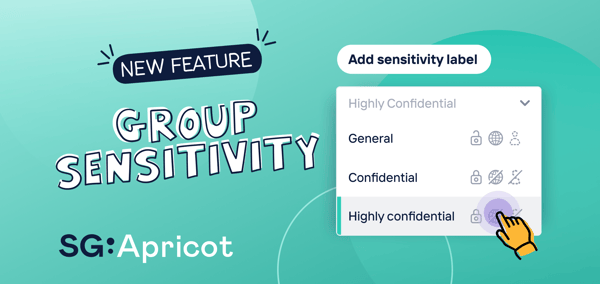
That’s why we’re launching a faster, easier way to manage team-level settings that automates part the process for you: group sensitivity labels. As part of this release, you can now assign a group sensitivity label to each Microsoft 365 group (and by extension, its attached team) in ShareGate, which then applies the correct security settings to that group automatically.
For example, if you know that one of your teams contains highly sensitive information—say, the R&D team discussing the secret ingredients in your best-selling pizza sauce—you can label that team as ‘Highly confidential’. Once you’ve applied that group sensitivity label, ShareGate automatically enforces stricter security settings by setting the team to private, turning off external sharing, and forbidding guest access.
How it works
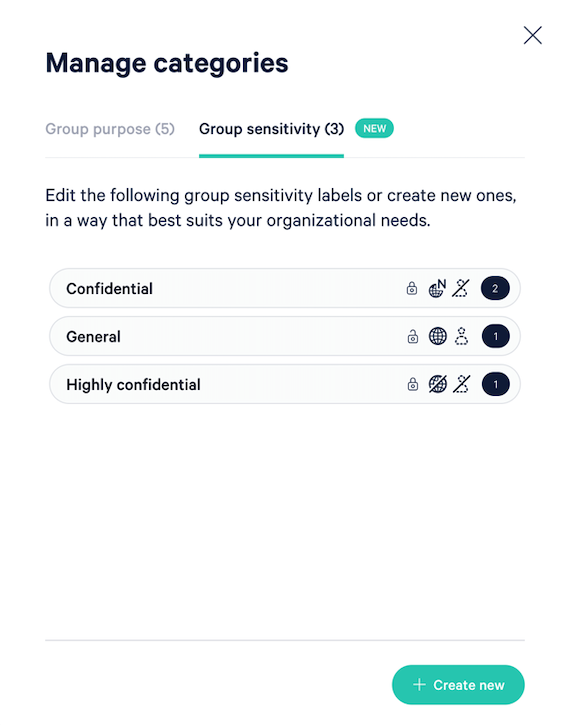
You can create your own group sensitivity labels in ShareGate with customized privacy status, external sharing, and guest access settings.
To help get you started, we’ve created the following default group sensitivity labels, which you can modify or even delete:
- General: Sets the group/team to public, allows external sharing with anyone, and enables guest access
- Confidential: Sets the group/team to private, only allows external sharing with new and existing guests, and disables guest access
- Highly confidential: Sets the group/team to private and disables external sharing and guest access
Create and edit group sensitivity labels in-app.
Each group sensitivity label should also include a description. Make sure the description clearly defines the corresponding group sensitivity level, as it will be presented to owners to help them make a choice on behalf of their team (more on that later).
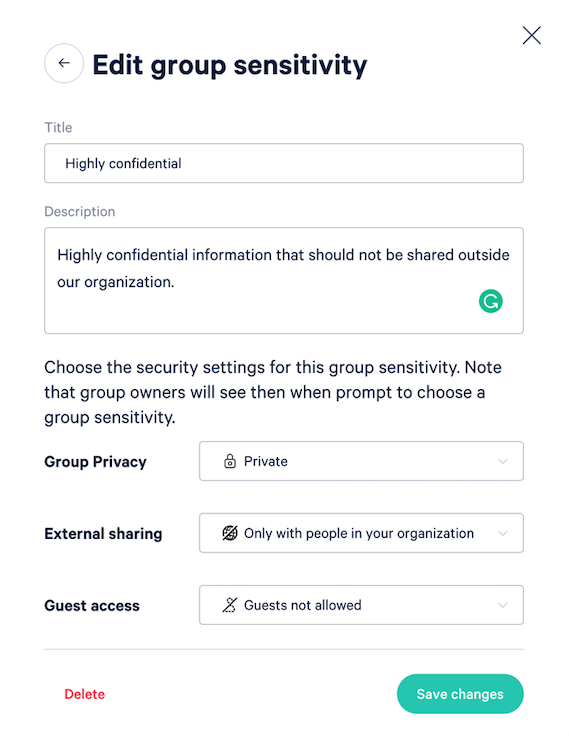
Add a description to help owners select the correct security settings.
Once you’ve established the different group sensitivity labels for your organization, you can manually add labels or overwrite a selection made earlier by an owner.
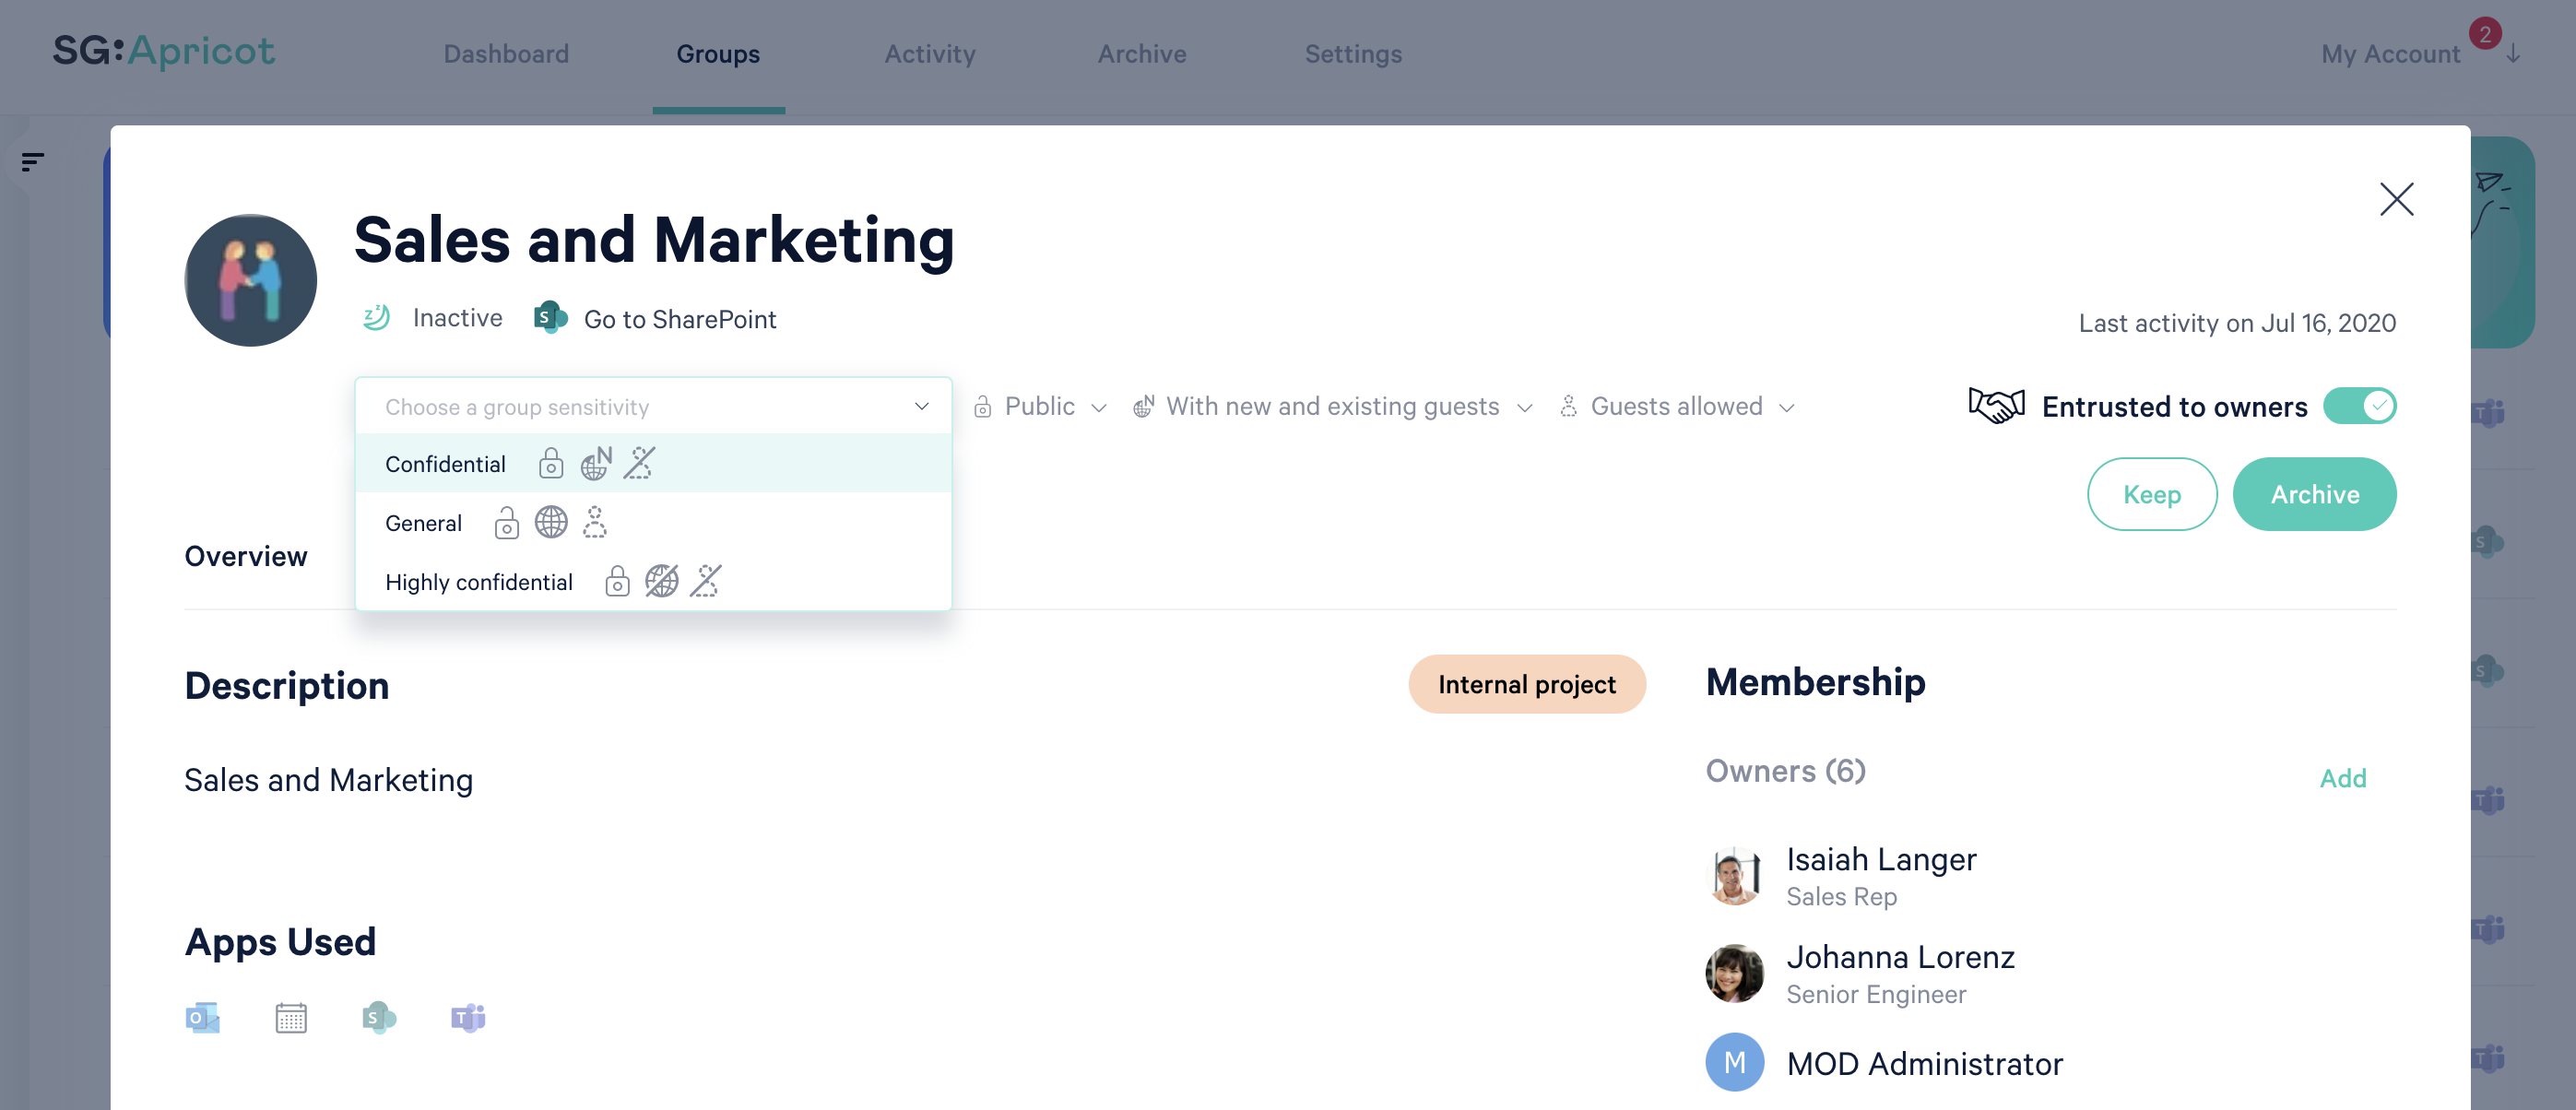
Manually assign or change a team’s group sensitivity label.
To help you get started, take a look at our group sensitivity labels support documentation.
Collect group sensitivity information from owners with ShareGate’s chatbot for Microsoft Teams
So, how do you know the sensitivity level of every single team?
Figuring this out is far from easy for someone in IT. When end users create a new team in Microsoft Teams, they only have to set the privacy status and choose a name—neither of which provides any indication of how sensitive the information inside it will be.
If you want to know how confidential the information within a team is in order to apply the correct security settings, the team owner is the best person to help you out. After all, they know why they created their team as well as the kind of information that will be shared between its members.
A conversational chatbot is the perfect solution for collecting information from owners; they integrate seamlessly with users’ flow of work, reduce the need for context-switching, and automate workflows and tasks. And we believe the best way to collect information about a team’s business purpose and sensitivity is to ask owners directly in Microsoft Teams. You might recall that we launched a ShareGate chatbot for Microsoft Teams back in May to help you understand how owners intend to use new teams.
Now, we’re adding to this capability by collecting information about sensitivity at the same time. All you have to do is set up your group sensitivity labels in ShareGate and activate our Teams chatbot.
How it works
Shortly after an owner creates a new Microsoft 365 group—whether they do so by creating a new team in Microsoft Teams or via any of the other 19 ways to create a Microsoft 365 group—our chatbot will reach out to ask them for the group’s reason of creation and level of sensitivity.
The bot will present them with the options you’ve pre-populated as well as each one’s description, making it easy for owners to make an educated decision.
For more details on how to set up the bot, head to our support documentation on using the ShareGate Teams bot.
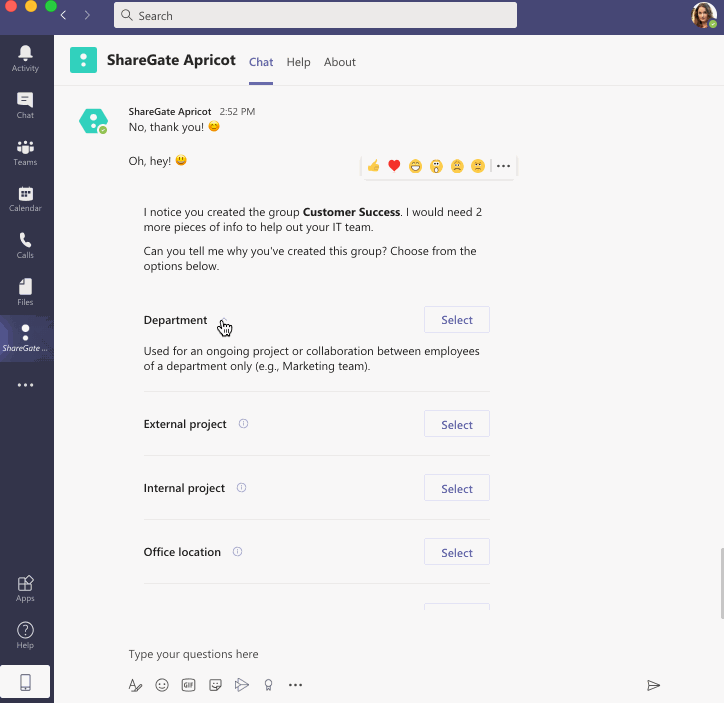
Owners pick the purpose and group sensitivity label that best fits their team.
Once the owner has answered the bot, the security settings that correspond to the group sensitivity label they selected will automatically be applied to their group/team.
Our bot also relates that information back to you in ShareGate on your ‘Groups’ page, where the newly applied label will appear in the ‘Sensitivity’ column next to that team.
From there, you can filter and organize your groups by sensitivity level and see which groups haven’t responded to the bot yet—so you can follow up with owners or manually select a group sensitivity label and purpose for those groups yourself.
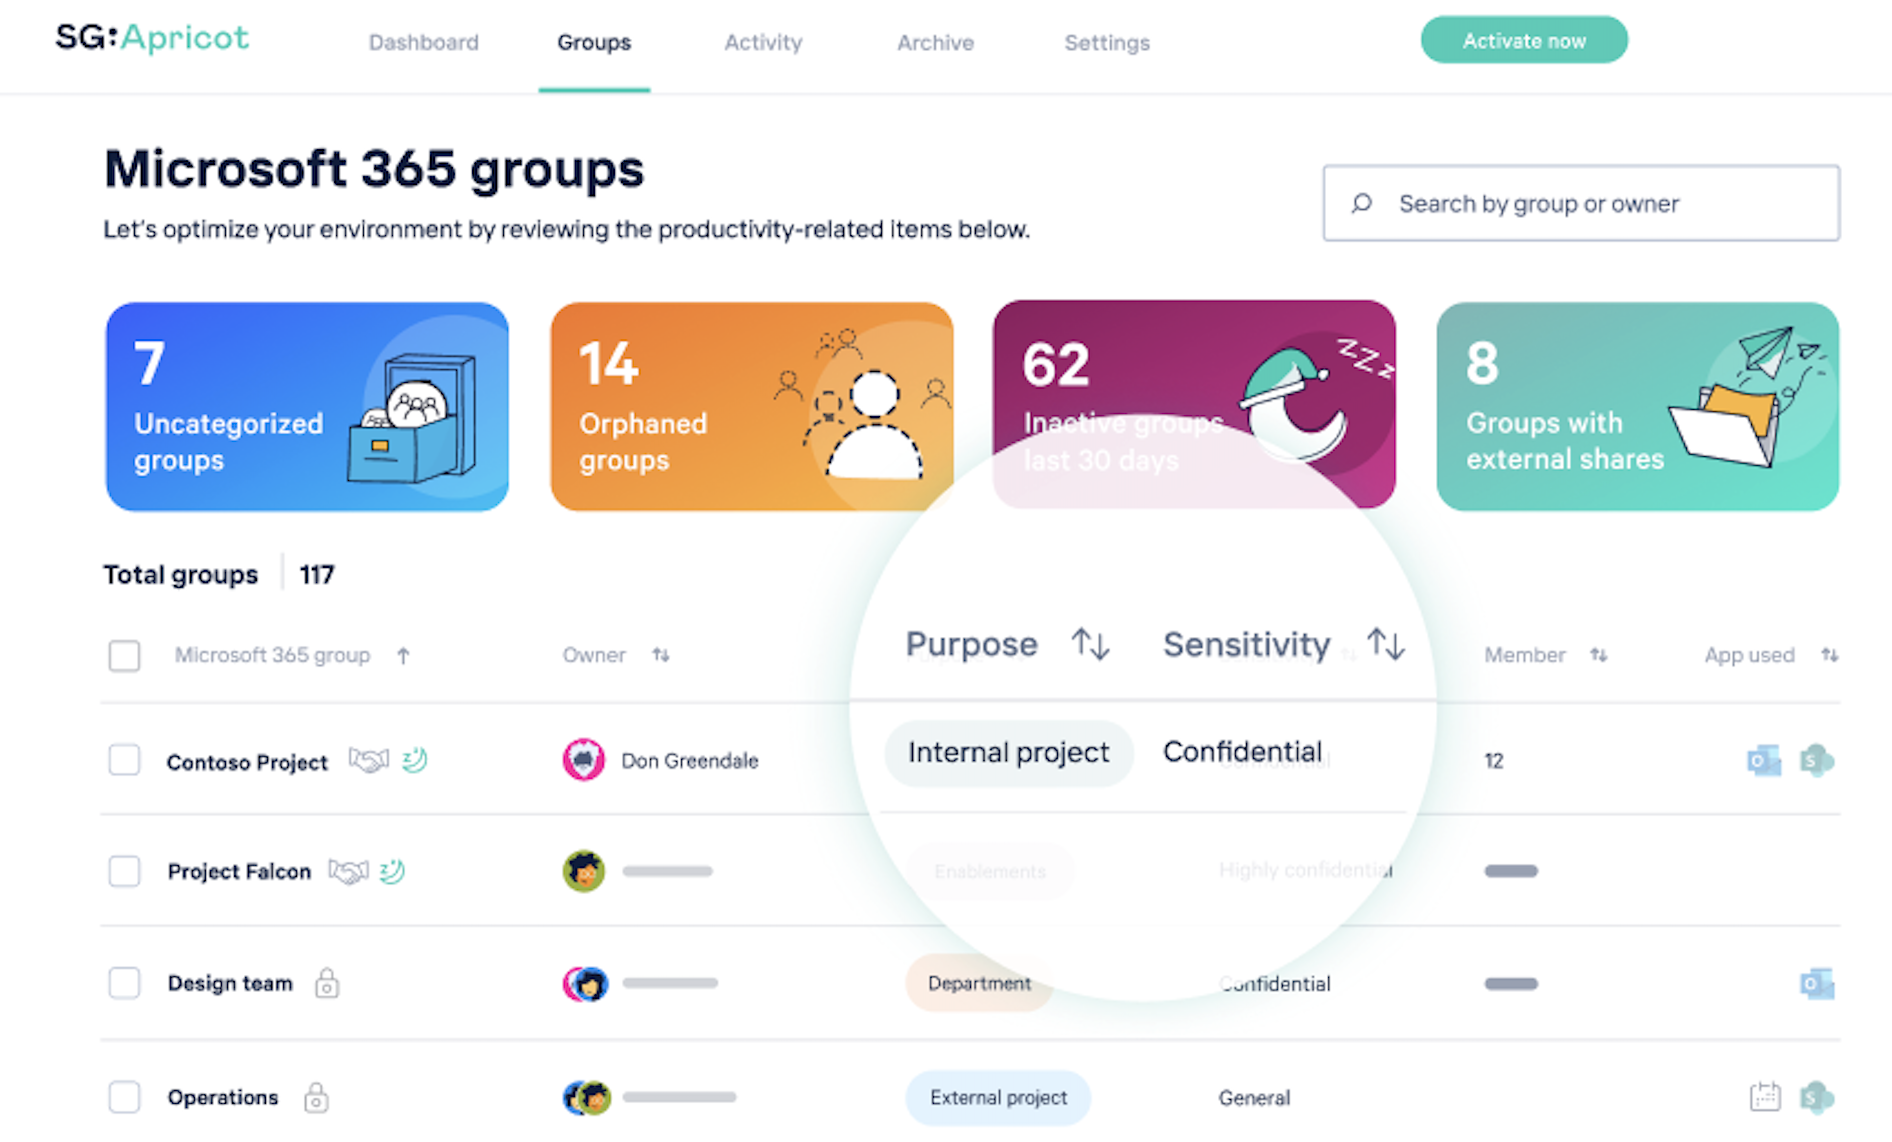
See all of your groups categorized by purpose and sensitivity in ShareGate.
Correct sensitivity mismatches to enforce your security settings
We’ve also made it easy for you to spot potential security flaws in your environment by flagging sensitivity mismatches—i.e., security settings that don’t match the corresponding group sensitivity label that’s been applied to a team. This gives you the chance to manually correct the situation and avoid having your data fall into the wrong hands.
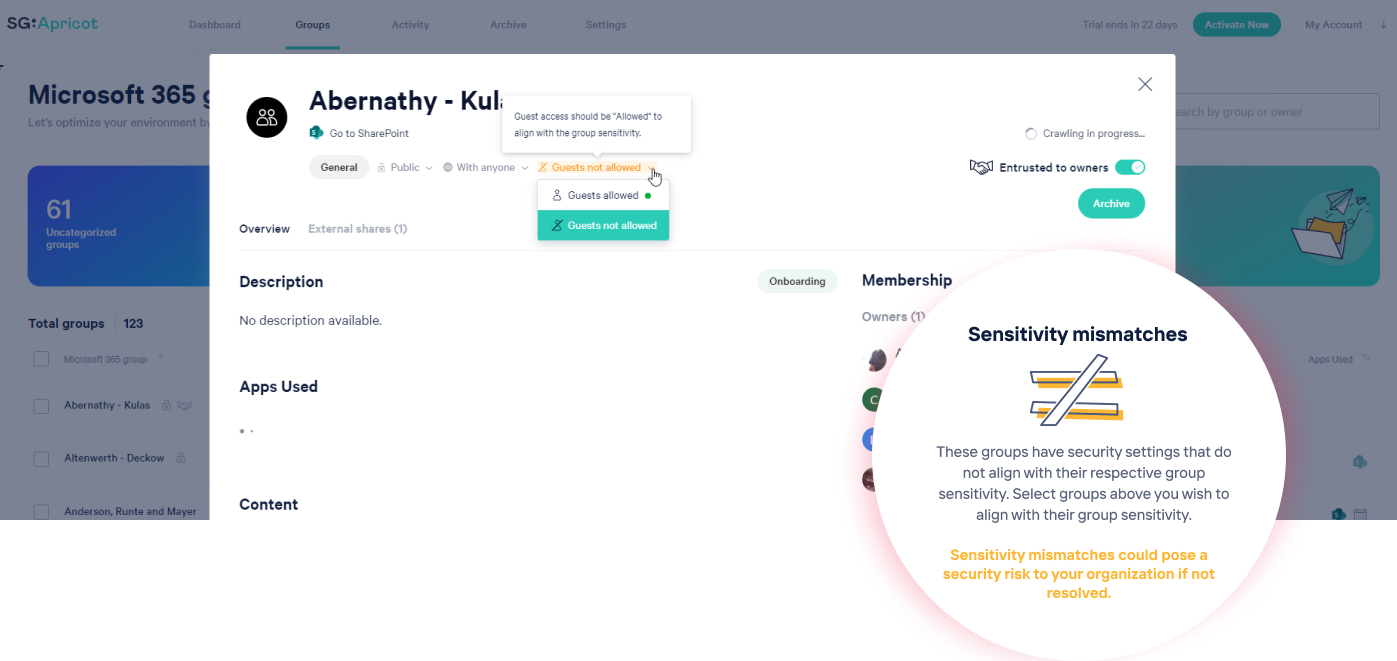
See potential security flaws so you can manually correct them.
For example, let’s say an owner created a team and initially identified it as ‘Highly confidential’. On your end, you had previously established that teams labeled ‘Highly confidential’ should be made private.
At some point after ShareGate applied the corresponding security settings, the owner changed the privacy status from private to public. We’ll bring that discrepancy to your attention so you can manually revert the privacy status back to private.
You can read more about sensitivity mismatches in our support documentation.
Coming soon
We’re excited for what’s coming up on the product roadmap! Our next release will tie everything together and enable you to set custom governance policies based on a team’s purpose and sensitivity.
For instance, you’ll be able to set custom inactivity thresholds that correspond to a team’s assigned purpose. So, you could set a policy that flags ‘Internal project’ teams as inactive after 180 days, whereas owners of teams with a group purpose of ‘External project’ will be asked to make a decision about archiving their team after only 90 days.
You’ll also be able to schedule external sharing reviews to occur at different frequencies depending on a team’s level of sensitivity. For example, you could ask owners to review their team’s external sharing links more frequently if its assigned group sensitivity label is ‘Confidential’ compared to if it’s labeled as ‘General’.
We can’t wait to see what custom policies you’ll put in place!
ShareGate is easy to setup and even easier to manage—no clunky interface, no coding, and no Azure AD premium subscription required.
If you’re a ShareGate customer, then we have great news! Your subscription now gives you full access to ShareGate at no extra charge! Activate your ShareGate account by signing in here. Make sure to have your ShareGate license key handy—you’ll need it complete your activation.
If you’re ready start categorizing your groups and teams according to business purpose, take a look at our group sensitivity support documentation to learn how to set it up!