
What is an ownerless Microsoft team? We explain why every team needs an owner, how to find those that don’t, and how to add an owner to Microsoft teams.
No matter how prepared you are, there are some things that are simply out of your control. Case in point? Employees tend to move around—whether starting a new job at your organization, leaving their current role for a new one, or switching between projects internally.
Keeping track of users is especially critical regarding resource accountability in Microsoft 365. We’re talking about ownership of teams in Microsoft Teams and all of their associated workloads.
So what can you do to ensure someone is always accountable for user-created resources?
When it comes to managing ownerless teams in your Microsoft Teams, you have three basic options:
Jump to…
What is an ownerless team in Microsoft Teams?
In Microsoft Teams, users can have one of two possible roles within a specific team: owner or member (which includes external users who have been granted guest access)
Both owners and members can access the team’s shared resources, files, and conversations. However, owners have unique permissions that make them vital to the proper functioning of each team.
For example, only team owners can:
- Edit the team name and description
- Delete the team
- Add members to the team (if it’s private)
- Promote a member to owner status
- See the name/owner of all private channels*
- Delete any private channel
*Team owners can only access a private channel’s conversations and content if they’ve been added.
Essentially, team owners are accountable for managing a team and its content throughout its lifecycle. Common best practice says you should have at least two owners to share the management of each team. That way, if one owner leaves, there’s still someone accountable.
But sometimes, you’ll find yourself in a situation where a team was created, and the only owner later left your organization completely—leaving that team ownerless.
This everything you need to know guide on Microsoft Teams channels can help further your knowledge about Teams and team channels.
Common best practice says you should have at least 2 owners to share the management of each team. That way, if one owner leaves, there is still someone who is accountable.
Tweet this
An ownerless team will function insofar as its members will continue to have the same access and permissions as before. However, if the team is private, no one within the team will be able to add or remove users without the help of IT.
Thanks to this step-by-step guide, understanding how to change or assign user roles allows for seamless access management in Teams.
Option #1: Manage ownerless teams in the Microsoft Teams admin center
Microsoft does include some fail safes to try to prevent ownerless teams and allows you to find ownerless teams if you already have them.
Preventing ownerless teams
Microsoft Teams includes some safety measures to help prevent ownerless teams from happening in the first place.
For example, if a team only has one owner, they’ll be prevented from leaving that team until another member has been promoted.
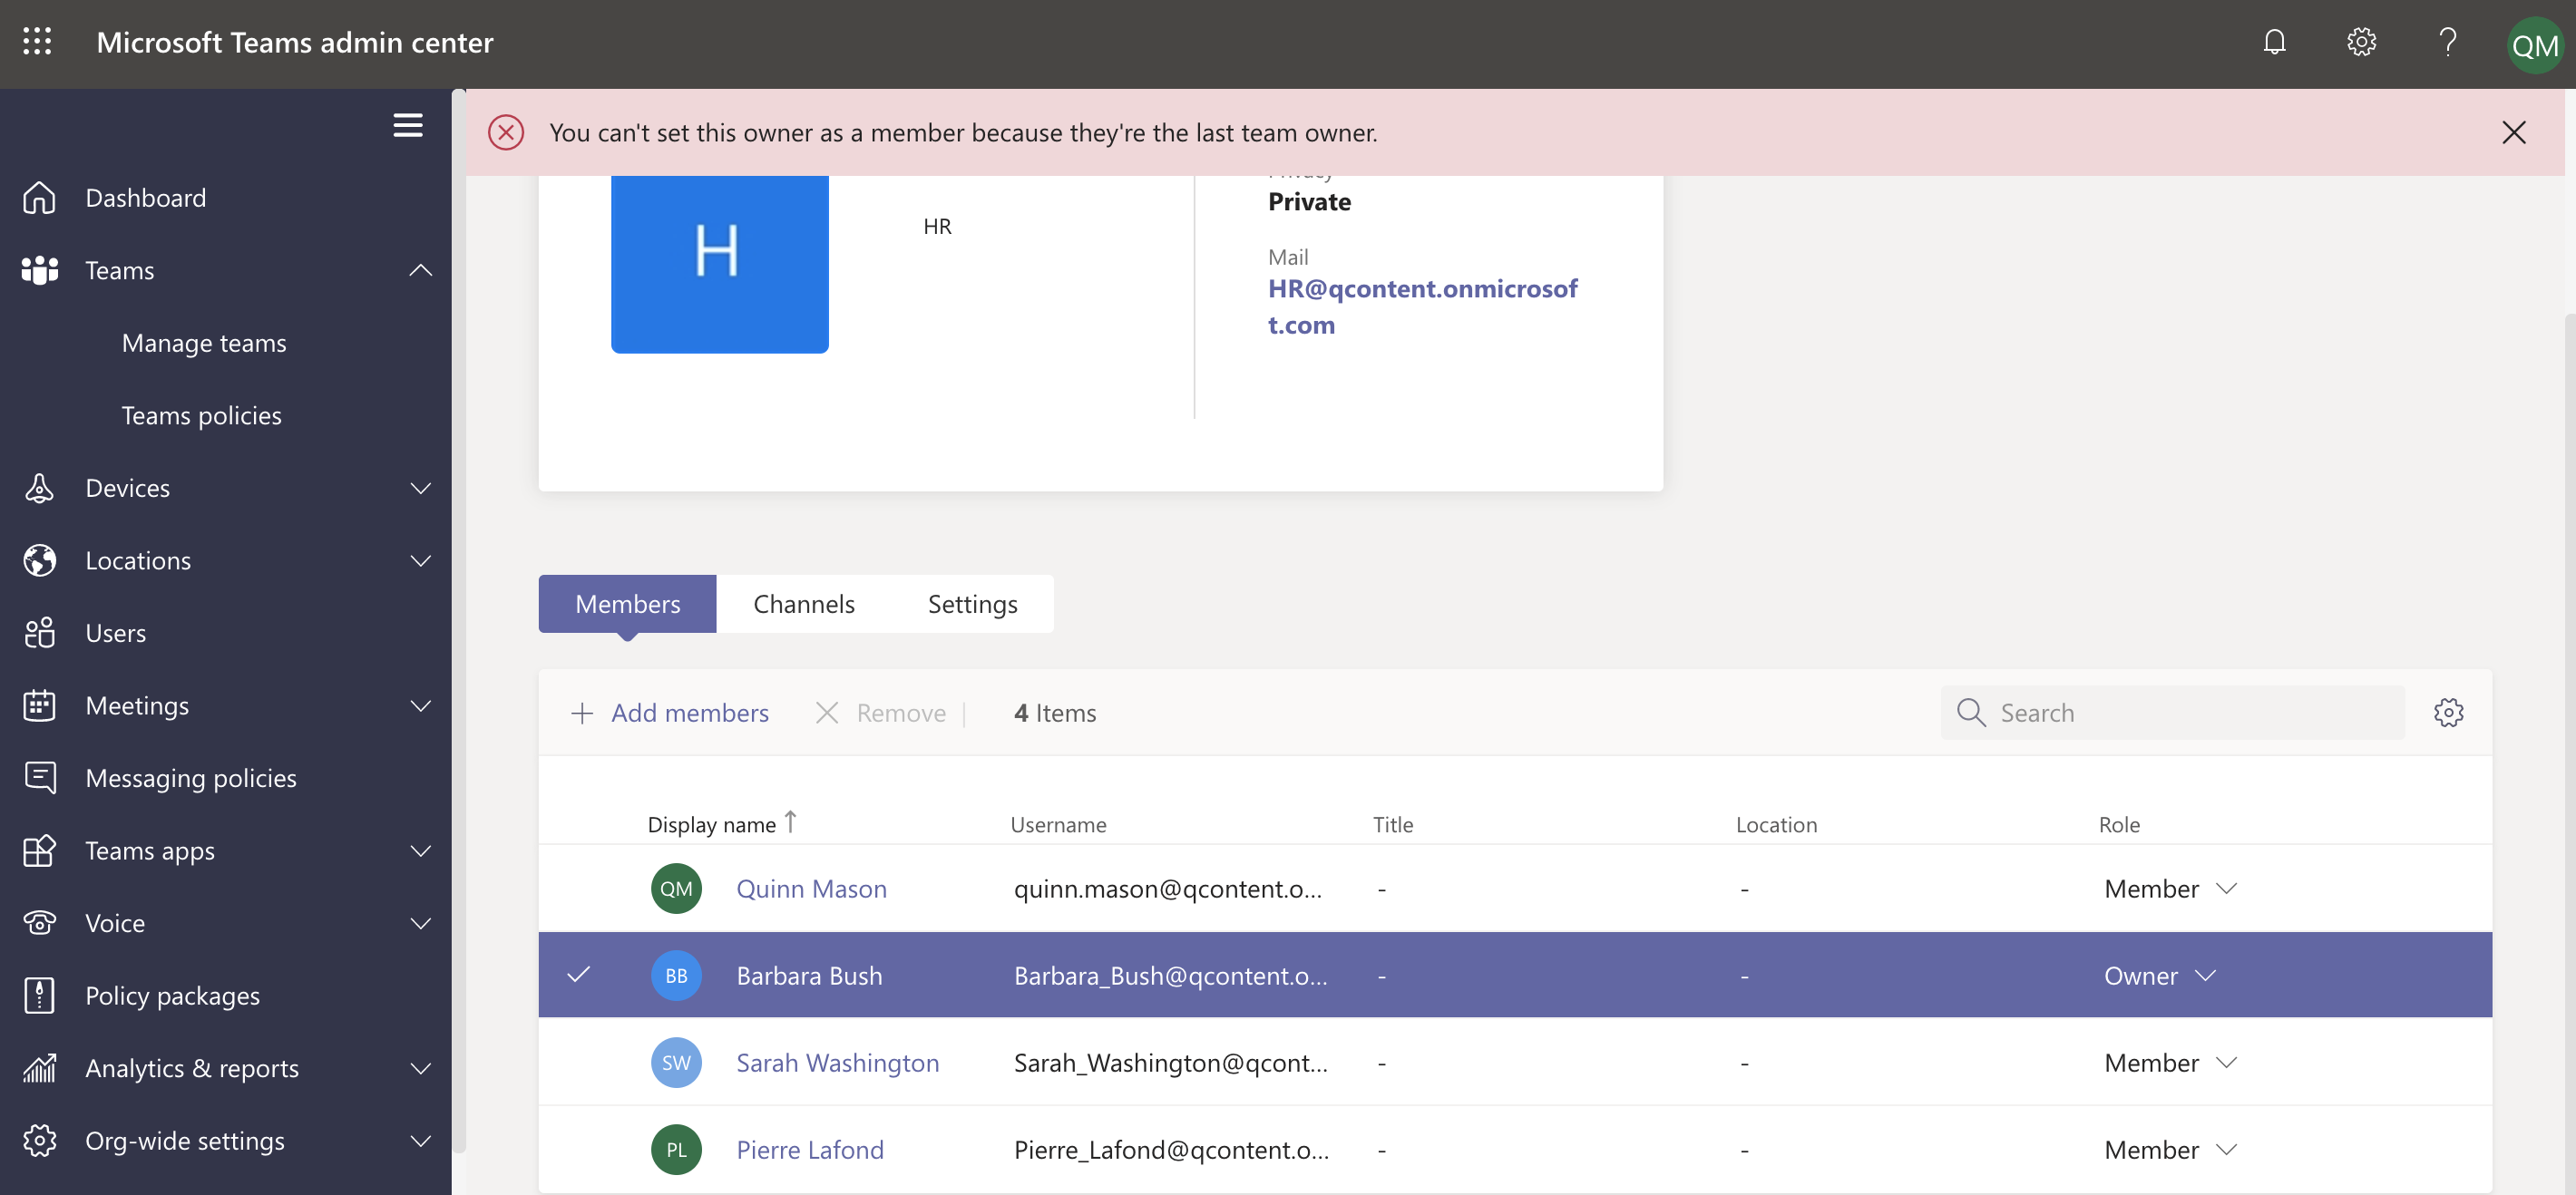
That rule also applies if you’re an IT admin trying to remove a team’s sole owner from a team through the Microsoft Teams admin center—the X Remove option won’t be made available to you.
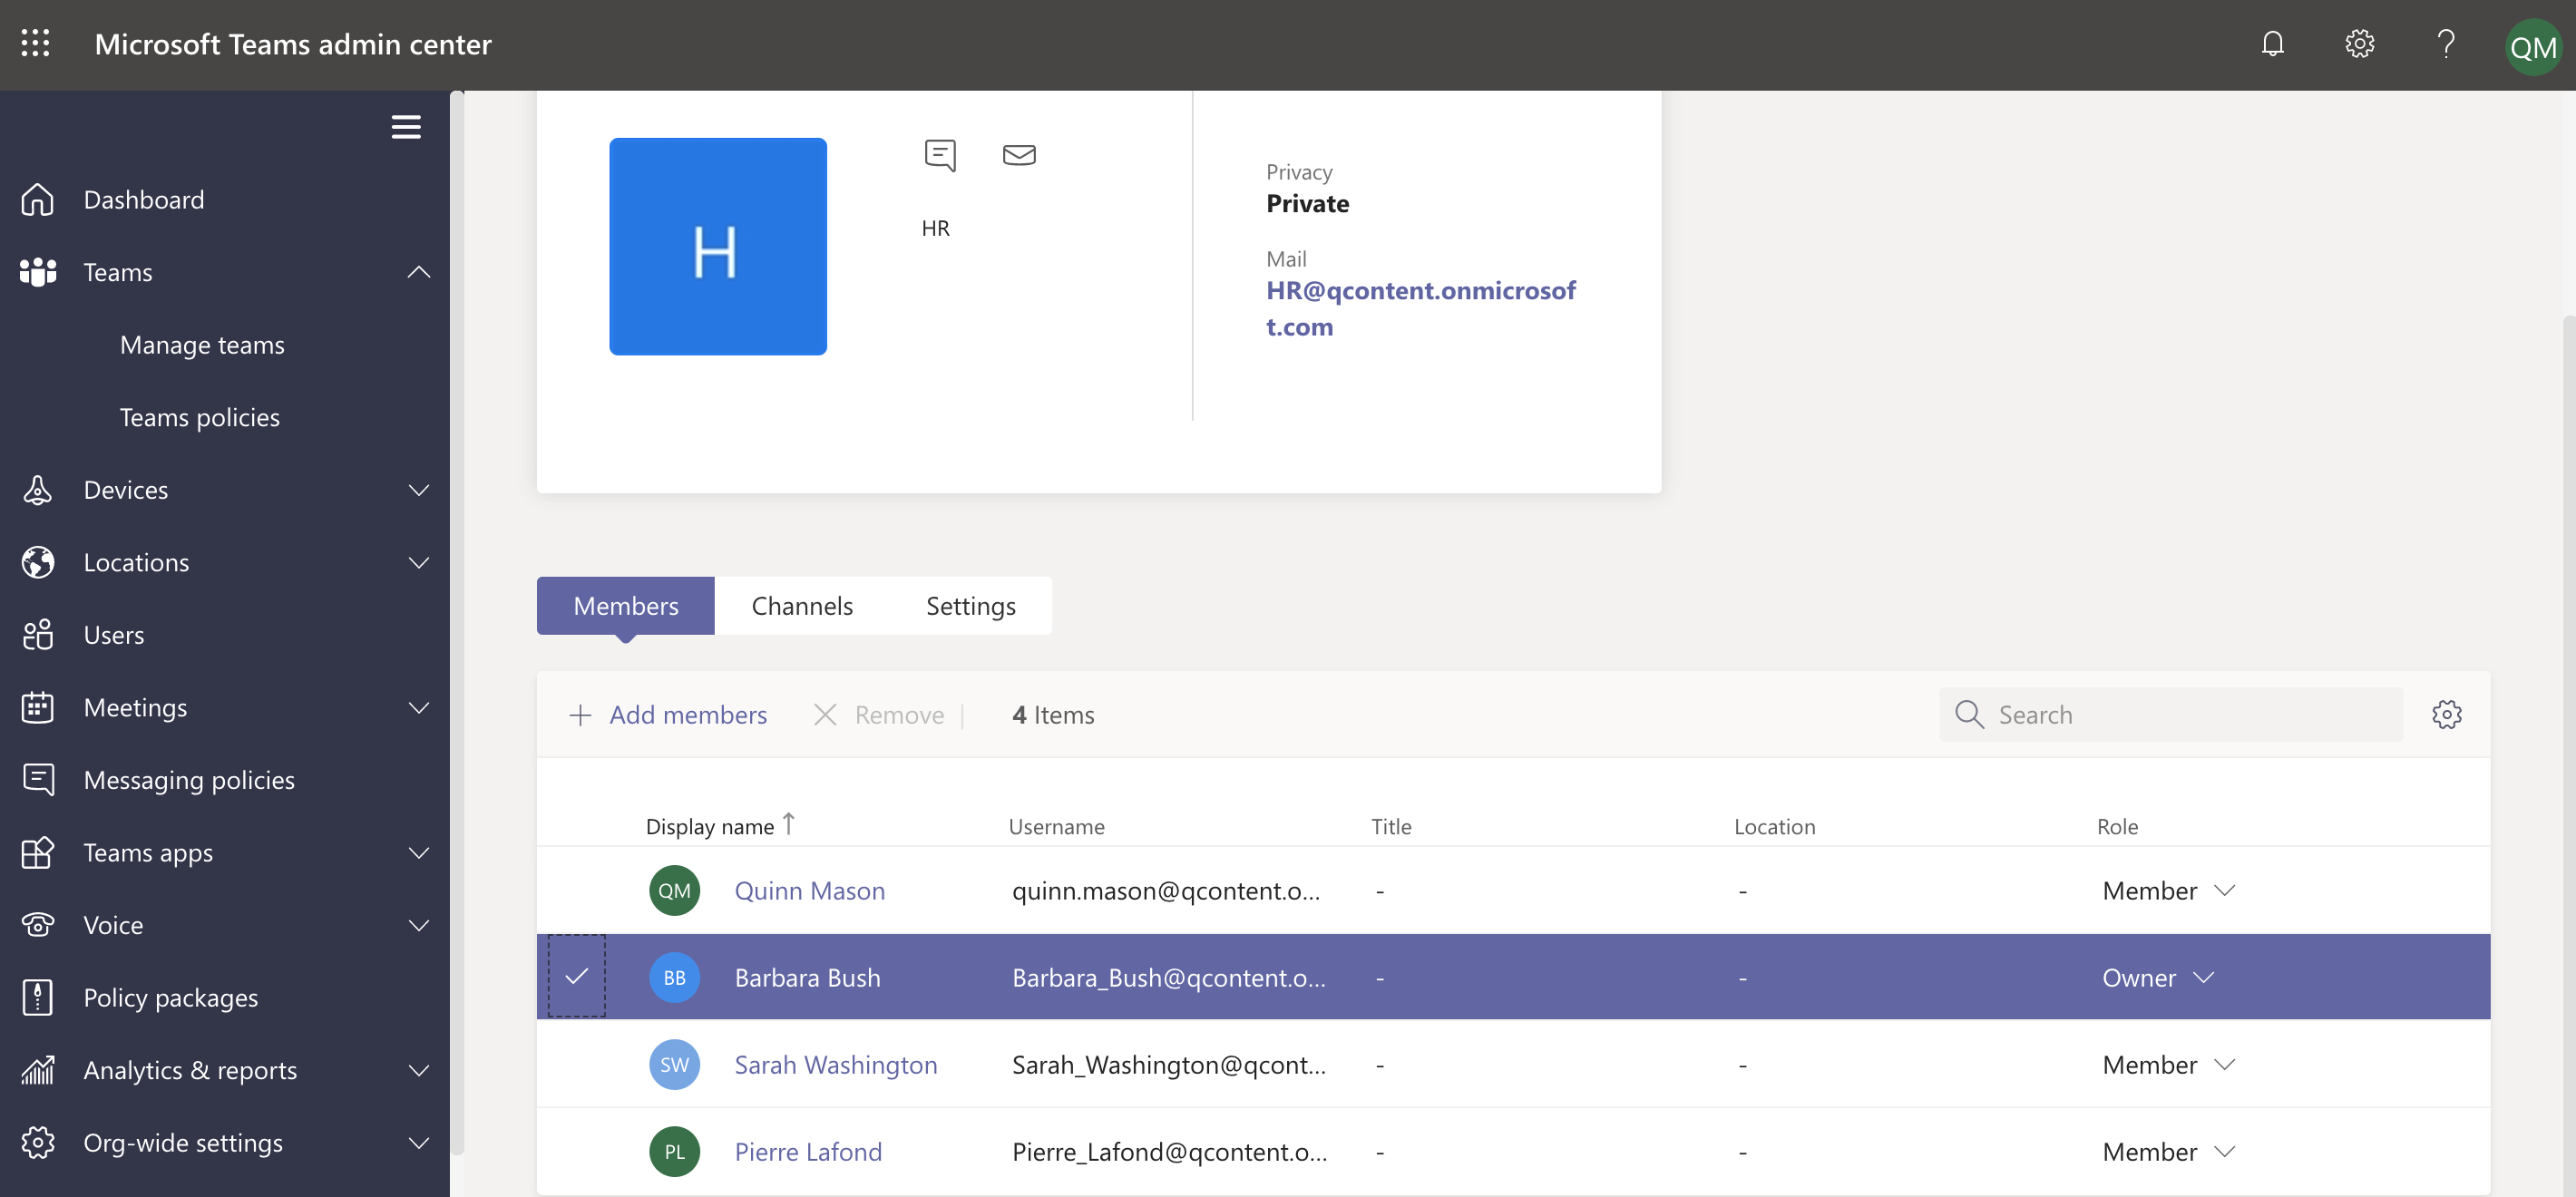
You’ll also be prevented from demoting a team’s sole owner to a member:
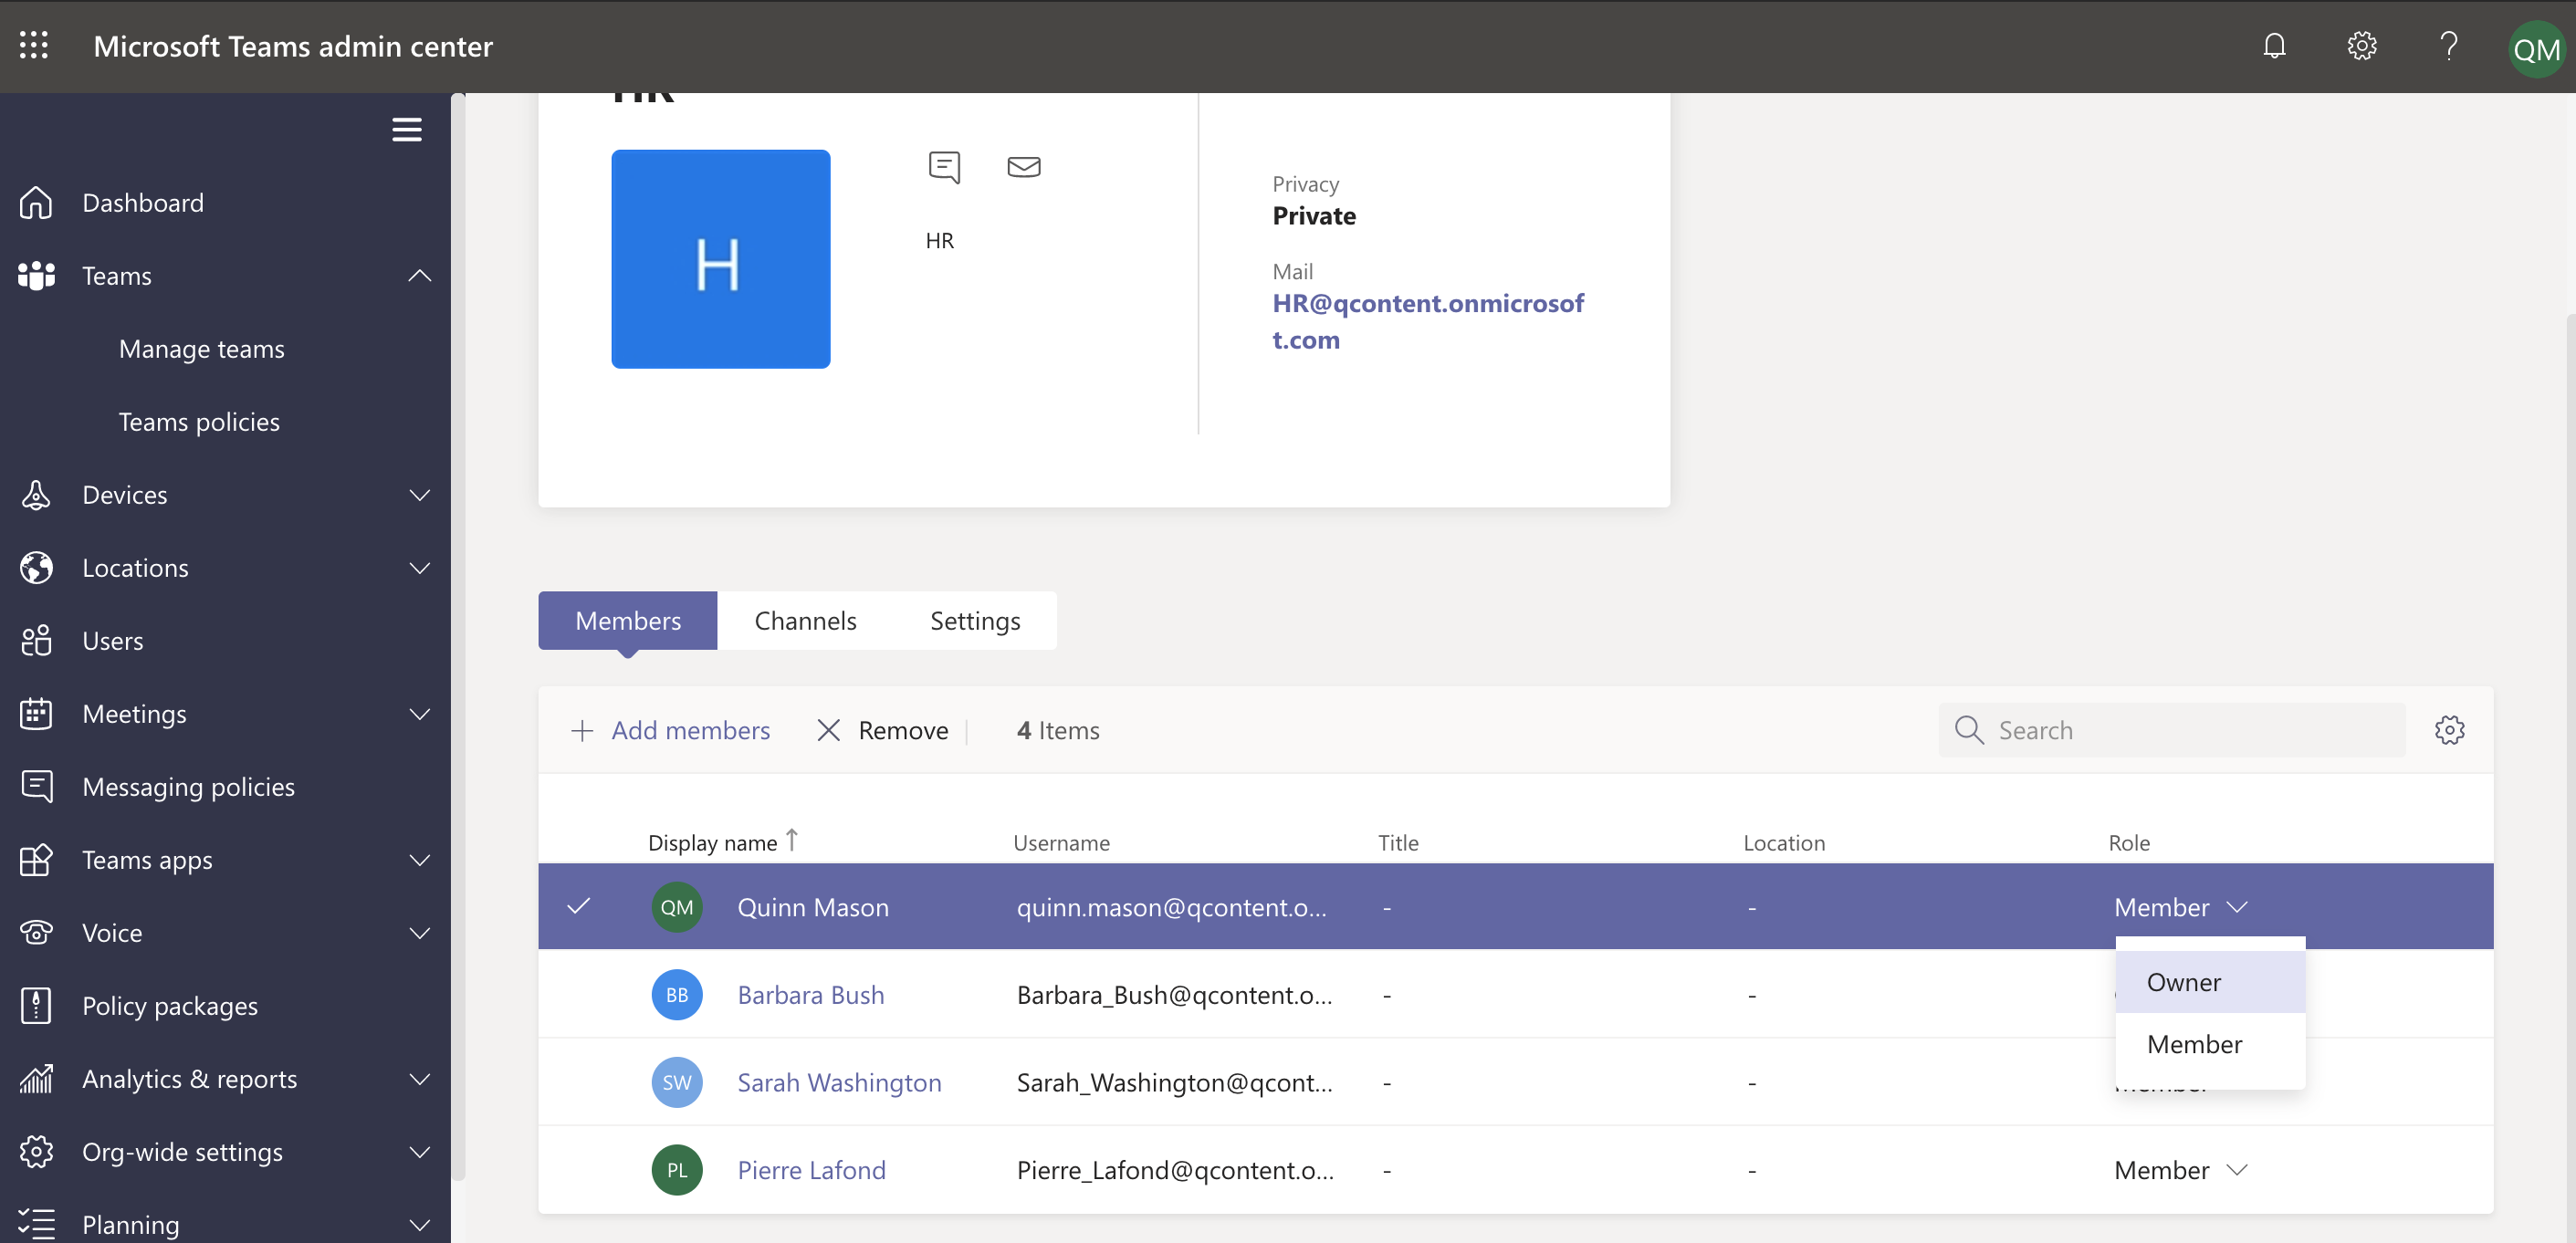
This UI is also where you can promote a current team member to a team owner. Simply click on the drop-down menu to the right of where their current role is listed and select Owner.
Finding ownerless teams
But what if an owner isn’t just leaving a team because they’ve switched projects? If a team’s only owner leaves your organization (their user account is removed), you now have an ownerless team on your hands.
Microsoft’s out-of-the-box solution for finding ownerless teams involves IT manually searching through the Microsoft Teams admin center. Ownerless teams will appear with a 0 in the Owners column, and an exclamation point next to it:
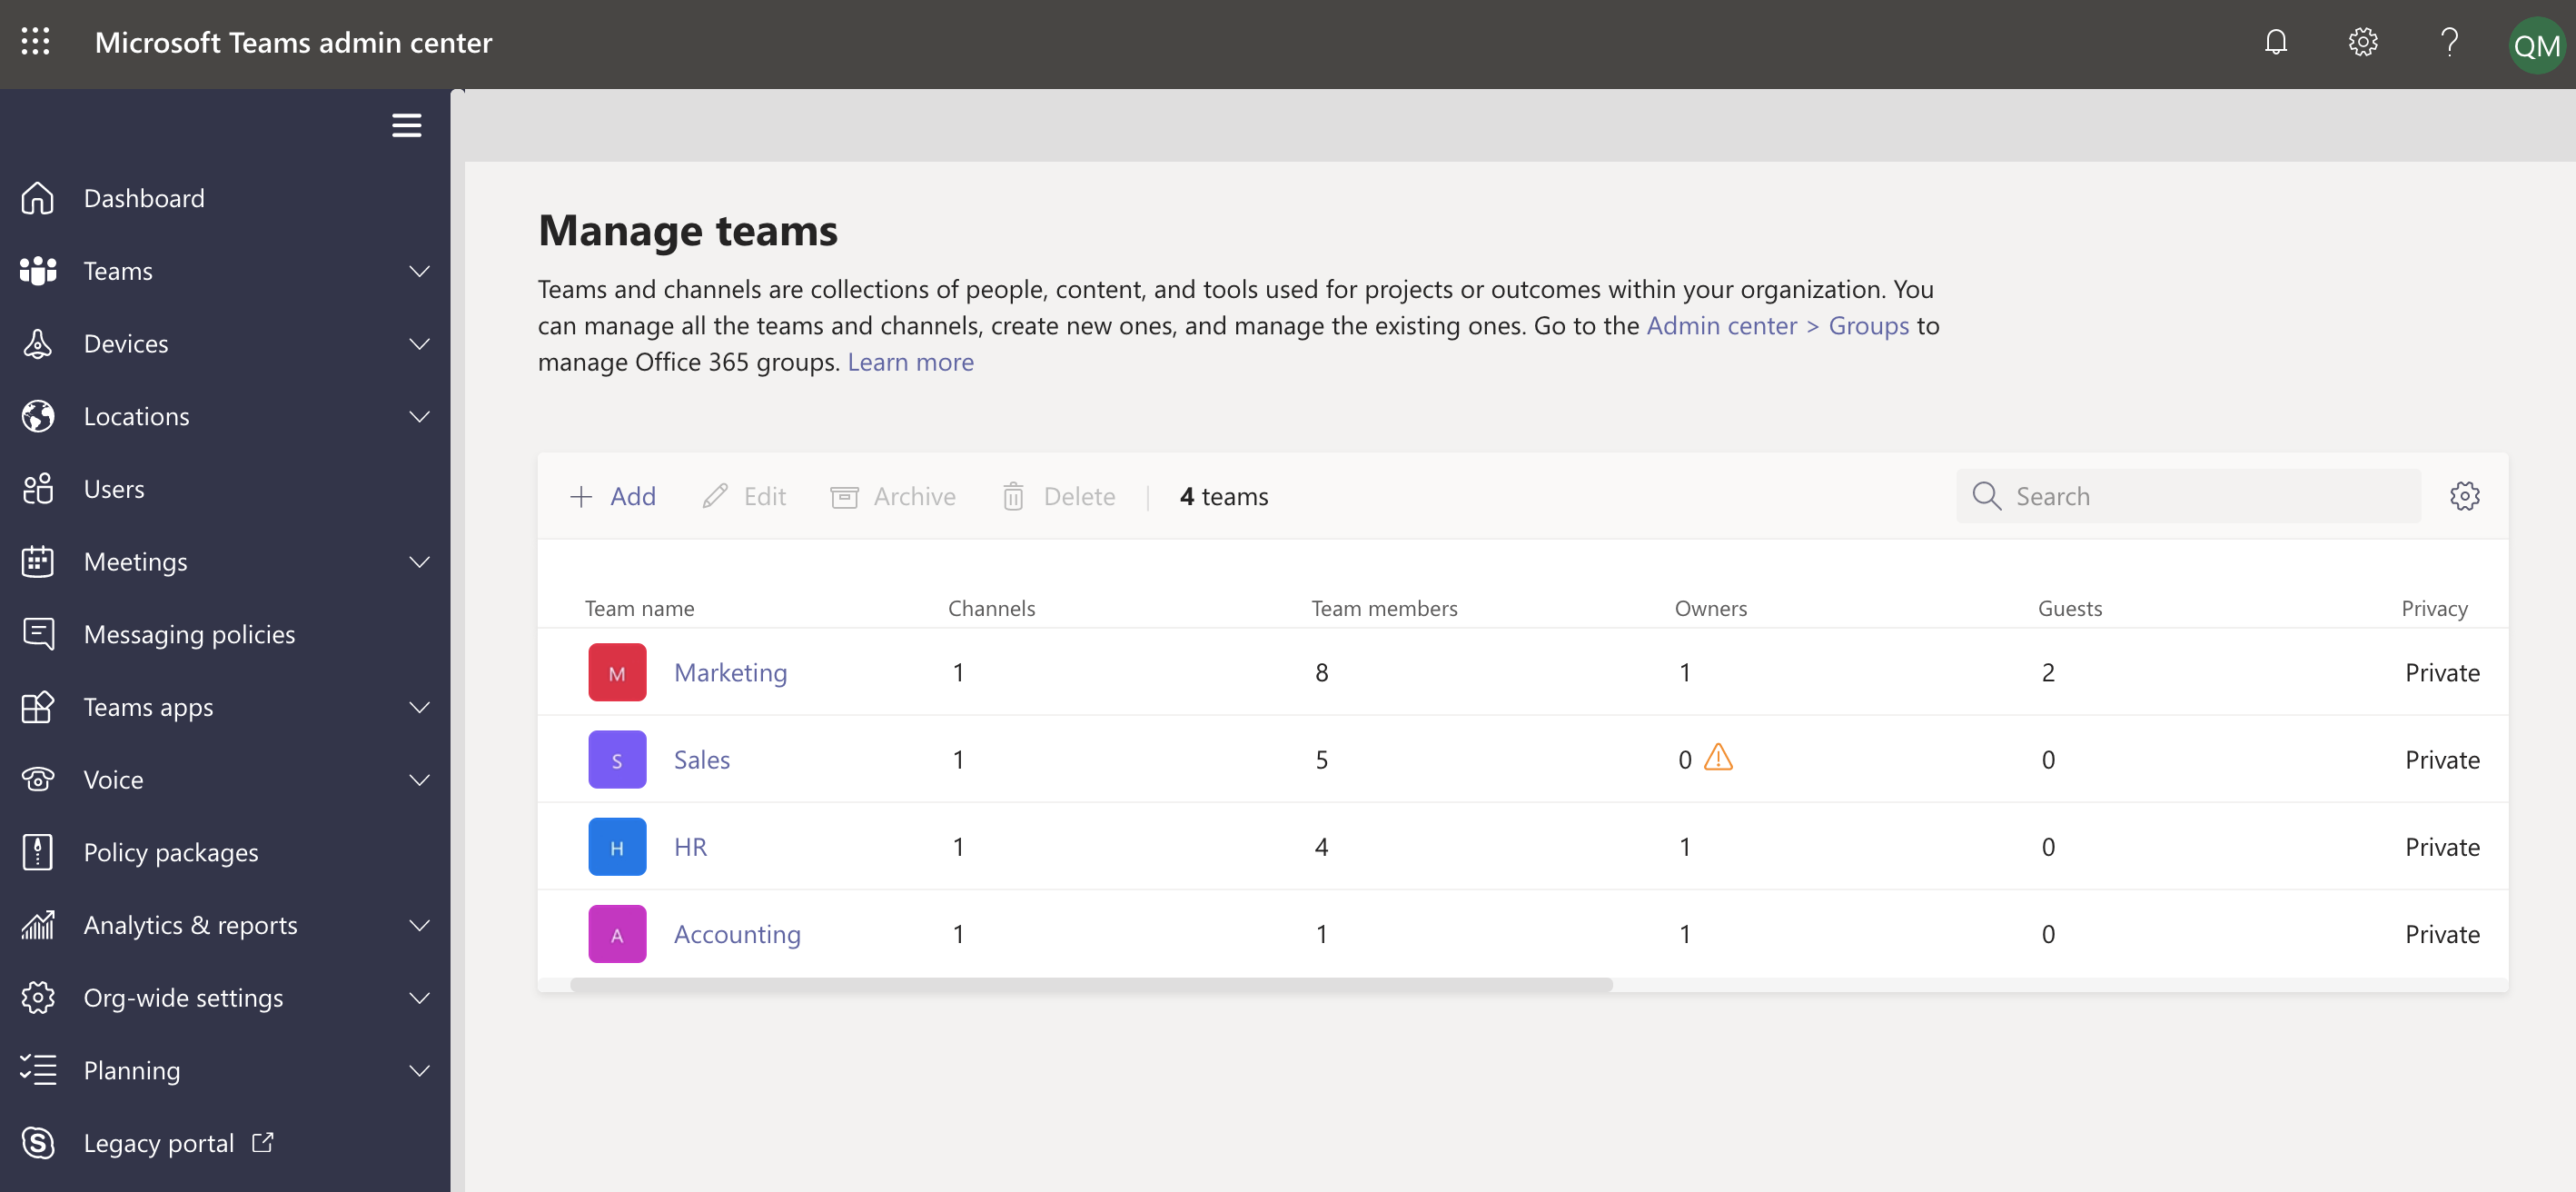
Not so bad if you only have a handful of teams. But aside from having to remember to continually check back, there’s also no way to filter or sort your list of teams within the admin center UI.
If your organization has hundreds—or even thousands—of teams, this method could quickly become a nightmare for IT.
Option #2: Use PowerShell to manage ownerless teams
If you’re not afraid of a little scripting, then using PowerShell may be your best option.
The General Availability Microsoft Teams PowerShell module supports multiple cmdlets that assist in managing the lifecycle of your teams.
As long as you are a Global Admin or Teams Service Admin, you can use the GA Teams PowerShell module to identify and manage teams on behalf of your users and make bulk updates faster—including changing memberships or configuring team settings.
This simple script shared by Microsoft MVP Tom Arbuthnot is based on the GA Teams PowerShell module and collects summary details about each team’s owner, member, and guest count.
From there, it’s easy to filter all your teams showing 0 owners—generating an instant list of all your ownerless teams.
PS C: \WINDOWS\system32> $OutputCollection | Where-Object {$_.Ownercount -eq 0} | Select-Object DisplayName

DisplayName
-----------
Team1
Team2
Team3
Team4
If you’re comfortable coding, this method is much less time-consuming than the first option. However, it still involves a bit of manual work for IT. Since users are continuously moving, you’ll need to run this report regularly—it’s not something you do once, and you’re done.
There’s also the matter of promoting a new owner once you’ve determined that a team is, in fact, ownerless.
The Add-TeamUser cmdlet allows you to add an owner or member to the team and the unified group associated with it:
Add-TeamUser
   -GroupId <String>
   -User <String>
   [-Role <String>]
   [<CommonParameters>]
It’s worth noting that using this cmdlet will only add the user as an owner to the unified group associated with the team, not as a member. You would then have to run the cmdlet a second time to add the user as a member.
If you promote a new team owner through the Microsoft Teams admin center (as shown in the section above), that user is automatically added as a member of the unified group at the same time. Either way, there’s still a fair bit of manual work on the part of IT.
To reduce manual work, these PowerShell script examples are aimed towards automating many admin tasks like copying chats from one Microsoft 365 tenant to another.
Option #3: Automatically detect and manage ownerless teams as they occur
Both options above involve quite a bit of manual work and put all the responsibility on IT—making it hard to scale quickly.
To identify and manage ownerless teams on an ongoing basis, you might instead consider automating the process with a third-party tool.
ShareGate does the work of the PowerShell script mentioned above, and more—without the need for coding.
You can view a list of your Microsoft 365 Groups (and by extension, your teams), along with summary details about each team’s membership, Microsoft 365 apps used, and whether or not it has a valid owner.
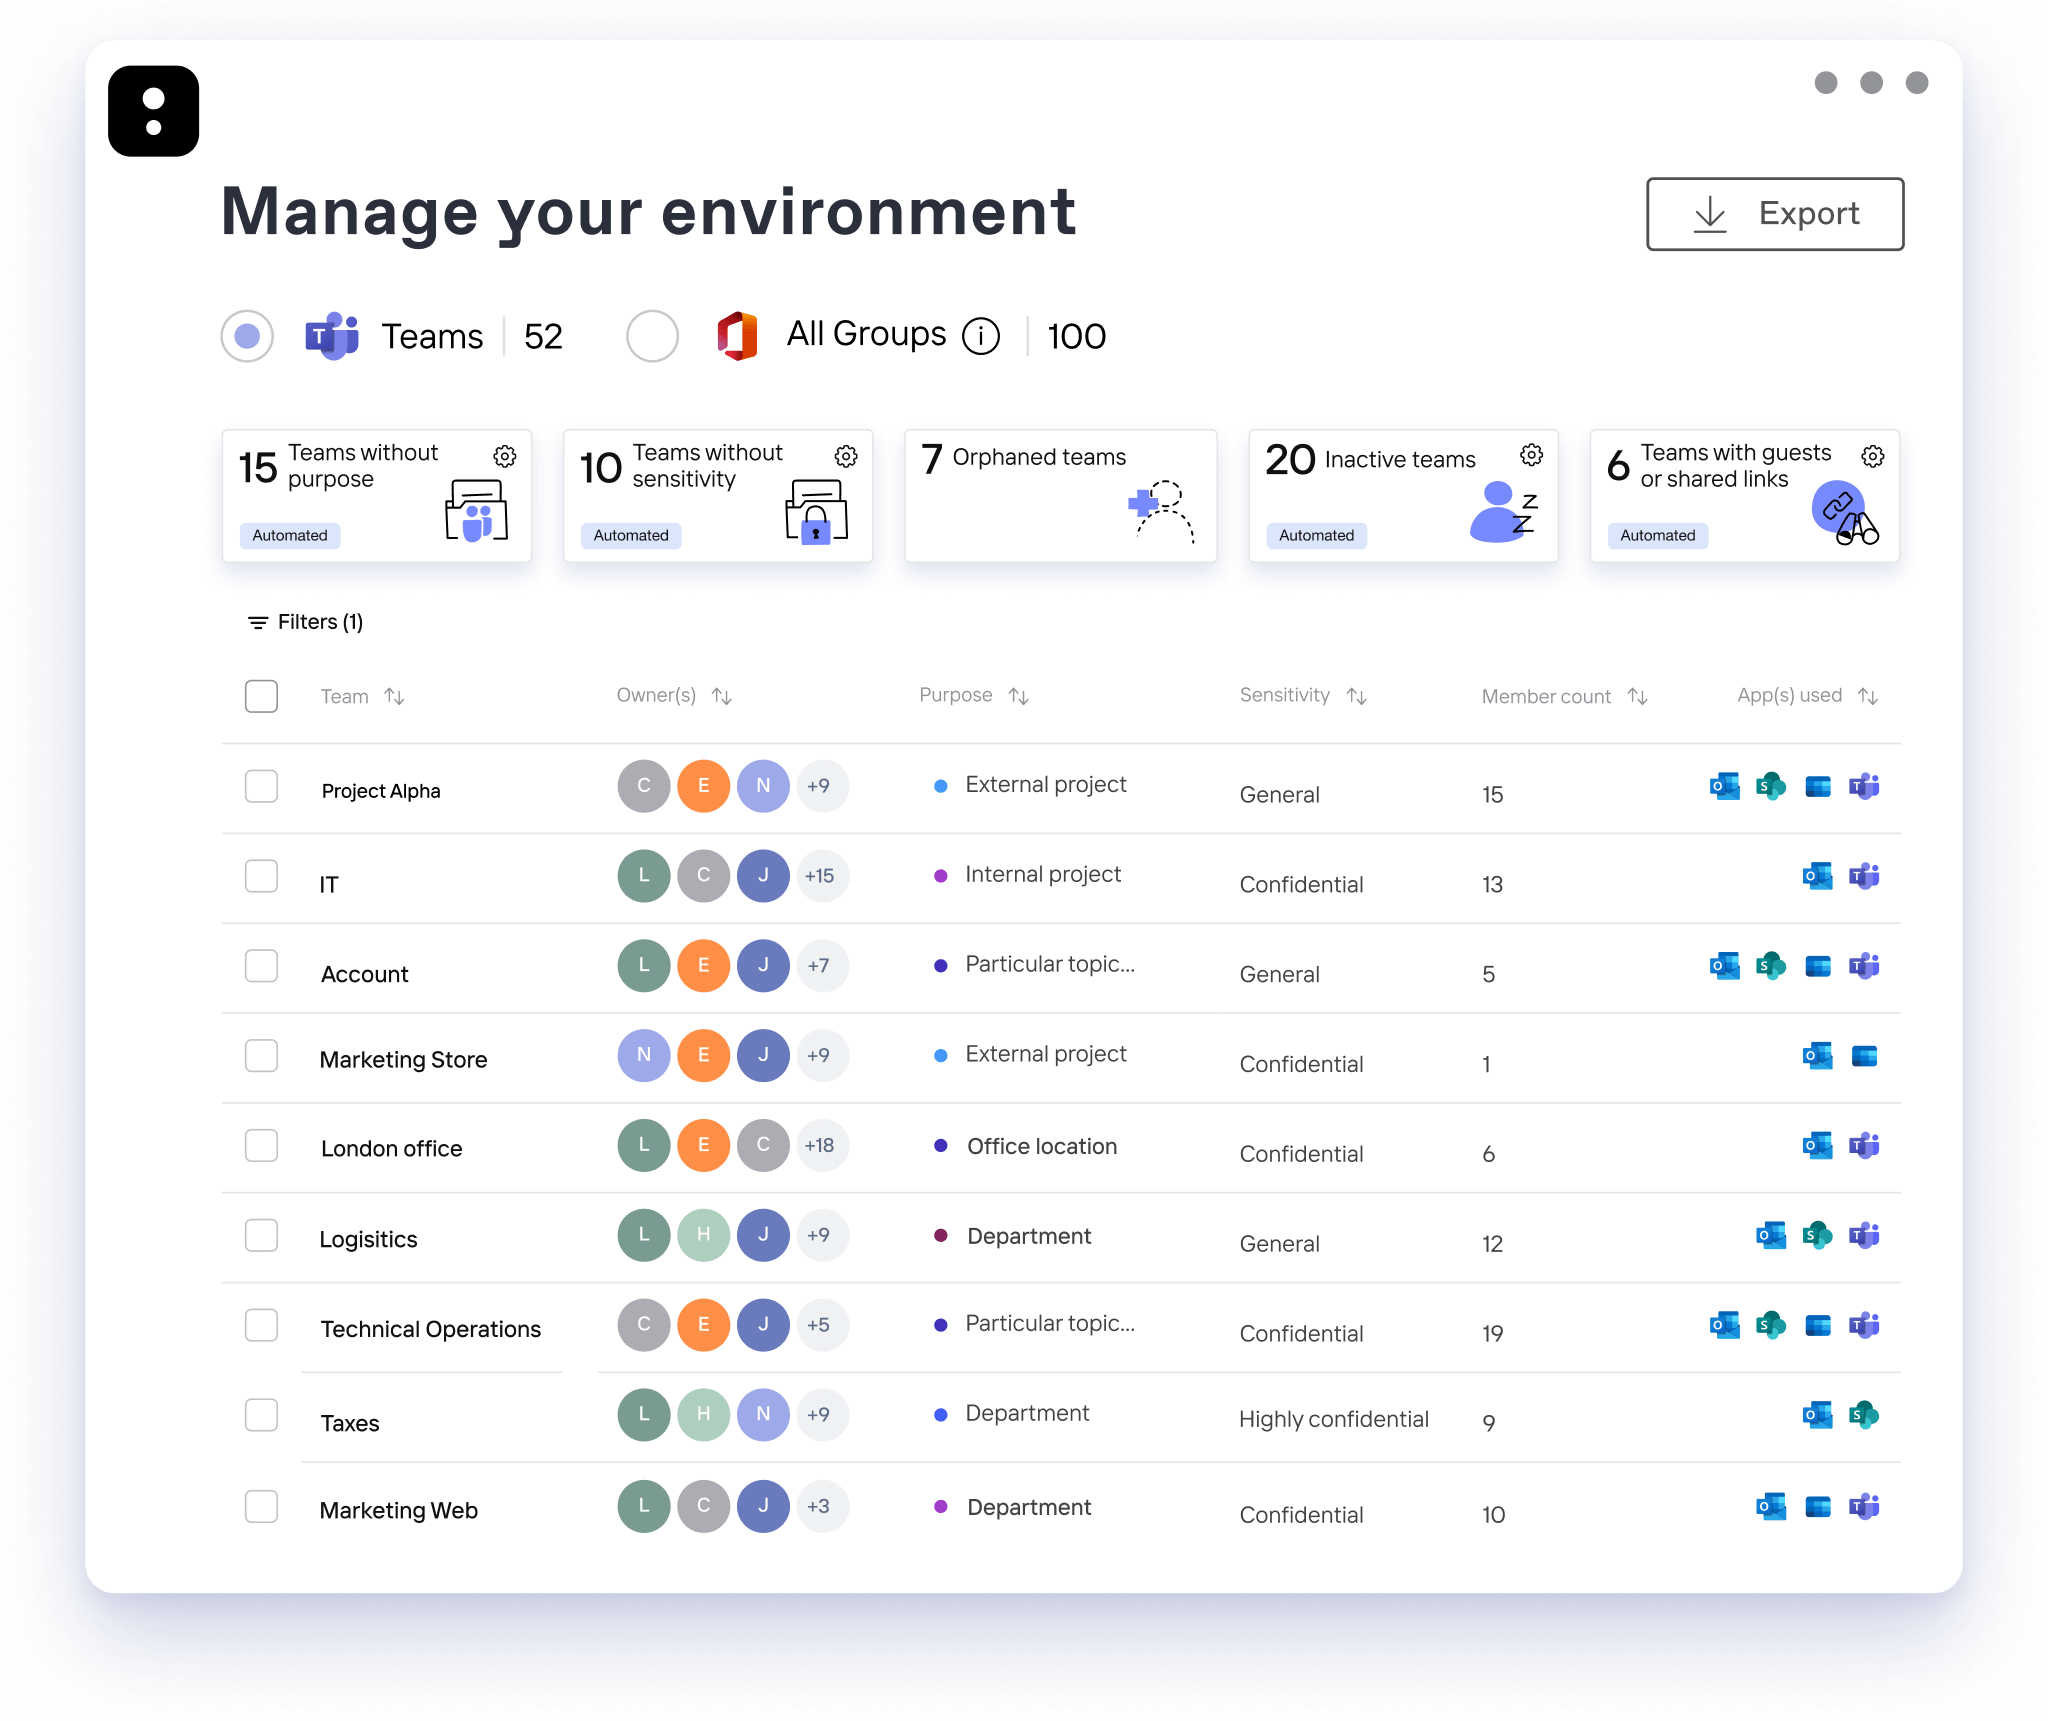
Then promote a new owner right away, with just a few clicks.
See who the last owner was so you can get a bit of context, and better understand how the team ended up ownerless in the first place.
By automating the process of identifying ownerless teams—and simplifying the process of promoting a new owner—you ensure there’s always someone accountable for every team in your tenant. Not to mention it frees up IT to tackle other things!
Automate your processes: How to clean up, organize, and govern Microsoft Teams with ShareGate