Make your journey from SharePoint to Teams a breeze. Microsoft MVP Andy Huneycutt (@AndyHuneycutt) covers best practices and how to connect an existing SharePoint site to a team in Microsoft Teams.
Microsoft Teams brings content, collaboration, and communication into a single application—it’s a one-stop shop for users to manage their workload in Microsoft 365.
And getting started with Teams couldn’t be easier. Within minutes, you can create a new team, start building channels, and invite users to collaborate. Everything you need is right within the Teams application.
👉Boost adoption: Get essential tips from our free online course—and ensure your organization uses Microsoft 365 tools securely.
So, how can your organization take advantage of everything great about Teams while maintaining the structure you’ve already invested in?
In this article, I’ll answer these questions and share my best practices for integrating Microsoft Teams with SharePoint—so you can leverage everything that Teams has to offer and make your journey from SharePoint to Teams as pain-free as possible.
Table of contents
Best practices to make your journey from SharePoint to Teams as pain-free as possible
Converting existing SharePoint sites to Microsoft Teams-connected sites involves several steps. You need to:
- Flatten your existing hierarchies (promote subsites to top-level site collections)
- Connect current SharePoint sites to Microsoft 365 Groups (“groupify”)
- Connect a SharePoint site to a team in Microsoft Teams (“teamify”)
- Use hub sites to tie everything together (“hubify”)
The journey to connect an existing SharePoint site to Microsoft Teams tends to be a one-way journey—mostly because once a site is flattened, groupified, teamified, and hubified, the process is not easily undone.
For this reason, I suggest following a few best practices to make your journey from SharePoint to Teams as pain-free as possible.
Learn SharePoint Online: best practices, tips, tricks.
Take time to evaluate the way your users work
Microsoft Teams has changed the way users work. By consolidating content, collaboration, and communication into a single application, content is surfaced more efficiently for the user.
This means less time searching for information, less time switching between applications, and improved productivity. With the majority of companies adopting distributed work processes, the desire for self-service automation has skyrocketed.
But, not every site needs to be converted to a Teams-connected site.
Sites that represent major departments, divisions, or business units—like HR, for instance—are more often used as publishing portals for news, announcements, and other company information.
Those types of sites can be converted into communication sites instead, which aren’t connected to Microsoft 365 Groups or Teams. On the other hand, these sites are great candidates to become the center of your hub site structures.
Not every site needs to be connected to Teams. Sites that represent major departments can be converted into communication sites, and are great candidates to become hub sites.
Andy Huneycutt (@AndyHuneycutt) Tweet this
Teams-connected sites are better suited for sites that require lots of collaboration between the site members, such as sites representing projects, teams, or groups.
Understanding how existing sites are being used within your organization will help you make an informed decision about which SharePoint sites will likely benefit from being teamified—so you can leave alone the ones that won’t.
Try it before you buy it
Because Microsoft Teams represents a new way of working, it’s important to make sure Teams is a good fit before you commit.
See if Teams will benefit your users by helping them manage their workloads and meet the expectations required of them in their role. Unfortunately, Microsoft Teams isn’t for everyone—and that’s okay!
Consider using a “try it before you buy it” approach to migrating to Teams. In this approach, the previous SharePoint sites are kept intact while users test-drive Microsoft Teams.
Here’s how it works:
- Create a new team in Microsoft Teams. This automatically creates a new SharePoint site associated with the team.
- Make existing content accessible in Teams. Copy some content to the new associated SharePoint site for the duration of the trial period. Additional content can be made accessible through channels and tabs as necessary—with tabs allowing access to other document libraries, lists, pages, and news from the older SharePoint site.
- Offer coaching, training, and assistance as needed. “Help” for Microsoft Teams is built right into the app (just look for the Help icon in the lower-left corner). I also recommend offering office hours during the trial period, where users can schedule short blocks of time to address specific questions.
- Gather feedback from users. Once the trial period has ended, work with users to gather feedback on their Microsoft Teams experience. What did they like? What worked well? What didn’t work? What would they change and why? Based on this feedback, you can make an informed decision about whether or not your users are ready to make the switch to Teams.
Now the journey really begins!
If everything went smoothly, you can either migrate the content from the existing SharePoint site to the new Teams-connected site and call it a day. Or, you can connect the existing SharePoint site to a new team in Microsoft Teams.
I’m going to focus on the second method for the remainder of this article.
How to connect an existing SharePoint site to a team in Microsoft Teams
As mentioned before, there are several steps involved in converting an existing SharePoint site to a Teams-connected site.
Depending on the current status of the site you want to convert (i.e. if it’s already a top-level site or connected to a Microsoft 365 group), you can skip ahead to the relevant next step.
Flatten your existing hierarchies
Microsoft recommends a flat hierarchy in SharePoint Online. This means adopting a flat topology with fewer subsites where it’s easier to restructure as your organization continues to evolve.
- Flat architecture: A system in the modern SharePoint experience in which every site is a site collection, and all can be associated to a hub site.
- Nested architecture: A hierarchical system of site collections and sub-sites with inherited navigation, permissions, and site designs typically used in classic SharePoint.
When adopting a flat topology, there are a few methods, but I’ll concentrate on the following two options in this article:
- Move SharePoint files and folders to a new site collection (self-service solution for users)
- Use a third-party tool to restructure your existing environment (often requires IT help)
For a detailed breakdown of each option, check out ShareGate’s article on how to move SharePoint subsites to the top level in SharePoint Online.
Option 1: Move SharePoint files and folders to a new site collection
Create a new site, manually select the items you want to migrate to the Microsoft Teams-connected site, and move them using the Copy to/Move to options in SharePoint Online.
Pros: Self-service. Users can migrate content as needed and at their own pace. Little to no IT assistance required.
Cons: Self-service means users have to manually move or copy content. Any content migrated using this method will need to have permissions set on the new Microsoft Teams-connected site. This option also has limitations with metadata.
A few things to note about this method:
- When you use Move to, the history of the document is copied to the new destination. When you use Copy to with documents that have version history, only the latest version is copied. To copy earlier versions, you need to restore and copy each one.
- When a file is moving, it will still appear in the source directory until its fully moved to the destination and then it will be deleted. The file will remain in the source site’s recycle bin after the move is complete and will be subject to the normal recycle schedule unless a user recovers it from the recycle bin.
- Moving files between libraries or sites preserves metadata by matching column names. If the destination does not have a matching column, metadata in the source column will be lost.
- It’s not recommended to move OneNote notebooks outside of the OneNote app.
- The Move to operation will fail if you attempt to move the document across libraries and the destination has enforced unique values.
Option 2: Use a third-party tool to restructure your existing environment
A third-party tool like ShareGate can promote your subsites to top-level sites (and automatically attach them to new Microsoft 365 groups!) in just a few clicks.
Pros: Controlled migration, can be run in batches for quick migration, permissions kept intact, metadata kept intact.
Cons: IT assistance usually required, site collection admin or higher permissions required.
ShareGate’s support documentation has more details about required permission levels and recommended best practices.
Connect to a Microsoft 365 group: “Groupify”
Microsoft 365 Groups (previously known as Office 365 Groups) is a cross-application membership service in Microsoft 365. Microsoft 365 Groups extends SharePoint team sites to include additional Microsoft 365 applications for collaboration using simplified permissions.
The additional Microsoft 365 applications include:
- A shared mailbox in Outlook
- A shared calendar in Outlook
- Planner for task management
- A shared OneNote notebook
Additionally, Microsoft 365 Groups can include:
- Microsoft Forms for surveys and quizzes
- Stream for video content
- Power BI workspaces for business intelligence
- Yammer for org-wide communities
- And a team in Microsoft Teams!
A Microsoft 365 group’s permissions are nested in the classic SharePoint group permissions, simplifying permissions management. Users that need the additional collaboration tools are granted access through the Microsoft 365 group permissions, while other users that only need access to the SharePoint site are granted access through classic permissions.
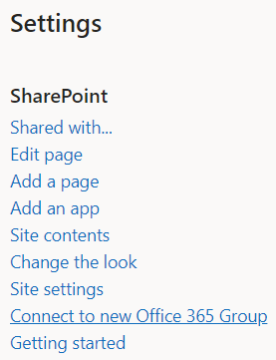
To connect a Microsoft 365 group to your SharePoint site, use the option available in the user interface. Select the gear icon in the navigation bar, then select the Connect to new Microsoft 365 group option, which launches a wizard that walks you through the group-connection process.
Connect to a team in Microsoft Teams: “Teamify”
Behind every team created in Microsoft Teams, there’s a SharePoint site powered by a Microsoft 365 group. This SharePoint site is based on the modern experience in SharePoint Online, and the document library contains folders that are connected to the channels in the corresponding team.
When connecting an existing SharePoint site to Microsoft Teams you have two options:
- Create a team from an existing SharePoint site
- Create a team from an existing SharePoint site using the Microsoft Teams app
Option 1: Create a Microsoft Teams team from an existing SharePoint site
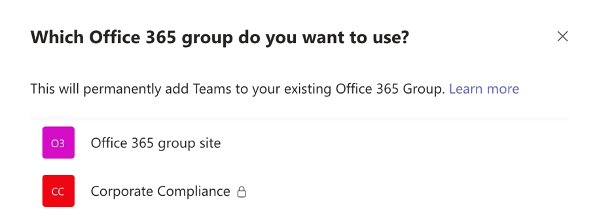
When you connect a SharePoint site to a Microsoft 365 group, you will have the option to create a team in Microsoft Teams for the group.
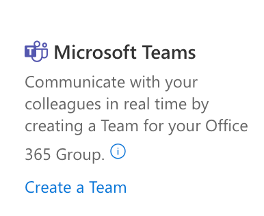
1. Navigate to the home page of the existing SharePoint Online team site.
2. Click on Create a team from the Microsoft Teams prompt in the bottom left corner of the screen.
Option 2: Create a Microsoft Teams team from an existing SharePoint site using the Teams app
You can also connect a SharePoint site to Microsoft Teams with the Microsoft Teams application.
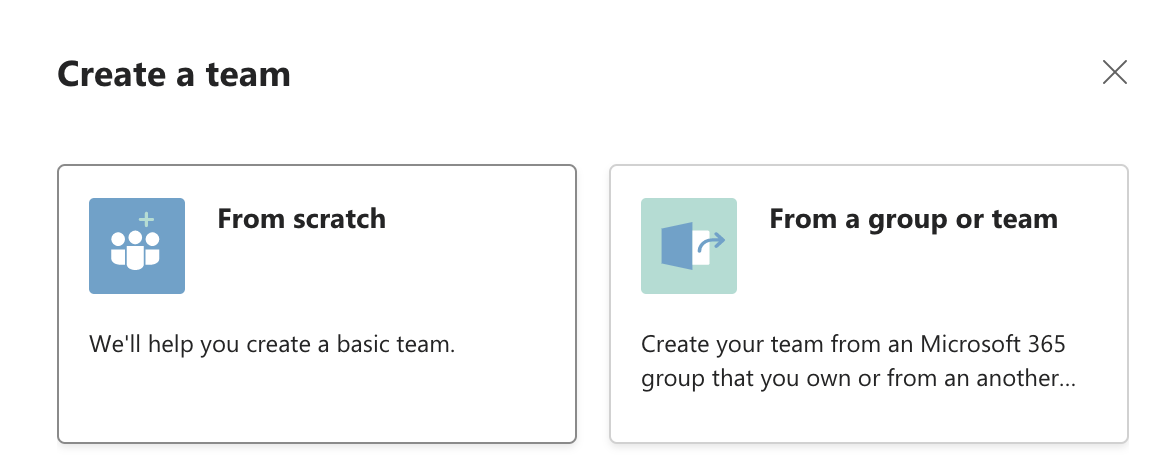
1. First, select Teams on the left side of the app and click Join or create a team at the bottom of your list of teams.

2. Then, click Create team (first card, top left corner).

3. From here, select From a group or team, and choose Microsoft 365 group.
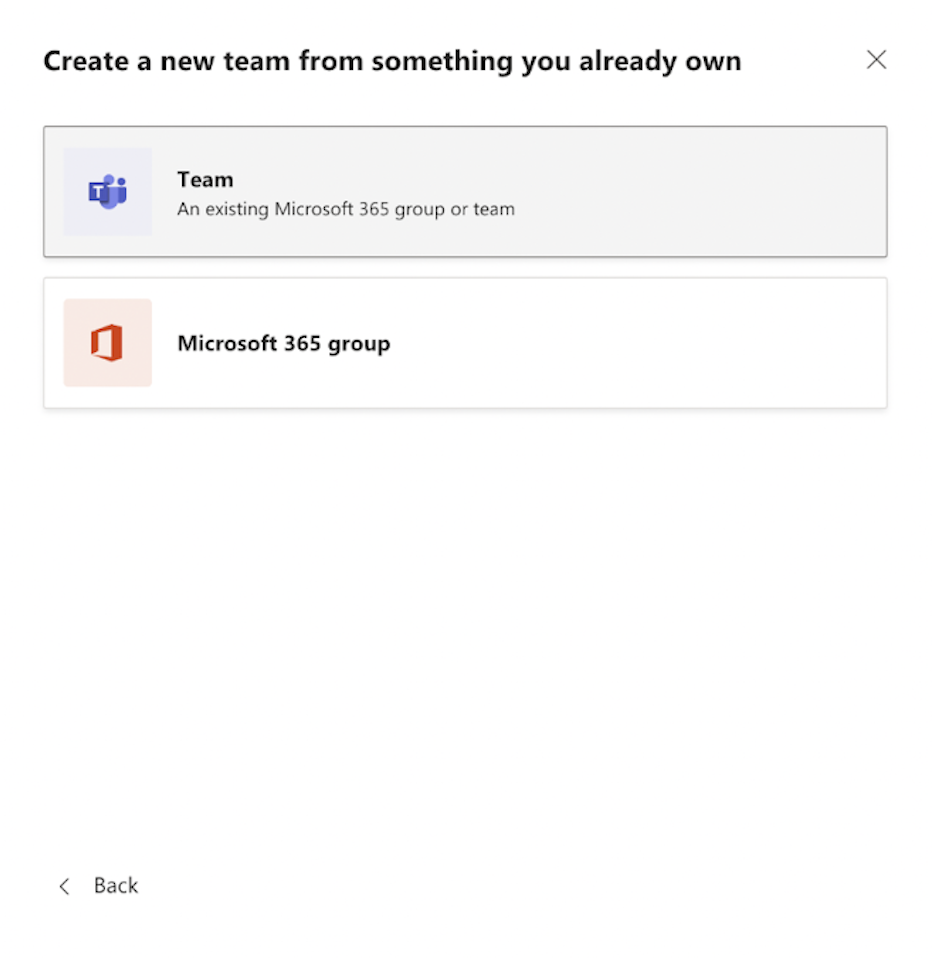
You’ll be presented with a list of groups you currently own that don’t already have a team associated with them and have less than 10,000 members.
4. Select your desired group, and a team with the same name will be created automatically. The team will share the same group privacy (public or private) and members as the original group.
Use hub sites to tie everything together: “Hubify”
Hub sites link together SharePoint sites based on departments, divisions, business units, teams, groups, and projects.
Hub sites bring organization and structure to your SharePoint intranet while providing flexibility as the org evolves.
Associating a site with a hub site brings shared navigation, applies themes, and makes it easier to discover related content, news, and site activity across all associated sites.
Don’t sub, hub instead.
To hubify your SharePoint sites and tie everything together, you’ll need an IT admin to register your department, divisions, and business unit sites as hubs. Communication sites are good candidates for center hubs here.
Create a hub site in the new SharePoint admin center
- Go to the Active sites page of the new SharePoint admin center and sign in with an account that has admin permissions for your organization.
- Select the site, select Hub, then select Register as hub site.
- Enter a display name for the hub site and specify the individual users or security groups you want to allow to associate sites with the hub.
Now your IT admins can associate SharePoint sites—including Microsoft 365 group-connected sites, Teams-connected sites, and other communication sites—with the main hubs. IT admins can also configure this for self-service hub association, or implement a hub approval process using Power Automate.
Associate a SharePoint site with a hub site
If you are the site owner, you can associate your existing site with a SharePoint hub site.
- On your site, select Settings, and then select Site information.
- In the Edit site information panel (under Hub site association) select the hub site with which you want to associate your site, then select Save. You can only choose one hub site with which to associate your site.
- If the hub requires approval, the site will be associated once the request is approved. Rejecting the association request will not associate the site with the hub site.
- If the hub has chosen to enable hub permissions, you will see a checkbox. Checking the box will add visitors managed by your hub to your site. You can choose to disable or re-enable at any time through Site permissions.
- Once associated, the look of your site will change to match that of the hub site and the hub site navigation bar will appear at the top.
Key takeaways
- Microsoft Teams brings content, collaboration, and communication into a single application and changes the way that users work. While one-stop-shop applications usually lead to more efficiency and increased productivity–remember: Microsoft Teams isn’t for everyone, and that’s okay!
- Take time to evaluate the way your users work. Have your users try it before you buy it with a Teams trial. And take the time to gather feedback on their Microsoft Teams experience. What worked well? What didn’t work?
- When your users are ready to move forward, you have multiple options—each with pros and cons you should consider. You can migrate the content from the existing SharePoint site to the trial team in Microsoft Teams, or you can connect the existing SharePoint site to a new team.
- If you decide to convert your existing sites, remember that it’s not easily undone. Keeping the existing site intact and migrating/moving content to the Microsoft Teams-connected site provides an option to revert in the event users decide Teams isn’t working for them.
- If you decide to connect an existing site to Teams, you’ll need to:
- Flatten your existing hierarchies (promote subsites to top-level site collections)
- Connect current SharePoint sites to Microsoft 365 Groups (“groupify”)
- Connect to a team (“teamify”)
- Use hub sites to tie everything together (“hubify”)
No matter which path you choose, be sure to offer coaching, training, and help as needed—this is really the key to driving user adoption.
Wow, what a journey!
Related Microsoft 365 documentation
How to move or copy files in SharePoint
Creating a team from an existing Microsoft 365 group
Planning your SharePoint hub sites
How to create a hub site in SharePoint
Associate a SharePoint site with a hub site