Microsoft Teams channels: Everything you need to know

Table of contents
With the help of Microsoft MVP Jasper Oosterveld, we break down teams vs. channels, plus the best practices for using your Microsoft Teams channels effectively.
In our guide to Microsoft Teams, we join forces with Microsoft MVPs to bring you up to speed on all things Teams.
Your Microsoft Teams teams bring people together, but Teams channels are where the collaborative magic happens and the real work begins. Teams channels are the go-to centralized hubs for employees to get things done and maintain focus and organization around a specific project, topic, or milestone. And with the recent rise of the distributed workplace, finding effective ways to work together from a distance has never been more critical.
In the past, we’ve talked about the structure of Teams. In this article, we’ll delve into the significance of channels in Teams and suggest best practices for optimizing this collaborative platform.
Table of contents
- What is a Microsoft Teams channel?
- What types of channels are there?
- How to use channels in Microsoft Teams (including best practices)
- Understanding Microsoft Teams channel roles
- Moving forward with channels (and confidence)

15 days of full access to ShareGate—Try now!
Explore all our powerful features—no credit card required—and see how we can help your projects.
What is a Microsoft Teams channel?
They’re a digital space that allows members to work together and communicate about specific topics related to the channel’s name or description. By design, they’re perfect for focused group discussions, sharing files, and team meetings.
For example, a business project team might use separate channels for marketing, development, finance, and other relevant topics.
Now, it’s worth mentioning that every team starts with a General channel. Use this channel as the name implies: to discuss general topics related to the team’s purpose—simple!
But, for every other topic, i.e., projects: create a new channel. It’s an efficient way to bundle all related content into one location.
Currently, there’s a limit to how many team channels you can have: 200 standard channels and 200 shared channels, including deleted channels during their 30-day recovery window. You can permanently delete a channel if it’s rarely being used from within the Microsoft Teams admin center—the chats will be deleted; however, all the files and documents shared within the channel will remain stored within the modern SharePoint team site.
EXTRA: Learn more about archiving and deleting Microsoft Teams channels.
When you’re just starting with Microsoft Teams, many teams won’t be listed. But be warned—once end-user adoption increases, so will the number of team names in your sidebar. The same applies to channels within a team.
How to keep your teams sidebar organized
Try selecting Show:
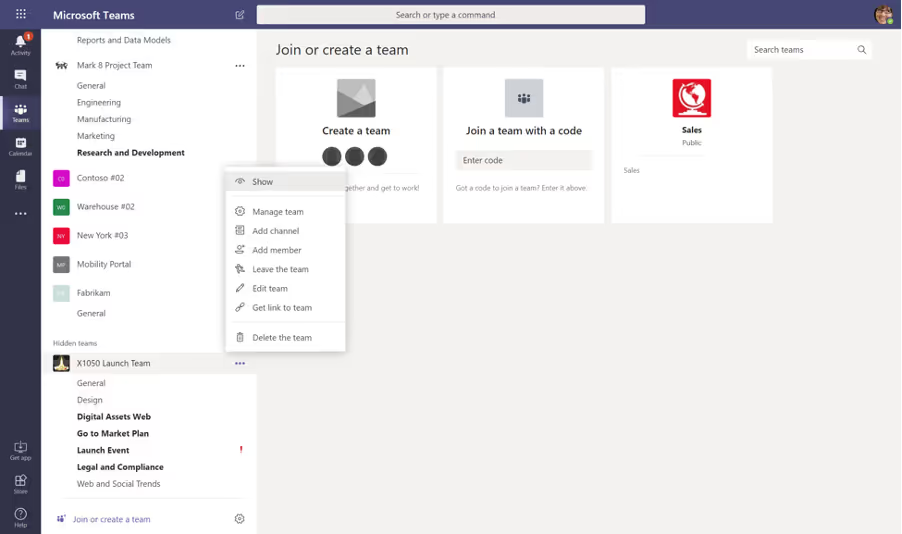
Or Hide:

All your favorite teams are listed under the Your teams section, with other teams appearing under Hidden teams. The same principle applies to channels. Your favorite channels are listed directly under the General channel.
You can see the other available channels by selecting Hidden channels:
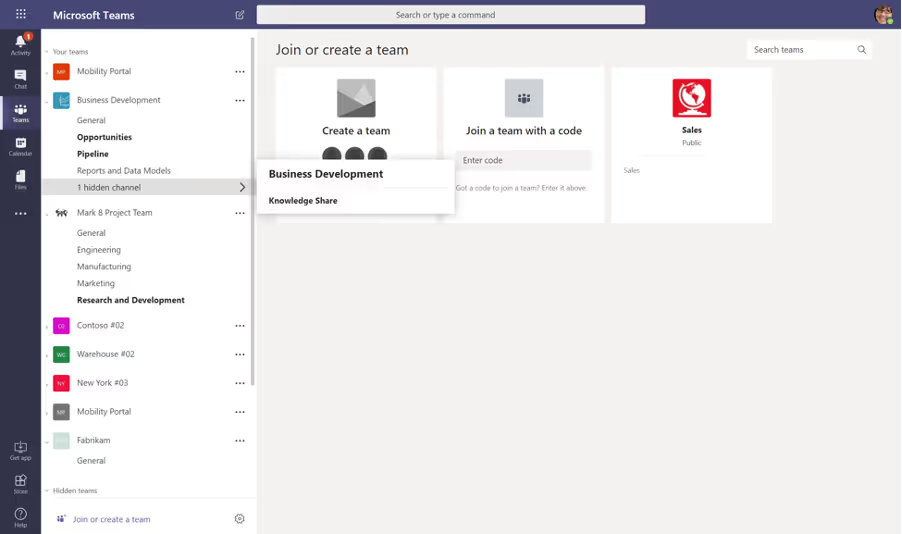
You can manually change the order of the teams by selecting a team, holding the left mouse button, and moving the team up or down.
LEVEL UP: Learn how to increase end-user adoption in Microsoft 365 with our free online course.
What types of channels are there?
There are three types of Teams channels, each with different team settings. Let’s look at them:
Standard channels
They’re open to all team members; anyone can search for whatever you post there. By default, all members of a team can create standard channels. However, team owners can change this permission and limit channel creation and permissions to specific roles.
When to use a standard channel
If your team is working on a project that requires shared resources, discussions, and information, a standard channel is the go-to solution. It promotes a collaborative work environment where every single team member can easily view and contribute to the project—a great way to keep the whole team up-to-date and engaged!
Private channels
One helpful way to work with a team is to create focused spaces—private channels—where members can collaborate more efficiently. This means narrowing down communication and content sharing to specific groups, which helps everyone work together more effectively towards common goals. It’s a great way to stay organized and get things done!
Only users who are members or owners of the private channel can access it, although anyone—including those with Microsoft Teams guest access—can be added as long as they’re already a team member.
When to use a private channel
Private channels are helpful when a group within a team wants to collaborate without having to create a separate team. For example, suppose these individuals must discuss sensitive or confidential matters like finances, HR issues, or strategy planning—a private channel helps them achieve privacy.
This way, only the members added to the specific channel can view and join the discussion—ensuring that the conversation remains under lock and key.
Shared channels
They’re for collaborating with people inside and outside your team or even your organization. Shared channels are great if you want to collaborate with individuals from different teams—like engineering, sales, or support—who work on different aspects of the same project.
Only a team owner can create shared channels; only shared channel owners can add members or share the channel with a team. Also, access to shared channels is limited to owners or members, so you must be invited to join one.
When to use a shared channel
Collaborating on a project or topic is much easier when people from different teams or organizations use shared channels—assuming a risk assessment for sensitive information has been conducted.
For instance, a shared channel can be used for a product launch, where members from Marketing, Sales, Customer Support, and external partners must work together. With shared channels, these participants can collaborate effectively and securely while maintaining full access to their respective teams’ content.
TIP: After you create a Teams channel, you can’t change its default channel type. You can’t convert a standard channel to a private channel, for example, or a shared channel into a standard one, and so on. For more details on Teams channel types, check out the official Microsoft documentation.
How to use Microsoft Teams channels (including best practices)
And it doesn’t stop there! Microsoft Teams channels offer even more valuable features that greatly enhance your collaboration experience. Let’s explore them:
You can create convenient links in your SharePoint team site (don’t worry, more on that in just a sec!) to specific teams or channels, making it effortless for everyone to find their way back to the source of information!
How about responding to emails within a channel, keeping all essential discussions and updates in one central place—it’s a game-changer for efficient communication!
But that’s not all! Team owners and members can effortlessly stay up-to-date with the latest conversations and updates in their favorite Microsoft Teams channels by following a channel. No more missing out on important information.
And suppose you want to fine-tune your notifications. In that case, you can manage channel notifications according to your preferences—customize them to ensure you receive alerts for what matters most to you.
And here’s a nifty trick: Need to get someone’s attention? Just @mention the team or channel you want to reach, and your message will land right in their notification center. It works wonders for capturing someone’s focus, whether in a general channel or a specific team.
Sounds good, huh? Let’s explore how to take advantage of these fantastic features and maximize your Microsoft Teams channels!
Create links to a team or channel
Each team has a dedicated modern SharePoint team site to store all of its related documents and OneNote files.
The navigation between your SharePoint team site and Microsoft Teams isn’t great, so that’s where the Add a link feature comes in.
Copy the team link, and create a new shortcut in your SharePoint team site quick launch:
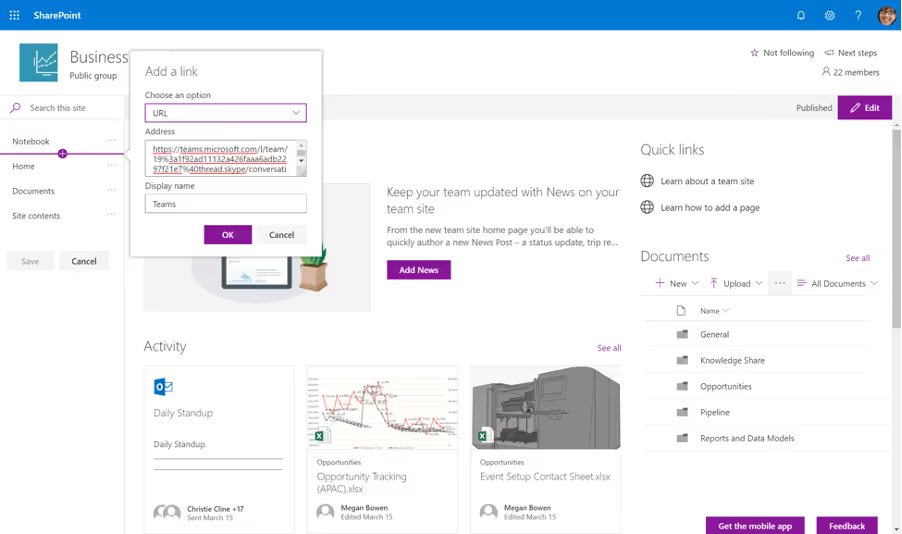
Works like a charm!
That being said, in most cases—especially after a team has been in use for a while—the Teams link should already show up in the Choose an option menu:

We also use this link within emails or group chats to point colleagues to a certain team.
Respond to emails in a channel
Ideally, team members save content directly through the Microsoft Teams application or the SharePoint team site.
Unfortunately, we don’t live in a perfect world where everyone works the same way—resulting in many attachments in your email inbox.
If you want to send an email to a channel in Teams, the channel email address comes in handy.
Go to the channel name and click More options > Get email address.
You can forward an email with an attachment or reply to an email in a channel:
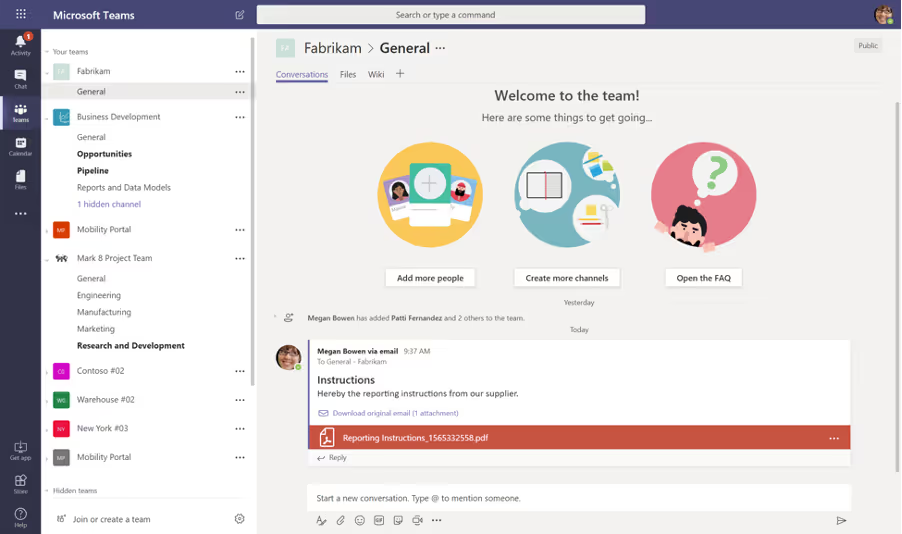
The email is displayed as a conversation, allowing your colleagues to respond—without emailing the original sender.
The attachment and email will also be stored on the SharePoint team site:

We’ll talk a little more about files later.
Follow a channel
Following one team’s updates and a handful of other channels is doable. But what about when you’re dealing with multiple teams and channels? It can become a full-time job.
By choosing the Follow option for a channel, you’ll receive updates about that specific channel’s activity—such as when a new post is published. It’s an easy way to stay up-to-date with your favorite channels.
Managing channel notification settings
Whether it’s a project-team thread about a task we’re currently working on or a gentle nudge that we’ve fallen behind schedule, channel notifications are crucial in keeping us informed and on track—but there is a flip side: too many notifications can harm employee focus and productivity. Here’re some ways to manage them:
- @Mentions: Users can personalize their notification settings to receive alerts when they are @mentioned in a channel conversation. This feature can be beneficial for keeping track of crucial conversations or assignments where their involvement is necessary—making sure they never miss a mention!
- Replies: Users can receive notifications when someone replies to their channel messages. This feature is super helpful for keeping the conversation (or memes) flowing and ensures prompt responses.
- Channel-specific notifications: With Microsoft Teams, users can customize their notification settings for each channel individually. This means that users can receive more notifications from important channels and fewer notifications from less critical ones. This feature helps users manage the total number of notifications they receive.
- Activity feed: Users can easily catch up on missed or unread notifications by reviewing their Teams activity feed for a summary of their notifications—simple!
- Do not disturb and quiet hours: Users can enhance their productivity by utilizing features such as setting a ‘do not disturb’ status or scheduling ‘quiet hours’ to prevent notifications from disrupting their work during specific timeframes.
Mention a team or channel
When using @team within a conversation, each team member receives a notification. The type of notification depends on the team’s and the individual’s settings:
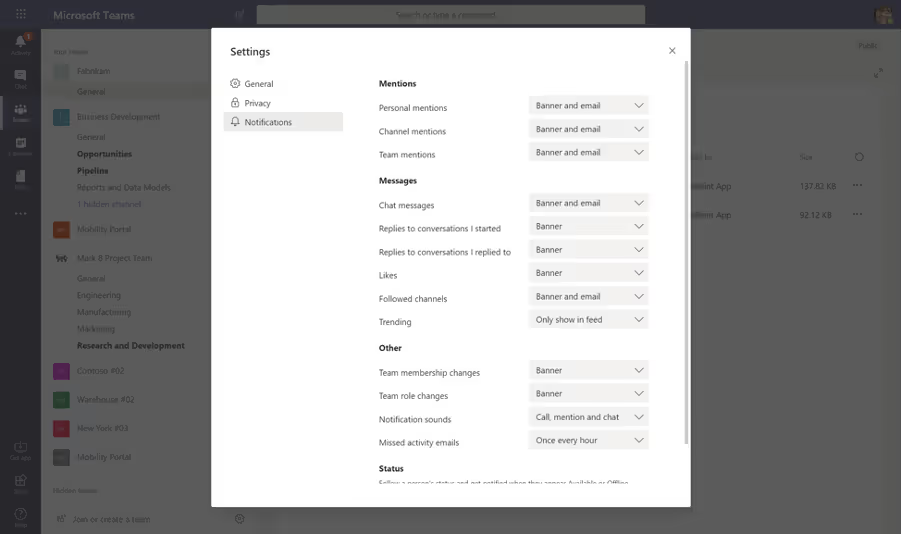
When using @channel within a conversation, each member who has favorited or follows the channel receives a notification.
Posting in a channel: Microsoft Teams conversations
Teams and channels are nothing without conversations. All conversations happen in chat and are enhanced with the following features:
- Emoticons
- Stickers and memes
- GIFs
If these aren’t your thing, don’t worry. The fun features aren’t mandatory; you can also just use plain text. If you use them, it might be a good idea to discuss how and when to implement them—either with the other project members or within your organization.
In a future post in this series, we’ll go into more detail about Microsoft Teams-related governance.
One of the greatest features of Microsoft Teams is the ability to add a document to a tab:
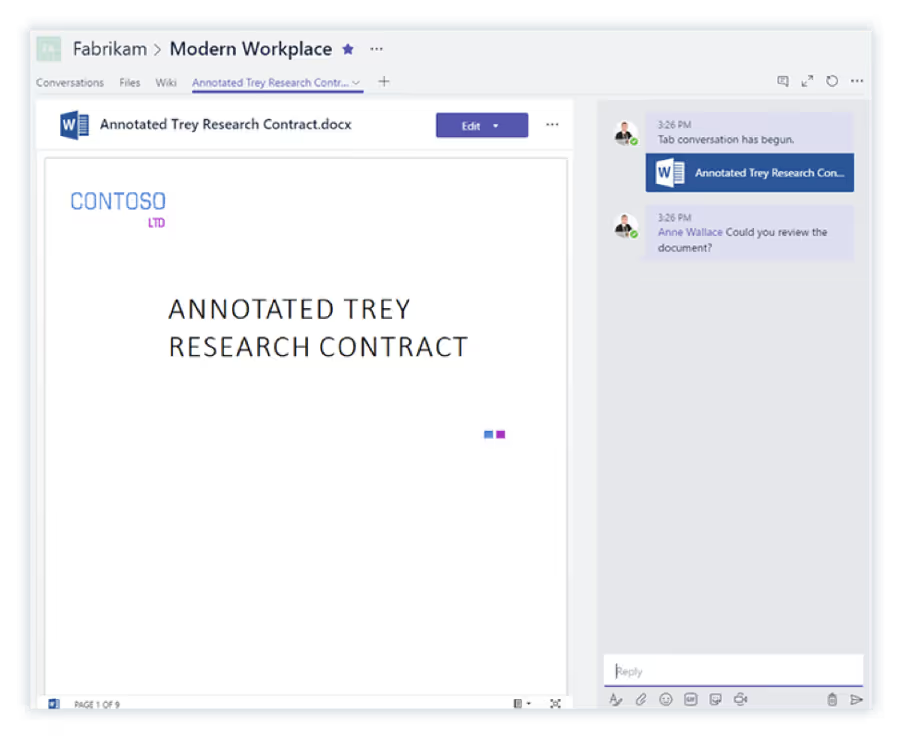
The tab is extended with a conversation window. All members of the team can now see the new tab:
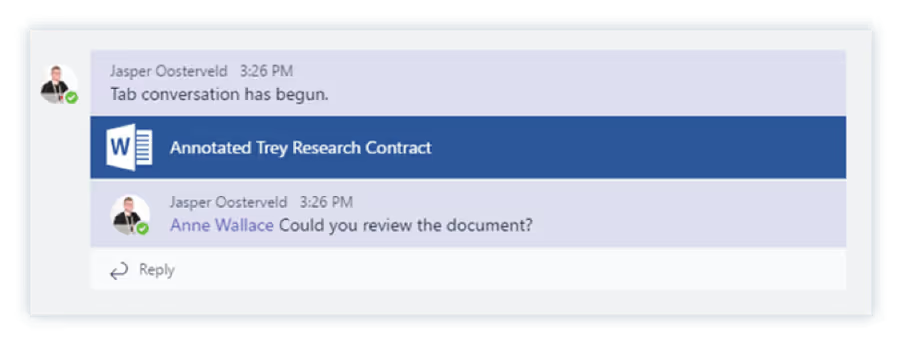
We recommend using this feature for documents you’re working on—for example, project plans, designs, calculation sheets, or reports.
Once you’re finished with the document, you can remove the tab. The conversations will remain intact, so you don’t have to worry about that.
Customizing Microsoft Teams channels
Personalize your Microsoft Teams channels and give them a distinct touch by utilizing the multiple features available, such as organizing your files and services with easy-to-use tabs or incorporating additional functionality with a diverse selection of apps—making work more enjoyable and productive (within reason, of course!).
Supercharge your workspace experience with:
- Tabs: Stay organized, boost productivity, and access everything you need in a snap—located at the top of a channel for quick access and holding all your important files, apps, and services. Nice!
- Apps: Upgrade your channel output by adding apps. Add Planner for task management and conquer your to-do lists or try third-party apps like Trello or GitHub that match your team’s preferences.
- Configured channel settings: Channels can be customized through settings like channel moderation, for example, deciding who can start new posts or adding a channel description, which can help guide the channel’s use and organization.
- Pinning: Keep your crucial messages front and center by pinning them to your channel—saving them from the digital abyss! With pinned channel messages, key information stays visible and accessible, effortlessly managing important information.
- Custom backgrounds in meetings: Who says meetings have to be boring? Users can customize their backgrounds while hosting meetings within the channel, adding personalization to communication—showcasing personality or transporting themselves to anywhere-but-here locations. *raises margarita*
Amplify productivity with app integration
As discussed, using apps can increase channel productivity by taking advantage of their features, such as easy integration, automation, and planning. Here are some examples to take advantage of:
- Power Automate in Teams: With Power Automate—previously known as Microsoft Flow—you can set up automated workflows between your preferred apps and services. In Teams channels, you can utilize this feature to automate tasks like posting messages, updates, or reminders based on particular triggers or conditions.
- Planner in Teams: To manage team tasks and assignments, Microsoft Planner can be added as a tab within a channel. This integration allows teams to easily organize work, create and assign tasks, and track progress directly within the channel.
- Power BI in Teams: You can integrate Power BI into a Teams channel as a tab. This feature allows teams to easily share and collaborate on data visualizations and reports, which promotes data-driven decision-making within the channel.
Understanding Microsoft Teams channel roles
With Microsoft Teams, you can easily assign channel roles and permissions to establish responsibilities, levels of contribution, and access controls. This way, everyone is on the same page and works together towards a common goal. Now, that’s a tick-in-a-box for any organization!
Plus, solid role and permissions assignment helps keep confidential information safe and prevents confusion when too many people have unrestricted access—meaning you can kick back and focus on more pressing matters!
Let’s look at the types of channel roles:
Types of channel roles
In Microsoft Teams, channel permissions can be divided into three roles: Owners, Members, and Guests, each having different levels of access and control. Let’s take a look:
Setting and managing channel roles
Setting channel roles is a breeze! You can set them up when you create the channel or edit them later through the channel settings. If it’s the latter you’re after, all you need to do is:
- Head to the Teams app (alternatively, you can use the Microsoft Teams admin center).
- Select Teams from the tabs menu, and click on the channel you want to adjust.
- Hover on the channel icon at the top of your screen.
- Click the member’s icon.
Here you can add members and change new and existing members’ roles.

If, however, someone asks for permission, it’s important to think things through. Take a moment to consider the person’s job and if they need access to what they’re asking for. You should also think about any security issues that could come up. Don’t hesitate to talk to other team leaders if you need before giving permission or making any changes.
As the Teams administrator, keeping things safe and efficient by reviewing permissions regularly is essential. Make sure to schedule occasional audits of channel permissions to check that only the necessary people have access and remove access from those who no longer need it. This way, you can protect your data and keep your collaboration environment in tip-top condition!
EXTRA: If you’re wondering how to decide which roles are appropriate for which team member, take a look at this fantastic quick-read guide on assigning Microsoft Teams roles!
Importance of strategically assigning roles
A team owner plays a crucial role in maintaining a secure environment and controlling access to sensitive information. By correctly assigning roles, team owners can safeguard valuable data, allowing only those who require access while restricting it from other members. But the benefits of strategic role assignments don’t stop at security.
By establishing clear roles within the channel, team members understand their responsibilities, minimizing confusion and avoiding unnecessary task overlaps. This streamlined approach ensures the whole team can work together seamlessly, maximizing productivity and achieving shared goals.
With team owners leading the way, the whole team thrives!
Access control in different channel types
Different channels have different functions. By picking the right one, you can help manage projects like a pro with focused conversations, the safe sharing of knowledge, or keeping your communication open with those outside your team.
- Standard channels: These are an excellent way for all team members to communicate, share files, and access common resources. The team owners have additional privileges, such as managing the channel’s settings and membership.
- Private channels: Only the team members who the channel owner invites can see and join these channels. The channel owner controls who can do what, so they’ll manage who’s in the group.
- Shared channels: Collaboration is made easier with shared channels because you can work with anyone—whether they are in your team or not. The channel owner can manage all the members’ permissions and decide who can join or share the channel with another team. Only the channel owners—or team owners—have the power to add members.
REMINDER: Confused why ‘General channel’ isn’t mentioned? Remember: a ‘General channel’ is automatically created when a new team is made. The channels listed above are manually created in addition to the ‘General channel’ and serve a defined purpose. Don’t worry; you got this!
Balancing permissions for participation and security
Setting permissions for a channel is super important. Depending on the channel type, different access and participation levels are allowed.
Standard channels are inclusive, so an entire team can view, collaborate and have their say on what’s happening—which is great because it encourages open communication and teamwork.
But for a shared or private channel, only invited people can join in. This way, sensitive conversations or projects stay confidential and private. Think of them as an extra security blanket keeping everything safe and secure (but not warm, obviously).
It’s essential to find the right balance between security and collaboration. If you’re too strict, people might be unable to work together effectively, which is bad because it isn’t great for productivity. But if you’re too lax, confidential information might get leaked—which is also bad. *two thumbs down*
Finding that sweet spot is key! By doing so, you can create secure and inclusive channels. Everyone can contribute and feel involved while still keeping important information protected. This kind of environment leads to better outcomes overall. *two thumbs up*
Moving forward with channels (and confidence)
Now that you know how team channels work, you’ve got the right tools to lead the charge and initiate channel creation within your Microsoft Teams environment.
Explore standard, private, and shared channels and maximize their output with features like mentions and notifications and even customization with tabs, apps, and cool backgrounds.
And if there’s one thing to take away from this, it’s encouraging users to utilize channels instead of creating new teams. This simple yet effective best practice reduces sprawl and simultaneously boosts productivity and collaboration—now that’s a win-win.
Congratulations. You’re ready to connect, communicate, and conquer channels!
EXTRA: Ready for your next step in mastering all things Microsoft Teams? That’s the spirit! But first, take a break; you deserve it. When you’re ready, get straight back to it with the ultimate guide on Microsoft Teams management.


.svg)
.avif)
%20(1).avif)
