

.svg)
.avif)
Microsoft 365 governance made simple
Fix what matters, faster, without complex rules or tool switching!
Free trial%20(1).avif)
Master Hacks: Migrate like a pro
Check out our video series to help you turn migration projects into masterpieces!
Table of contents
We explain two ways to manage user and group permissions in SharePoint Online permissions—ensuring the right people have access to the right things.
SharePoint online permissions are managed through a set of membership groups within some types of sites (owners, members, visitors, etc.).
We know, and Microsoft also knows, that secure collaboration is crucial when working online. You have a wide array of users with access to site content, and you need to ensure that the intern doesn’t somehow stumble onto the company’s secrets.
With SharePoint Online, you can configure broader capabilities to secure collaboration within M365, giving users more control over SharePoint permissions.
Here at ShareGate, we enable you to implement SharePoint permissions best practices in one handy multi-tool.
In this article, we explain how to simplify the process of SharePoint permissions management across different types of sites. By the end, you’ll get a clear picture of the flexibility you now have when looking to collaborate securely inside and outside your organization.
What are SharePoint permissions?
In a nutshell, SharePoint lets you grant permissions to users in SharePoint. But another important follow-up question would be, “How much can I play around with these permissions?”
To answer that question, it’s a good idea to familiarize yourself with all the permissions available in SharePoint. They include:
Team permissions: Depending on whether you add a user as an owner or a member of the associated Microsoft 365 group, permissions to the team site are assigned accordingly. When Dave is added as a team member in the group, he’s automatically a ‘member’ of the SharePoint team site rather than an ‘owner’ or ‘visitor.’
Communication site permissions: Communication site permissions are more granular; unlike team sites, they aren’t part of Microsoft 365 Groups, giving admins greater control over permission settings. Owners, members, or visitors added to a SharePoint communication feature are only associated with that particular site. Of course, different SharePoint permission levels can be granted (as an owner, member, visitor, or custom SharePoint group) to a single user, security groups, or an entire Microsoft 365 group.
Use case: Inviting visitors to a communication site for collaboration. Visitors can be added as part of a security group where permissions are standardized for a large number of visiting collaborators.
Hub site permissions: SharePoint admins control which users can add more sites. Hub permissions can go either of two ways:
- For team sites, permissions should be managed from the corresponding Microsoft 365 group.
- Permissions should be managed from the SharePoint group for communication sites (since communication sites aren’t part of Microsoft 365 Groups).
Shareable links permissions: Any user assigned SharePoint permission to access a site, group, or team automatically has SharePoint access to the corresponding site data. Shareable links allow you to share specific data rather than the entire site content. You can edit permissions so that the shared link is accessible by everyone or specified users.
Guest sharing permissions: SharePoint allows guest-sharing capabilities to make collaboration with outside parties easier. Permissions can be edited so that only specific site data is accessible by outside parties.
👉 Struggling to keep SharePoint permissions tidy? You’re not alone. Our survey of 650 IT pros shows governance and access controls are the top headaches after migration. See how others are tackling it in the State of Microsoft 365 report.
An overview of permission levels in SharePoint
First, let’s have a closer look at all the SharePoint permissions levels available in SharePoint:
SharePoint permissions best practices: Custom permission levels
On top of your existing SharePoint permission list, you can use custom permission levels to tailor permissions management around your organization’s specific needs.
Keep the following information in mind about custom permission levels in SharePoint, and you’ll be all set:
When to create custom permissions
Administrators can create custom SharePoint permission levels and define what a user can do within the boundaries you create for them. This can include creating a custom permission level where a user can edit documents, manage permissions, change site settings, etc.
For example, say you have an HR executive who should be able to view, edit, and delete employee records but shouldn’t be able to tamper with any site settings. You can create a custom permission level around this and name it “HR Executive – Employee Records Management.”
Best practice for custom permission levels
Based on our experience, we have a few suggestions before creating and assigning custom permission levels within your organization.
The following practices help avoid confusion and roadblocks for end users:
- Thoroughly analyze user roles and responsibilities to understand what a user requires for seamless workflow and what they don’t, based on their job description.
- Consult with stakeholders to understand their point of view, what they require access to, and why.
- Document the purpose and scope of each SharePoint permission level to keep things clear for everyone.
- Conduct periodic reviews to ensure permissions are consistent with organizational requirements and security policies.
Best practices for permissions inheritance and breaking permissions inheritance
Consistency of security policy enforcement directly influences how secure your Microsoft 365 environment actually is. If we specifically talk about the role of SharePoint permissions management in ensuring consistency, here’s how permissions inheritance will help:
Permissions inheritance
In SharePoint, permission inheritance means permissions assigned to a ‘parent object,’ like a site collection or site, are automatically passed down to the ‘child object’ created within that site.
The parent-child relationship with permissions means that the child object gets the same permissions as the parent object, reducing the manual effort required to constantly assign permissions whenever a new object, such as a site, is created.
The best practice for security within your SharePoint environment is to leverage permission inheritance to your advantage to create a structure where permissions are automatically assigned without repeating the same process of assigning new permissions.
Breaking permission inheritance
Instances will occur within your SharePoint environment when you’ll need to configure advanced permissions settings for specific objects to enhance security and access control. I In instances like this, you’ll need to stop inheriting permissions to break the inherited access and apply custom security settings to that object. This is called breaking permissions inheritance. This allows for role-based access control (RBAC) and enables unique permissions for specific objects.
The best practice is only to break permission inheritance when absolutely necessary and document it so all customized permissions can be tracked. Also, when documented, make sure the reason for the discontinuity in default permissions is also explained.
But still, know that breaking permission inheritance too much will create an overly complex permissions structure that will be difficult to manage. You might be able to understand the customized structure because you’re making these changes, but you’ll end up making lives difficult for new administrators who have to deal with this.
P.S. There’s an easier way to manage permissions, ensure consistency, and live inside a completely secure SharePoint environment. ShareGate’s permissions management feature is the ultimate solution.
Best practices for the principle of least privilege
One critical aspect of maximizing security within your organization is only allowing users necessary access to information. Needlessly giving permission to the intern to access a folder that contains the company’s finances isn’t smart, is it?
The principle of least privilege emphasizes just this.
What is it?
The principle of least privilege states that users should be given the lowest possible permissions required to fulfill their job responsibilities. This minimizes unnecessary risk and reduces security issues such as data leakage, data modification, or unauthorized access.
Importance and best practice in permissions management
The importance of implementing the principle of least privilege within your organization is paramount, as the risk of security breaches is minimized. Regularly review and adjust permissions to ensure that users have the appropriate default permission levels based on their role and responsibilities. This will help maintain a secure SharePoint environment and protect sensitive data from unauthorized access or misuse.
Best practices for simplifying SharePoint permissions management using groups
- Plan and organize: Before creating SharePoint groups, carefully analyze your organization’s user roles and responsibilities. Group users based on their common permissions requirements and responsibilities. This helps ensure that SharePoint roles and permissions are assigned efficiently and consistently across your document library.
- Limit unique permissions: Aim to minimize the number of unique permissions within your SharePoint environment. Too many unique permissions can lead to complexity, making it challenging to manage and troubleshoot permissions. Whenever possible, leverage permission inheritance and SharePoint groups to maintain a consistent and manageable permission structure.
2 ways to manage user and group permissions in SharePoint Online
Method #1: Using Microsoft
Add users to a group
- On the SharePoint site, click share/members.
- Click on Add Members.
- Enter the names or e-mail addresses of the users you want to add will appear in the dialogue box.
- You can also set SharePoint permissions levels when sending the invite.
- Once done, click on Share, and the invite will be sent.

Remove users from a group
- Go to the SharePoint site and click Settings.
- Click Site settings/Site Information.
- Click View all site settings/Site settings. (Some users might need to click on Site contents before viewing the Site settings dialogue).
- On the Site Settings page, go to Users and Permissions—> People and Groups.
- Go to People and Groups—>Quick Launch and select the user you want to remove.
- Click Actions—>Remove Users from Group.
- A confirmation dialogue box will pop up. Click Ok to proceed and remove the user.
Grant site access to a group
- Go to the SharePoint site and click Settings.
- Go to Site Permissions.
- Click Advanced Site Permissions once the site permissions page opens.
- On the Advanced Site Permissions page, click on the Permissions tab.
- Click Grant Permissions.
- Click on Share and enter the group name to who you’d like to give access.
- After you click on Share, a prompt will appear asking you the level of permissions you want to give to the group. By default, the group will be able to edit. But, you can change permission levels by clicking on Show options—> Select a Permission Level/Select a group or permission level.
- Once permissions for the group are finalized, click Share to proceed.
Assign a new permission level to a group
- Go to the SharePoint Site and click Settings—>Site Settings/Site information on the SharePoint site. (Sometimes, you’ll have to click on Site contents and then Site settings).
- Once on the Site Settings page, click on Users and Permissions—> Site Permissions.
- Hover over the user/group to which you’d like to assign a new permission level. Tick the check box to select them.
- Go to the Permissions tab and click on Edit User Permissions.
- You’ll be prompted to a screen where you’ll be able to grant custom permissions to the group. If you check multiple boxes, the user will get a combination of all those SharePoint permission levels.
Method #2: Editing permission assignments using ShareGate
ShareGate simplifies the permissions management process. You can add permissions, copy user permissions, and remove permissions—among other actions—straight from the quick actions menu.

Add permissions
To grant permissions to users or groups in a target location, go to Explorer and select the sites where you want to apply the changes. Click + Add from the Permissions section in the Quick actions menu.

In Add permissions, you can select one or multiple users and grant them new permissions over the items previously selected in the Explorer. You can add them to existing SharePoint groups, assign them as Site Collection administrators, or assign them explicit SharePoint permissions. These can be out-of-the-box permission levels or custom ones. You can also assign permissions to SharePoint groups and Active Directory groups.
Copy user permissions
One particularly interesting feature is the ability to copy the permissions of a user to another.
For example, your company makes two hires for the Sales Team: Alex and David. As an IT admin, you know Alex and David’s permissions should be the same. In ShareGate, copy Martin’s already existing permissions and assign them to Alex and David. That’s it! Alex and David now have the same access to site content as the rest of the team. You can select a tenant, sites, or any SharePoint object for this operation.

Remove permissions
It’s been a few months, and Alex and David have been promoted to new positions with different job descriptions. As a result, the old permissions are no longer required.
Our Remove Permissions option is there to help you remove permissions from users or groups.
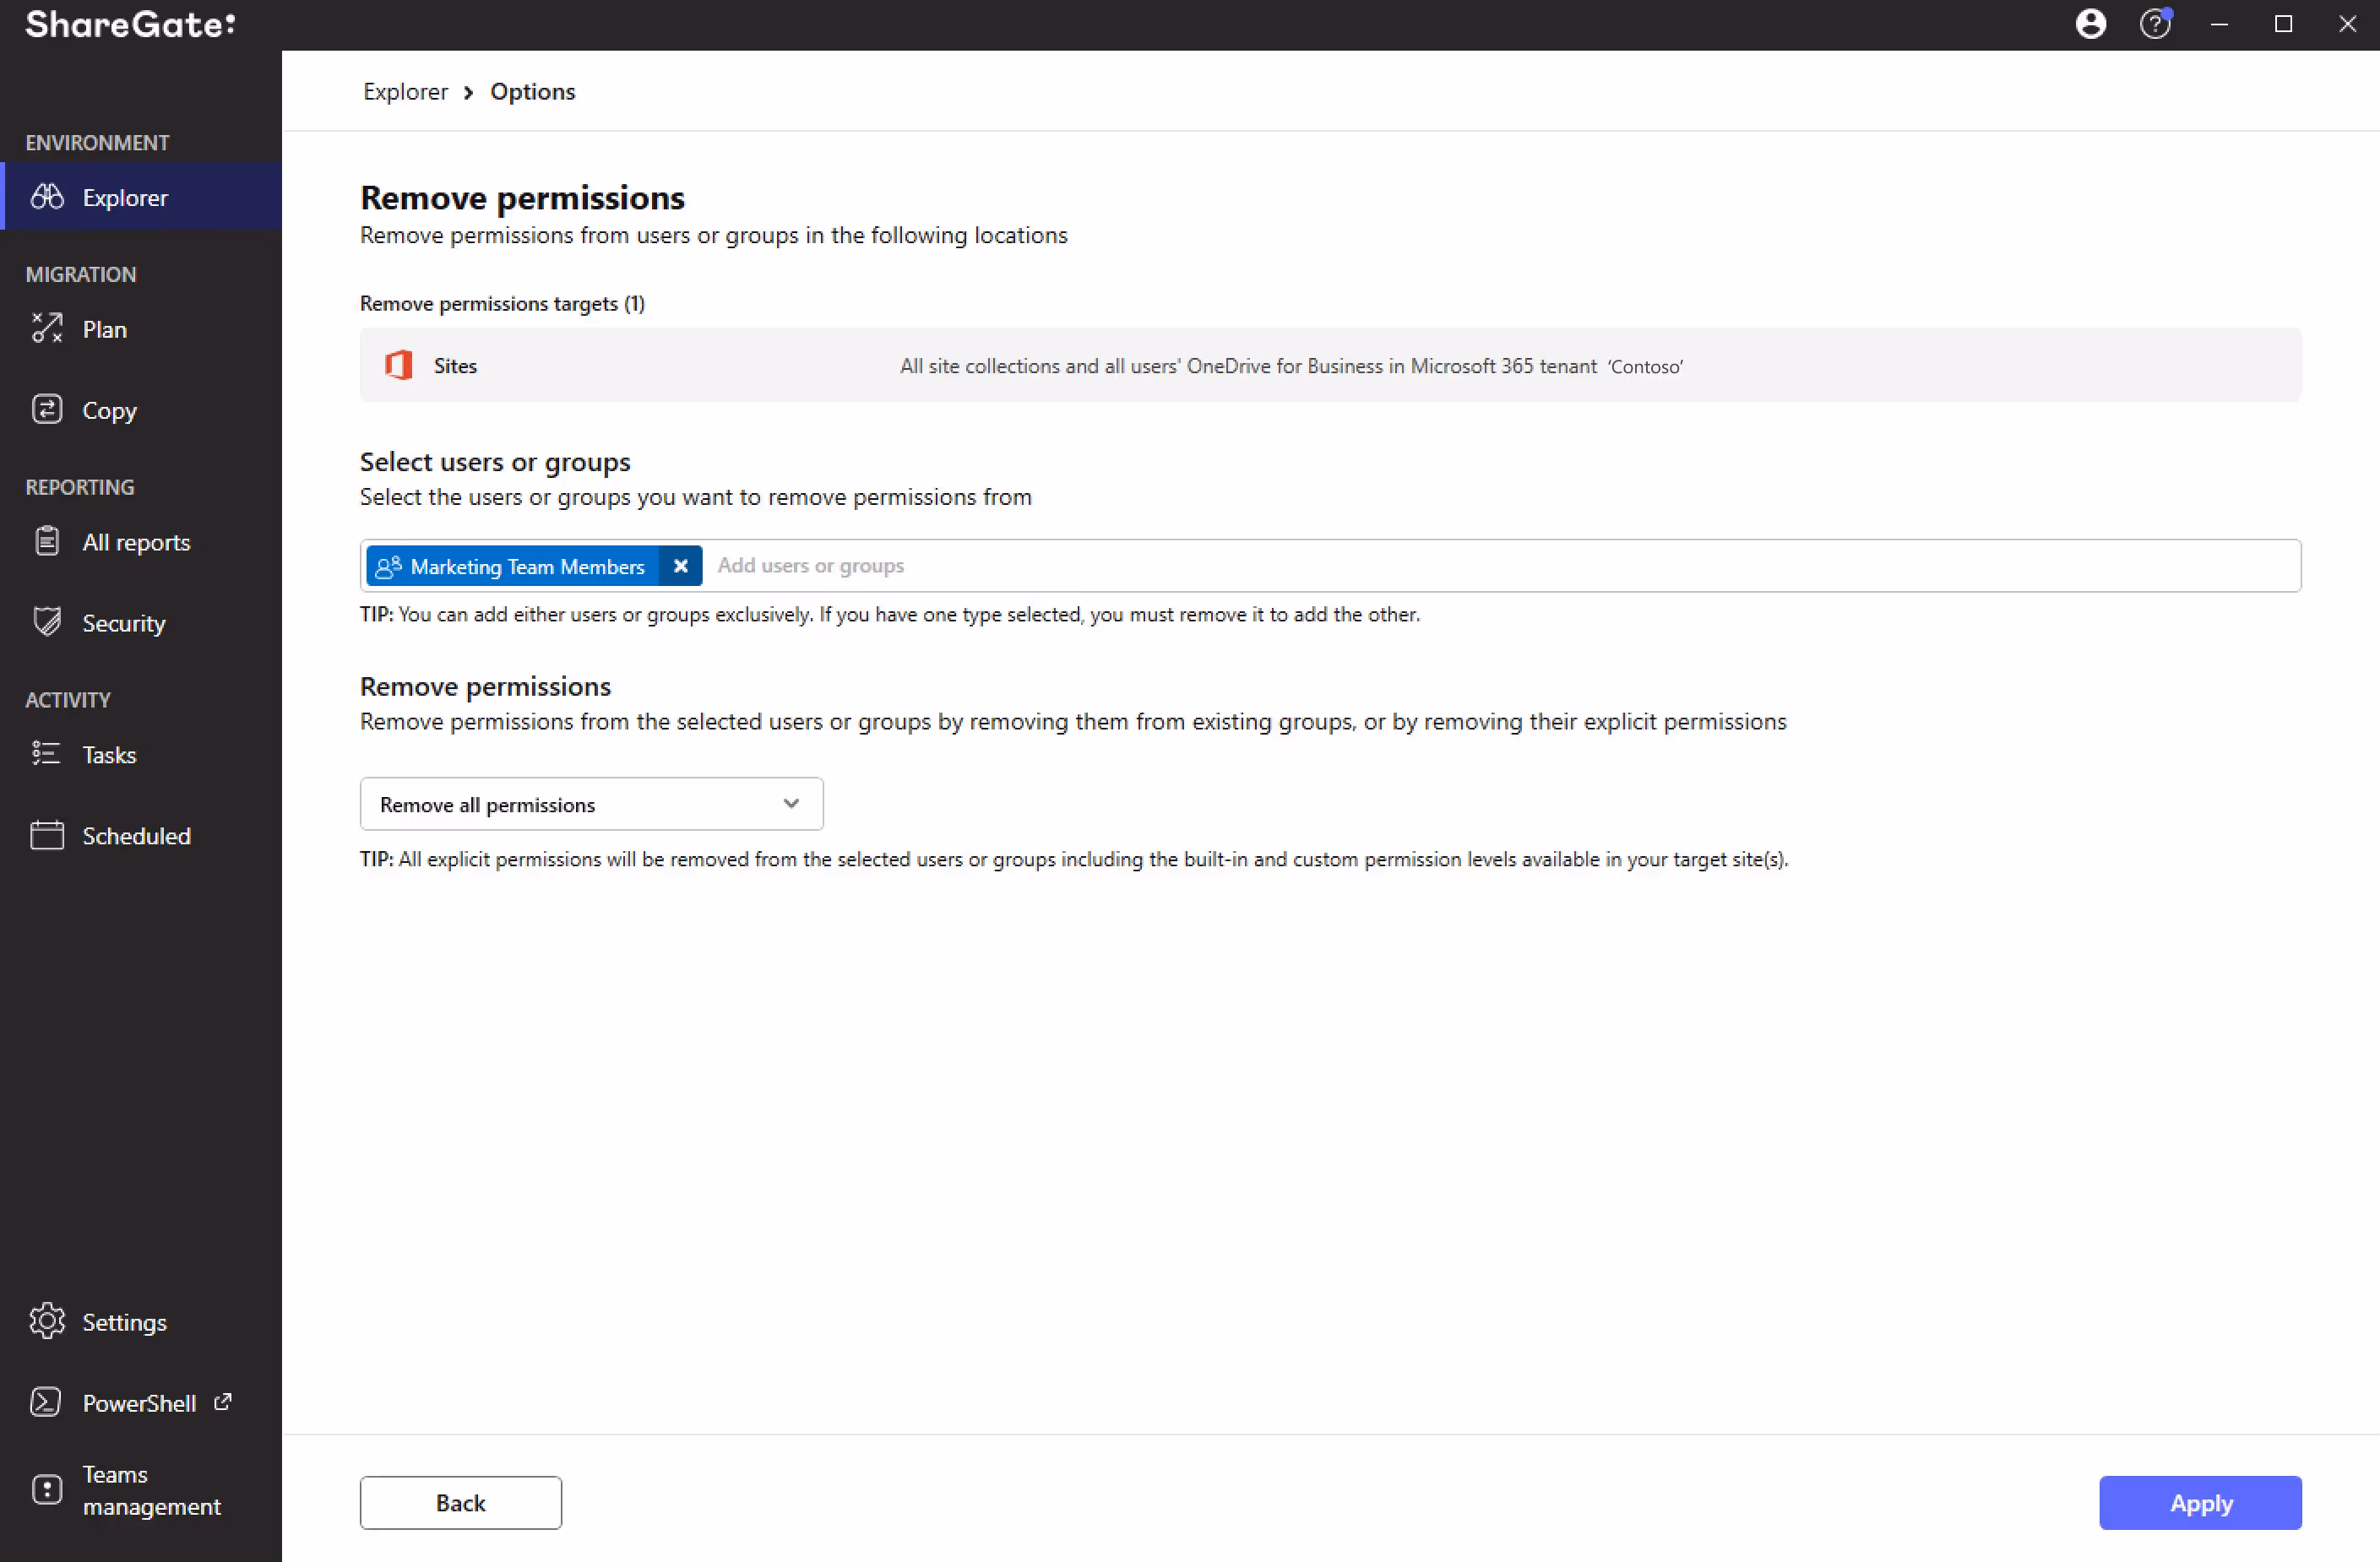
With Remove permissions, you can select your tenant, sites, or other SharePoint objects to:
- Remove from SharePoint group membership
- Remove from site collection administrators
- Remove their explicit permissions
- Remove all permissions
ShareGate’s Permissions Matrix Report: An answer to permission management problems in SharePoint
Permissions must be managed efficiently and regularly audited to maintain an ongoing compliance standard of high-level security for your organization’s data.
ShareGate offers a built-in Permissions Matrix Report, which covers all those bases. Think of it as your all-knowing personal security assistant.

With one click, you get comprehensive visibility of what users and groups have access to and their permission levels in your SharePoint and Microsoft 365 environments.
With the results from our Permissions Matrix Report, you can:
- See who (and which groups) can access what, including external users and the content shared via anonymous links.
- Plan your migration by helping you answer, “Are these the SharePoint permissions I want to have when I migrate to the destination?”.
- Compare pre- and post-migration. Before you make the move, get a snapshot of your SharePoint permissions list. You can compare your source to your destination when your migration is completed.
If you can’t wait to dive into our Permissions Matrix Report and all our Microsoft 365 management solutions, start a 15-day trial with ShareGate (it’s free!).
It’s safe to say that there’s a fair amount of attention spent on permissions management in SharePoint. The platform is evolving to cater to digital and secure collaboration.
Advanced permissions capabilities allow you to track who has access to what across the organization. And if you want more flexibility in staying updated about these permissions, you always have ShareGate’s Permission Matrix Report to rely on.
However, another crucial aspect often overlooked is user training for maintaining data governance and security compliance within organizations. Educating users on proper permission protocols can mitigate the risks of data breaches and ensure smooth collaboration. By incorporating user training into your SharePoint governance strategy, you empower users to understand their roles and responsibilities regarding access management. This proactive approach will promote a culture of security awareness and accountability among all stakeholders.
Advanced permission capabilities allow you to track who has access to what across the organization. And if you want more flexibility in staying updated about these permissions, you always have ShareGate’s Permission Matrix Report to rely on.
SharePoint permissions management FAQs
Have questions about managing permissions and user access in SharePoint? We answer some of the most common questions, whether you’re new to SharePoint or looking to refresh your knowledge!
What are the different permissions in SharePoint?
SharePoint permissions define what users can do with content, like documents, lists, and sites. There are various permission levels, such as Read, Edit, Contribute, and Full Version Control, which grant different access levels.
What is a permission level in SharePoint?
A permission level in SharePoint is a predefined set of permissions that determine a user’s access to a specific item or site. For example, the “Read” permission level allows users to view content, while “Edit” allows them to modify it.
How do I give permission to SharePoint?
Permissions in SharePoint are typically managed through groups, making it easier to manage access for multiple users while maintaining a structured permission model. You can create groups with specific permission levels and then add users to those groups. This approach simplifies permission management compared to assigning permissions directly to individual users.
What are the roles in SharePoint?
In SharePoint Online, roles are essential for managing access and permissions effectively. They can be categorized into Unit-Level Roles and Site-Level Roles or Permissions.
Unit-Level Roles:
- Site Network Administrator (SNA): Responsible for managing the structure, usage, and permissions of hubs and sites.
- Business Owner (BO): Manages SharePoint Online at the University level, ensuring compliance, consistency, and support for SharePoint Online within their college, department, or division.
Site-Level Roles and Permissions:
- Hub Administrator: Special role for managing hub sites, allowing the association of sites with a hub.
- Site Administrator (Site Collection Administrator): Holds the highest level of access within a SharePoint site.
- Site Owner: Full control over the site, managing sub-sites, permissions, and settings.
- Site Member: Can contribute content, edit, collaborate, and view most information.
- Site Visitor: Limited access, typically for viewing content.
What are the 3 permission groups available in SharePoint?
SharePoint traditionally uses three default permission groups to categorize various permission levels:
- Owners: This group has full control, including Site Owners and SharePoint administrators.
- Members: This group includes users with varying levels of editing and contributing permissions, such as Edit and Contribute.
- Visitors: This group has read-only access, allowing them to view content but not modify it.
What is the best practice for SharePoint permissions?
The best practice for SharePoint permissions is to follow the principle of least privilege. This means granting users only the minimum permissions they need to perform their tasks. This approach minimizes security risks and simplifies access management. Here are some additional best practices:
- Use groups for permission management instead of assigning permissions directly to individual users.
- Regularly review and update permissions to ensure they remain appropriate.
- Use SharePoint permission inheritance to streamline permission management for sub-sites.
Does ShareGate require restarting migrations after a failure?
You can't resume a failed migration from where it left off. You have to rerun it. The good news: you don't have to copy everything again. Depending on your scenario, incremental, merge, or "don't copy existing" options let you pick up what's missing without starting from scratch.


.avif)


