.svg)

.avif)
Put your Microsoft Teams management on auto-pilot
We identify potential issues so you can course-correct them before they escalate!
Free trial%20(1).avif)
Master Hacks: Migrate like a pro
Check out our video series to help you turn migration projects into masterpieces!
Table of contents
Administering Microsoft Teams in your organization is easier when you know a little bit about a lot of products across the entire Microsoft 365 ecosystem. In our on-demand webinar, Microsoft MVP Benjamin Niaulin talks getting up to speed and the “nuts and bolts” of Teams.
We’ve seen the profound events of the past year transform nearly every aspect of our world. The pandemic drastically accelerated the shift to a “digital workplace”—which would otherwise have taken years to implement.
With a broad range of collaboration capabilities, it’s easy to see why a tool like Microsoft Teams has been making its way into many workflows. In fact, Teams usage is at an all-time high; it currently has more than 145 million daily active users (up from 75 million in April 2020).
But for IT admins offering support to their WFH colleagues, fast deployment without proper governance to keep Teams organized and secure can be a recipe for chaos.
Ben covers some important tips to administering Teams like a pro.
Watch the on-demand webinar of Teams Administration 101: insights into building a foundation for effective remote work, and see Ben’s in-Teams demos and walkthroughs.
Still have questions after watching the session? Read our roundup of your questions from the webinar, answered by experts and compiled into a handy, curated list.
Or, you can keep reading to review the main takeaways below.
Microsoft Teams is the hub for teamwork
Microsoft Teams connects people while minimizing the challenges of remote collaboration.
As per Microsoft, this is exactly the purpose of the application: “Microsoft Teams is the hub for teamwork that brings together chat, meetings, calling, devices, apps, and solutions all in one place.”
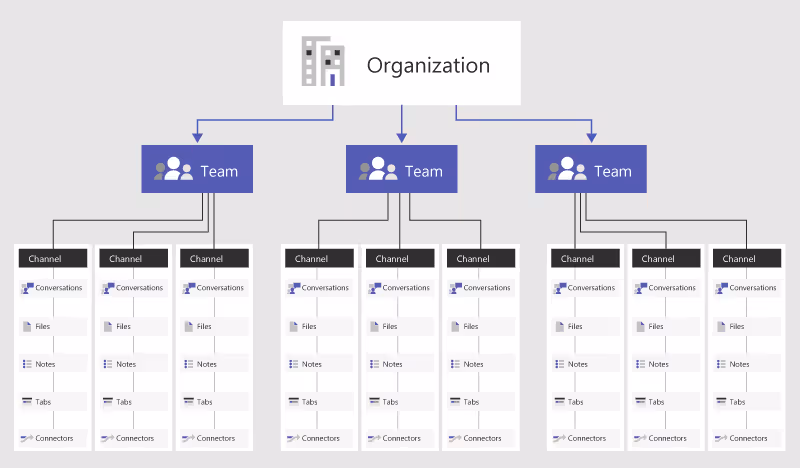
Along with tying together tools in one centralized application and empowering collaboration, Microsoft also structured Teams in a way that creates a hierarchy reflecting most modern organizations.
For our purposes, there are two things to walk away with:
- The teams within Teams—or “Teams teams” as they are sometimes, confusingly, called—are where most collaborative work takes place.
- Teams teams contain channels, subgroups of the main team. This is a way to keep project/location/interest-specific content in front of the right people without bogging down the whole team.
It’s important to really know what’s under the hood of each team to manage them—and the remote work taking place within them—effectively.
Putting the cart before the horse can be tempting. Truly understanding what is Microsoft Teams and how it works can be an excellent primer for mastering Teams and Team channels.
First and foremost, the basics of Teams administration is knowing where content is stored.
Benjamin Niaulin, Microsoft MVP (@bniaulin) Tweet this
Microsoft Teams ties together top-notch tools
While Teams offers a lot of great features and benefits, it doesn’t really do it on its own—it’s integrated with other Microsoft 365 services, such as the Microsoft Office suite.
Here are the base functions that come out of the box with Teams:
I can hear you say, “This can’t be. I’ve used Teams, but I’ve never used these tools before.”
Well actually, you have. When you use Teams, it’s leveraging the strengths of the best Microsoft 365 tools by packaging them together through the Teams interface.
Microsoft Teams surfaces functionalities in a convenient way that helps everyone work better together.
To manage Teams features, you need to manage the related tools
If Teams doesn’t actually “own” what’s happening inside of it, what does this mean? How do I gain control?
It’s important to take a step back at this point and realize what this structure of tools within tools actually means and how much power it brings you.
Instead of looking for thousands of tiny feature settings and sliders inside each team, you can look to the focused settings within each related application.
To add features or share items, it’s important to remember what product Teams is leaning on.
For example, when a new team is created for the members of your marketing department, this means that an associated “Marketing” SharePoint site has been created for the team. This team site acts as a centralized file management location for the whole team.
So, if you want to make changes to file-sharing permissions, the SharePoint admin settings provide much finer-tuned control than anything in Teams itself.
Even users don’t live in Teams
What about making changes to the makeup of teams—the membership of each team, or the permissions they’ve been granted?
While Teams has a few “add” or “remove” functionalities for team owners, teams and their memberships are recorded in the Azure Active Directory and Microsoft 365 Groups.
Azure AD stores:
- Users and their settings
- Security groups and their settings
- Microsoft 365 groups and their settings
What is Microsoft 365 Groups?
There tends to be a bit of confusion around Microsoft 365 Groups and Teams.

When you create a team in Teams, on the backend, you’re also creating a Microsoft 365 group (as well as the associated SharePoint document library, OneNote notebook, and tie-ins with other cloud-based applications).
If the group was created somewhere other than Teams, an associated team is “optional”—you’ll need to create a team from an existing group manually.
Microsoft 365 Groups is not a product, nor does it compete with any of the others. It’s just like your security groups, but with the addition of a provisioning robot and a sense of centralized management.
Understand permissions for adding members to Groups
Within a Microsoft 365 group, users are assigned one of three possible roles: owner, member, or guest—each with its own unique permissions that are applied consistently across tools—hence the sense of centralized management. For example, when someone external to your organization is added to a Microsoft 365 group as a guest, those permissions follow them across products in Microsoft 365.
Microsoft 365 group permissions
*Members are users within your organization—meaning that if self-service functionality is enabled, they can create new groups where they would be the owner.
**Guests can view and edit group files if the admin has enabled external sharing.
The settings for each group also live in Azure AD. Once configured, they apply almost everywhere in Microsoft 365, enabling you to adjust settings for multiple products at once.

But what do we mean by “provisioning robot”? Well, every time a Microsoft 365 group is created in Azure AD, a corresponding space is automatically provisioned in other Microsoft 365 products, such as SharePoint, Outlook, and Planner.
Microsoft 365 Groups provisioning works a little bit differently with Teams, though, so you need to pay attention to how a team is created.
Microsoft Teams admins can manage certain settings from the Microsoft Teams admin center
So if file-sharing permissions are configured in the SharePoint admin center, and team and group membership can be configured in Azure AD, what can you control if you’re only acting as an admin for Teams?
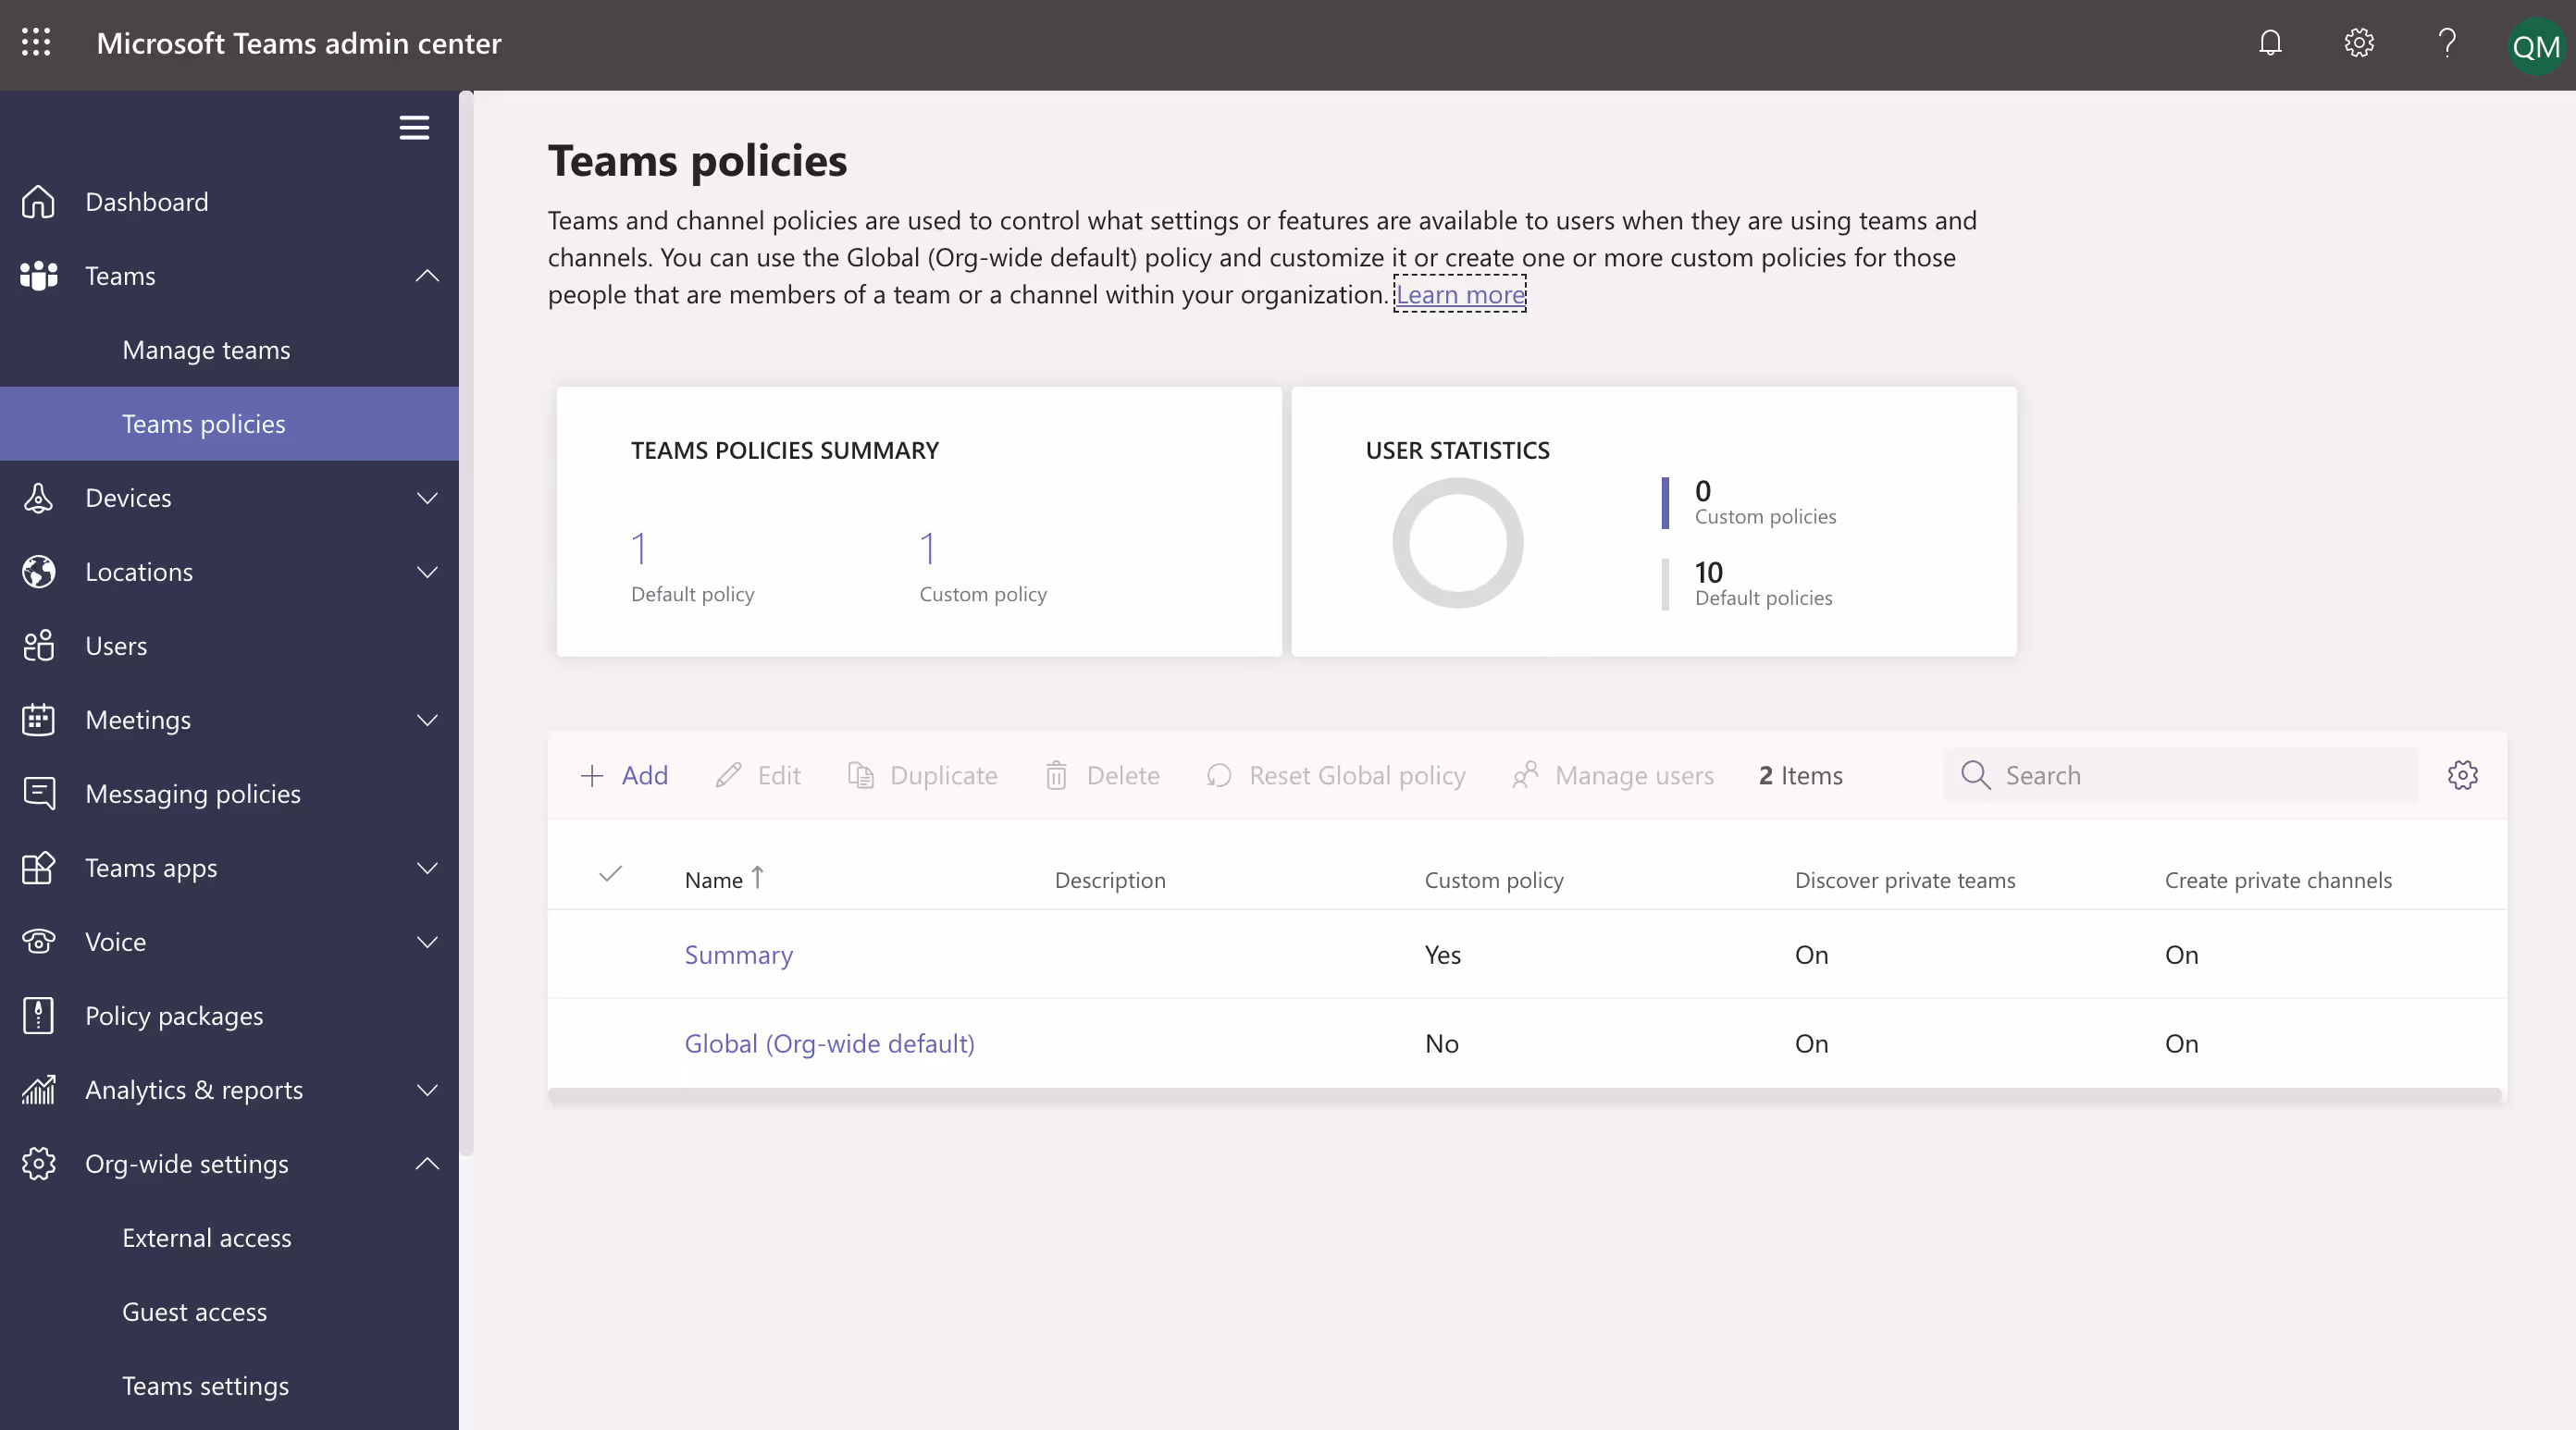
Manage Teams settings for your organization
The Microsoft Teams admin center is where you can manage organization-wide user settings related to the Teams app itself (go to the Teams admin center, then select Org-wide settings).
From here, you can configure the following settings:
- External access
- Guest access
- Teams settings
External access lets your users communicate with another organization’s users through Teams.
Guest access allows teams in your organization to collaborate with external users by granting them access to teams and channels. Note that you may need to enable guest access at several different authorization levels outside the Teams admin center, as well.
Teams settings let you set up features like email integration, notifications and feeds, and tagging for your organization’s teams. You can also turn file sharing and cloud file storage options on or off.
Assign policies to users and teams
From the Teams admin center you can also set policies to control things like:
- Team and channel creation
- Messaging
- Meetings
- Phones
These policies can be applied to users and teams rather than the whole organization, so they allow for more flexibility and customization.
You can assign a policy to an individual user, or a small group of users, through the Teams admin center (Users > click on the user)—or use PowerShell to assign a policy to a batch of users.

Or set teams policies (Teams > Teams policies) to control what settings are available to users when they’re using teams and channels.
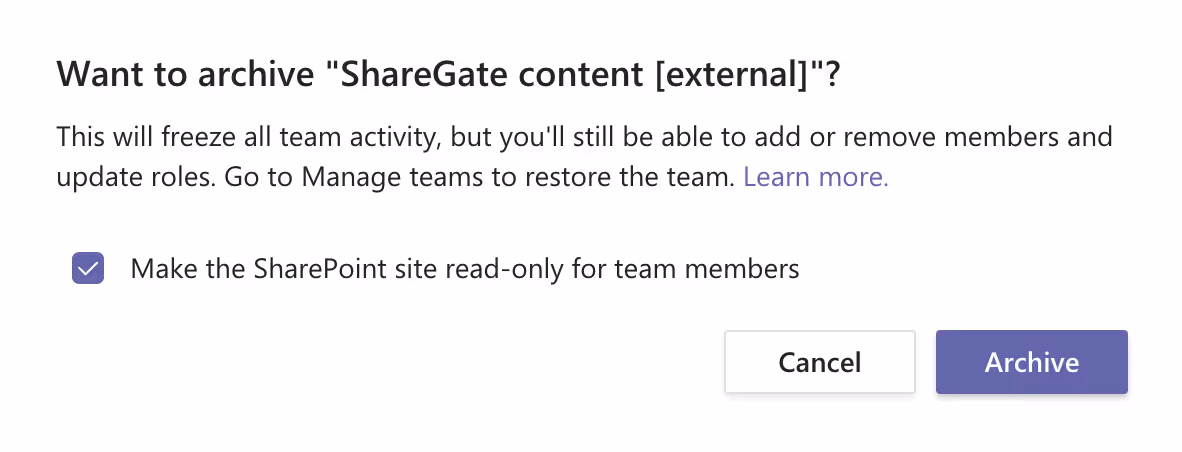
Archive or delete a team
As a Teams admin, you can also archive or delete a team that’s no longer needed from the Teams admin center (Teams > Manage teams > click on the team > Archive).

Archiving a team puts it in a read-only state. You’ll still be able to search through an archived team for stuff that you need, and you can choose to reactivate it (or delete it) at some point in the future.
Once you click on Archive for a team, you can select Make the SharePoint site read-only for team members to prevent people from editing the content in the associated SharePoint site and Wiki tab (although team owners can still edit this content).
You can also delete a team if you want to remove all its content. But be careful: While you can restore a deleted team by restoring its associated Microsoft 365 group, deleted Microsoft 365 groups are only retained for 30 days (a period referred to as “soft-delete”). Once that timeframe has passed, there’s no way to get a deleted group or team back.
There are always advanced features to learn
There are other ways to tackle Microsoft 365 governance at scale.
If you’re not afraid of a little coding, there’s even more you can do in Teams with the help of PowerShell.
For example, you can use PowerShell to categorize certain Microsoft 365 groups as “Secret”—allowing sensitive groups to be hidden from your Global Address List (GAL) and membership.
Set-UnifiedGroup
-HiddenFromAddressListsEnabled $True
–HiddenGroupMembershipEnabled
The caveat here is that you should make sensitive groups private to avoid casual searches surfacing for confidential documents. It’s also a good idea for users to mark secret groups as favorites so they’re easily accessible in all clients.
To tackle Microsoft 365 governance at scale, you might also want to look into the following:
- Creation permissions
- Naming policy
- Expiration policy
- Soft delete and restore
- Guest access
- Reporting
- Policies and information protection
- Azure AD access reviews
- Upgrade distribution lists to groups in Outlook
Some tips and tricks can go a long way
Learning the ropes of Microsoft Teams is one thing, getting the most out of your Teams experience is another. These tips and tricks will help you save time and ensure your organization is set up for success!
#1: Know your limits to adding teams, channels, and members
These are some of the limits, specifications, and other requirements that apply to Teams.
Source: https://docs.microsoft.com/en-us/microsoftteams/limits-specifications-teams
#2: Choose the best Teams client to use
Microsoft Teams is available for desktop (Windows, Mac, and Linux), web, and mobile (Android and iOS). All three need an active internet connection and don’t support an offline mode. But how do these clients differ, and which one should you use?
The Teams desktop client is a standalone app that you download and install on your computer. It provides real-time communications support for team meetings, group calling, and private on-on-one calls—so if you’re looking for better call quality, you’re better off going with the desktop client.
The Teams web client is a fully-functional version of the tool that can be accessed and used from a variety of browsers without downloading anything onto your computer. The web client offers a consistent experience and level of control and is useful if you’re a member of one tenant and a guest access user in another—you can use the desktop client for one and the web client for another to easily switch between the two.
The mobile client is useful for messaging when you just need Teams to function as a chat tool.
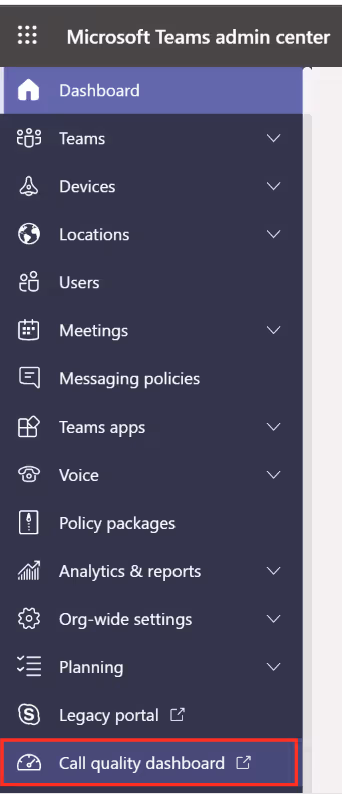
#3: Take advantage of Teams’ Call Quality Dashboard
Did you know that Teams has a Call Quality Dashboard (CQD)? It aggregates information about an organization’s Teams to help admins optimize a network.
Whereas Call Analytics is designed to troubleshoot call quality problems with specific calls, the CQD focuses on overall patterns with regards to call quality. Reports generated in CQD include call quality metrics that provide insight into overall call quality, server-client streams, client-client streams, and voice quality Service Level Agreements (SLA)—all of which is extremely useful in today’s WFH world.
#4: / commands can be a huge help
Commands are shortcuts; they’re designed to save you time and make your life easier. In Microsoft Teams, commands can help you perform common tasks, such as:
- Updating your status (/available, /away, /busy)
- Going to a specific channel (/goto)
- Viewing recent files and saved messages (/files, /saved)
- Checking your call quality (/testcall)
- And many more!
Educate your end users so they can take advantage of all the commands Teams has to offer.
#5: Schedule meetings directly in Teams
When you create a Microsoft team, it comes with a shared Outlook calendar. Your calendar in Teams (found in the left toolbar), is connected to your Exchange calendar—so if you schedule a meeting in Outlook, it’ll show up in Teams, and vice versa.
There are benefits to scheduling a meeting directly in Teams—not least of which is that you get to remain in your current flow of work. For example, you can book a meeting with everyone that’s part of a Teams chat directly by selecting the “Schedule a meeting” icon below the box where you type a message.
Or, if you schedule a new meeting in your Teams calendar, it’s exceptionally easy to invite people outside your organization or include everyone from a specific channel.
Build a solid foundation in Microsoft Teams with these best practices for administration and onboarding to keep team members connected, regardless of their location.