How to enable and manage guest access in Microsoft Teams at every authorization level
.svg)

.avif)
Put your Microsoft Teams management on auto-pilot
We identify potential issues so you can course-correct them before they escalate!
Free trial%20(1).avif)
Master Hacks: Migrate like a pro
Check out our video series to help you turn migration projects into masterpieces!
Table of contents
Turning on guest access in Teams involves more than just flipping a switch. We break down Microsoft Teams guest access requirements, with step-by-step instructions on how to enable guest access at all four authorization levels.
Related reading: The ultimate guide to Microsoft 365 external sharing
With guest access in Microsoft Teams, you can allow external users to join existing teams and channels. Employees can invite anyone with an email address, such as Outlook or Gmail, to join their team, where they could then chat, video call, and edit documents together. It's almost like having them on your team, even if they're not!
Guest access in Teams is enabled by default. If your organization is just starting out in Teams and you haven’t configured any additional security settings yet, users can start inviting external users to join your teams as guests from the get-go.
So, whether you're setting up guest access for the first time, turning it back on, or just making adjustments, there are four authorization levels to understand in Teams.
Depending on your organization's needs, these different authorization levels provide you with flexibility in how you set up guest access. To help you get started, we created this handy guide to explain these levels and how to enable and manage guest access in Microsoft Teams at every authorization level.
Why guest access matters in Microsoft Teams
Microsoft Teams is great for chatting and working together with your colleagues. But what if you need to work with people outside of your organization? That’s where guest access in Teams comes in.
- Improved communication: Guest access makes working with people outside your organization easier. Team members can share ideas and updates directly in Teams, just like they do with coworkers.
- Project management: With guest access, you can invite them to chat, work on documents together, and join meetings. It keeps everyone in the loop and helps projects move forward.
- Greater reach: Guest access lets you work with a wider range of businesses. It means more ideas can flow, leading to even better projects.
Guest access vs. External sharing: What’s the difference?
On the surface, external sharing is making content available to someone outside of your organization. Behind the scenes, though, external sharing can mean very different things.
Depending on the needs of your organization, external sharing can be used to enable:
- Collaboration with guests in a document (via sharing link)
- Collaboration with guests in a site (via sharing link)
- Collaboration with guests in a team (via guest access)
If external sharing is disabled for your organization, then guest access in Teams will also be shut down.
That’s because guest access is a form of external sharing; when you invite a guest to join a team, you’re making content available to someone outside your organization.
Because Teams is built on top of Microsoft 365 Groups, you can manage guests in your Microsoft Entra ID, and the same compliance and auditing protections apply to the rest of Microsoft 365.
Essentially, guest access lets you maintain complete control while your data never leaves your sight.
Authorize guest access in Microsoft Teams
Remember when we said that guest access is a form of external sharing? Well, here’s why that’s important: you can’t turn on guest access in Microsoft Teams if external sharing is shut down entirely in your Microsoft 365 environment.
Because Microsoft Teams is essentially a unified Microsoft 365 user interface—integrating with other Microsoft apps and services like SharePoint, OneDrive for Business, and Microsoft 365 Groups—guest access features and capabilities in Teams can actually be managed through four different levels of authorization.
- Microsoft Entra ID: Controls guest experience at directory, tenant, and application levels.
- Microsoft 365 Groups: Controls guest experience at the Microsoft 365 Groups and Microsoft Teams level.
- Microsoft Teams: Controls guest experience at the Microsoft Teams level.
- SharePoint Online / OneDrive: Controls guest experience in SharePoint Online, OneDrive for Business, Microsoft 365 Groups, and Microsoft Teams.
Overview of guest access features in Microsoft Teams
Guest access in Microsoft Teams empowers you to collaborate seamlessly with external users, fostering better communication and streamlined project management. Here's a closer look at the key features and functionalities it offers, explained simply for beginners:
1. Team and channel access
- Channels are collaborative spaces within the team in Teams. They help organize conversations around a project, topic, or collective purpose.
- Shared channels are a type of channel in Teams that allows members of a team to collaborate with people inside and outside your organization, without having to be added to each other’s organizations as guests. External users can seamlessly access a shared channel site via Microsoft Entra B2B direct connect.
- Setting up shared channels requires some additional configuration by IT admins. For one thing, you need to configure cross-tenant access settings in Microsoft Entra ID—on both ends; your organization and the organization you’ll be collaborating with. Additionally, shared channels are automatically enabled, but you can configure certain settings such as guest access.
2. Communication and collaboration
- Chat and video conferencing: Facilitate real-time communication with guest users through chat functionalities and video meetings. This enables clear and efficient discussions, even with external participants.
- Co-authoring documents: Work together on documents in real-time with guest users. This allows for collaborative editing and ensures everyone is on the same page.
- File sharing: Share specific files and folders within a team with guest users. You can control their access level (view only, edit, etc.) to maintain data security.
3. Guest permissions and control
- Assign specific roles: Define the level of access each guest user has within a team. This could be limited to viewing channels, participating in chats, or even co-authoring documents.
- Manage guest invites: Team owners (often project managers or team leads) can invite, remove, and manage guest access permissions within their teams.
4. Guest review and expiration
- Guest expiration: You can set an expiration date for guest access in a team. It automatically removes their access after a certain period, ensuring guest permissions are reviewed regularly. (This is not enabled by default but can be configured by someone with a bit more technical knowledge, like Maya from your IT department.)
- Access reviews: When employees can invite external users to join and share files with them directly, regular access reviews are also required to ensure the right people can access the right content.
These collaboration features are made possible through Microsoft Entra ID. It's important to note that conducting comprehensive access reviews for Microsoft 365 often requires a Microsoft Entra ID Premium P2 license, as this service provides visibility into user access patterns.
Access review in Microsoft Entra ID just shows you who has access to what. When you conduct your review, you still need to know who should and shouldn't have access. This means you'll need to develop a process to keep up with group owners to get this information.
BONUS TIP: Third-party solutions like ShareGate offer tools that help you review guest access and external sharing, and don't require a Microsoft Entra ID Premium P2 license.
5. Security and compliance
- Data residency: Guest access ensures your data remains within the secure Microsoft 365 environment.
- Compliance and auditing: The same compliance and auditing protections that apply to your Microsoft 365 environment extend to guest access activities, providing a layer of transparency and accountability.
- Security features: While not directly managed through guest access settings, Maya (IT admin) can implement additional security features like Multi-Factor Authentication (MFA), Conditional Access, and Device Management to enhance the security of your Teams environment, including guest access.
6. Guest options and management
- Guest options in a team: Guests will have access to features based on the permissions assigned to them. This could include viewing channels, participating in chats, co-authoring documents, or even joining meetings (depending on the settings). Imagine a guest being invited to a specific project channel. They might only see and interact with information related to that project.
- Manage guest options: Team owners can control the permissions granted to guests, ensuring they can only access the information and features they need for their specific tasks.
Guest access in Microsoft Teams helps you collaborate securely and keeps projects moving forward. Remember, some features might need a tech person to set up, but guest access in Teams is still easy to use for secure collaboration.
Understanding the levels of authorization for guest access
Guest access in Microsoft Teams empowers collaboration with external users, but it's crucial to understand the different levels of control you have. In this section, we will discuss these authorization levels and their configuration details.
There are four key levels of authorization that determine a guest's experience in Microsoft Teams:
Level 1: Enable guest sharing in Microsoft Entra ID (previously Azure Active Directory)
This serves as the bedrock for employee identities and access management within Microsoft 365. Maya from IT configures Microsoft Entra ID (formerly Azure AD) to define the overall guest experience at the directory and tenant level. Policies set here apply to all Microsoft 365 services, including Teams.
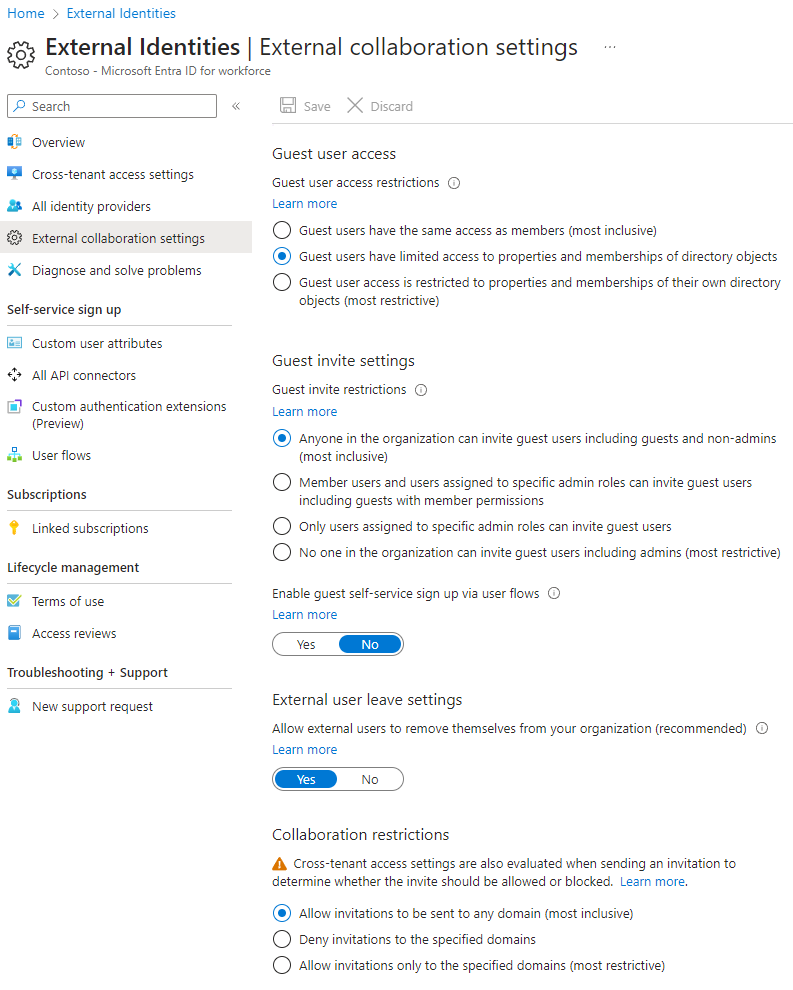
To enable guest sharing in Microsoft Entra ID:
- Sign in to Microsoft Entra External ID.
- In the left navigation pane, expand External identities.
- Select External collaboration settings.
- Ensure that either Member users and users assigned to specific admin roles can invite guest users, including guests with member permissions, or Anyone in the organization can invite guest users, including guests and non-admins are selected.
- If you made changes, select Save.
- 6. MFA (Optional Configuration) can be enforced for guest users by enabling it within the Security section of the Microsoft Entra ID admin center. This adds an extra layer of security by requiring a secondary authentication factor (like a code from a mobile app) during guest login.
To set up multi-factor authentication for guests:
- Open the Microsoft Entra admin center.
- Select the Protection section, then choose Conditional Access.
- On the Conditional Access | Overview page, select Create New Policy.
- In the Name field, assign a descriptive name to the policy for easy identification later
- Select the Users link.
- Choose Select Users and Groups, and then select the Guest or External Users check box.
- In the dropdown, select B2B collaboration guest users and B2B collaboration member users.
- Select the Target resources link.
- Select All cloud apps on the Include tab.
- Select the Grant link.
- On the Grant blade, select the Require multifactor authentication check box, and then click Select.
- Under Enable policy, select On, then select Create to save the policy.
Level 2: Enable Microsoft 365 Groups guest settings
The Microsoft 365 Groups authorization level controls the guest experience in both Microsoft 365 Groups and Microsoft Teams.
Since Microsoft Teams uses Microsoft 365 Groups for team membership, your Microsoft 365 Groups guest settings need to be enabled in order for guest access to work in Teams.
To configure your Microsoft 365 Groups guest settings:
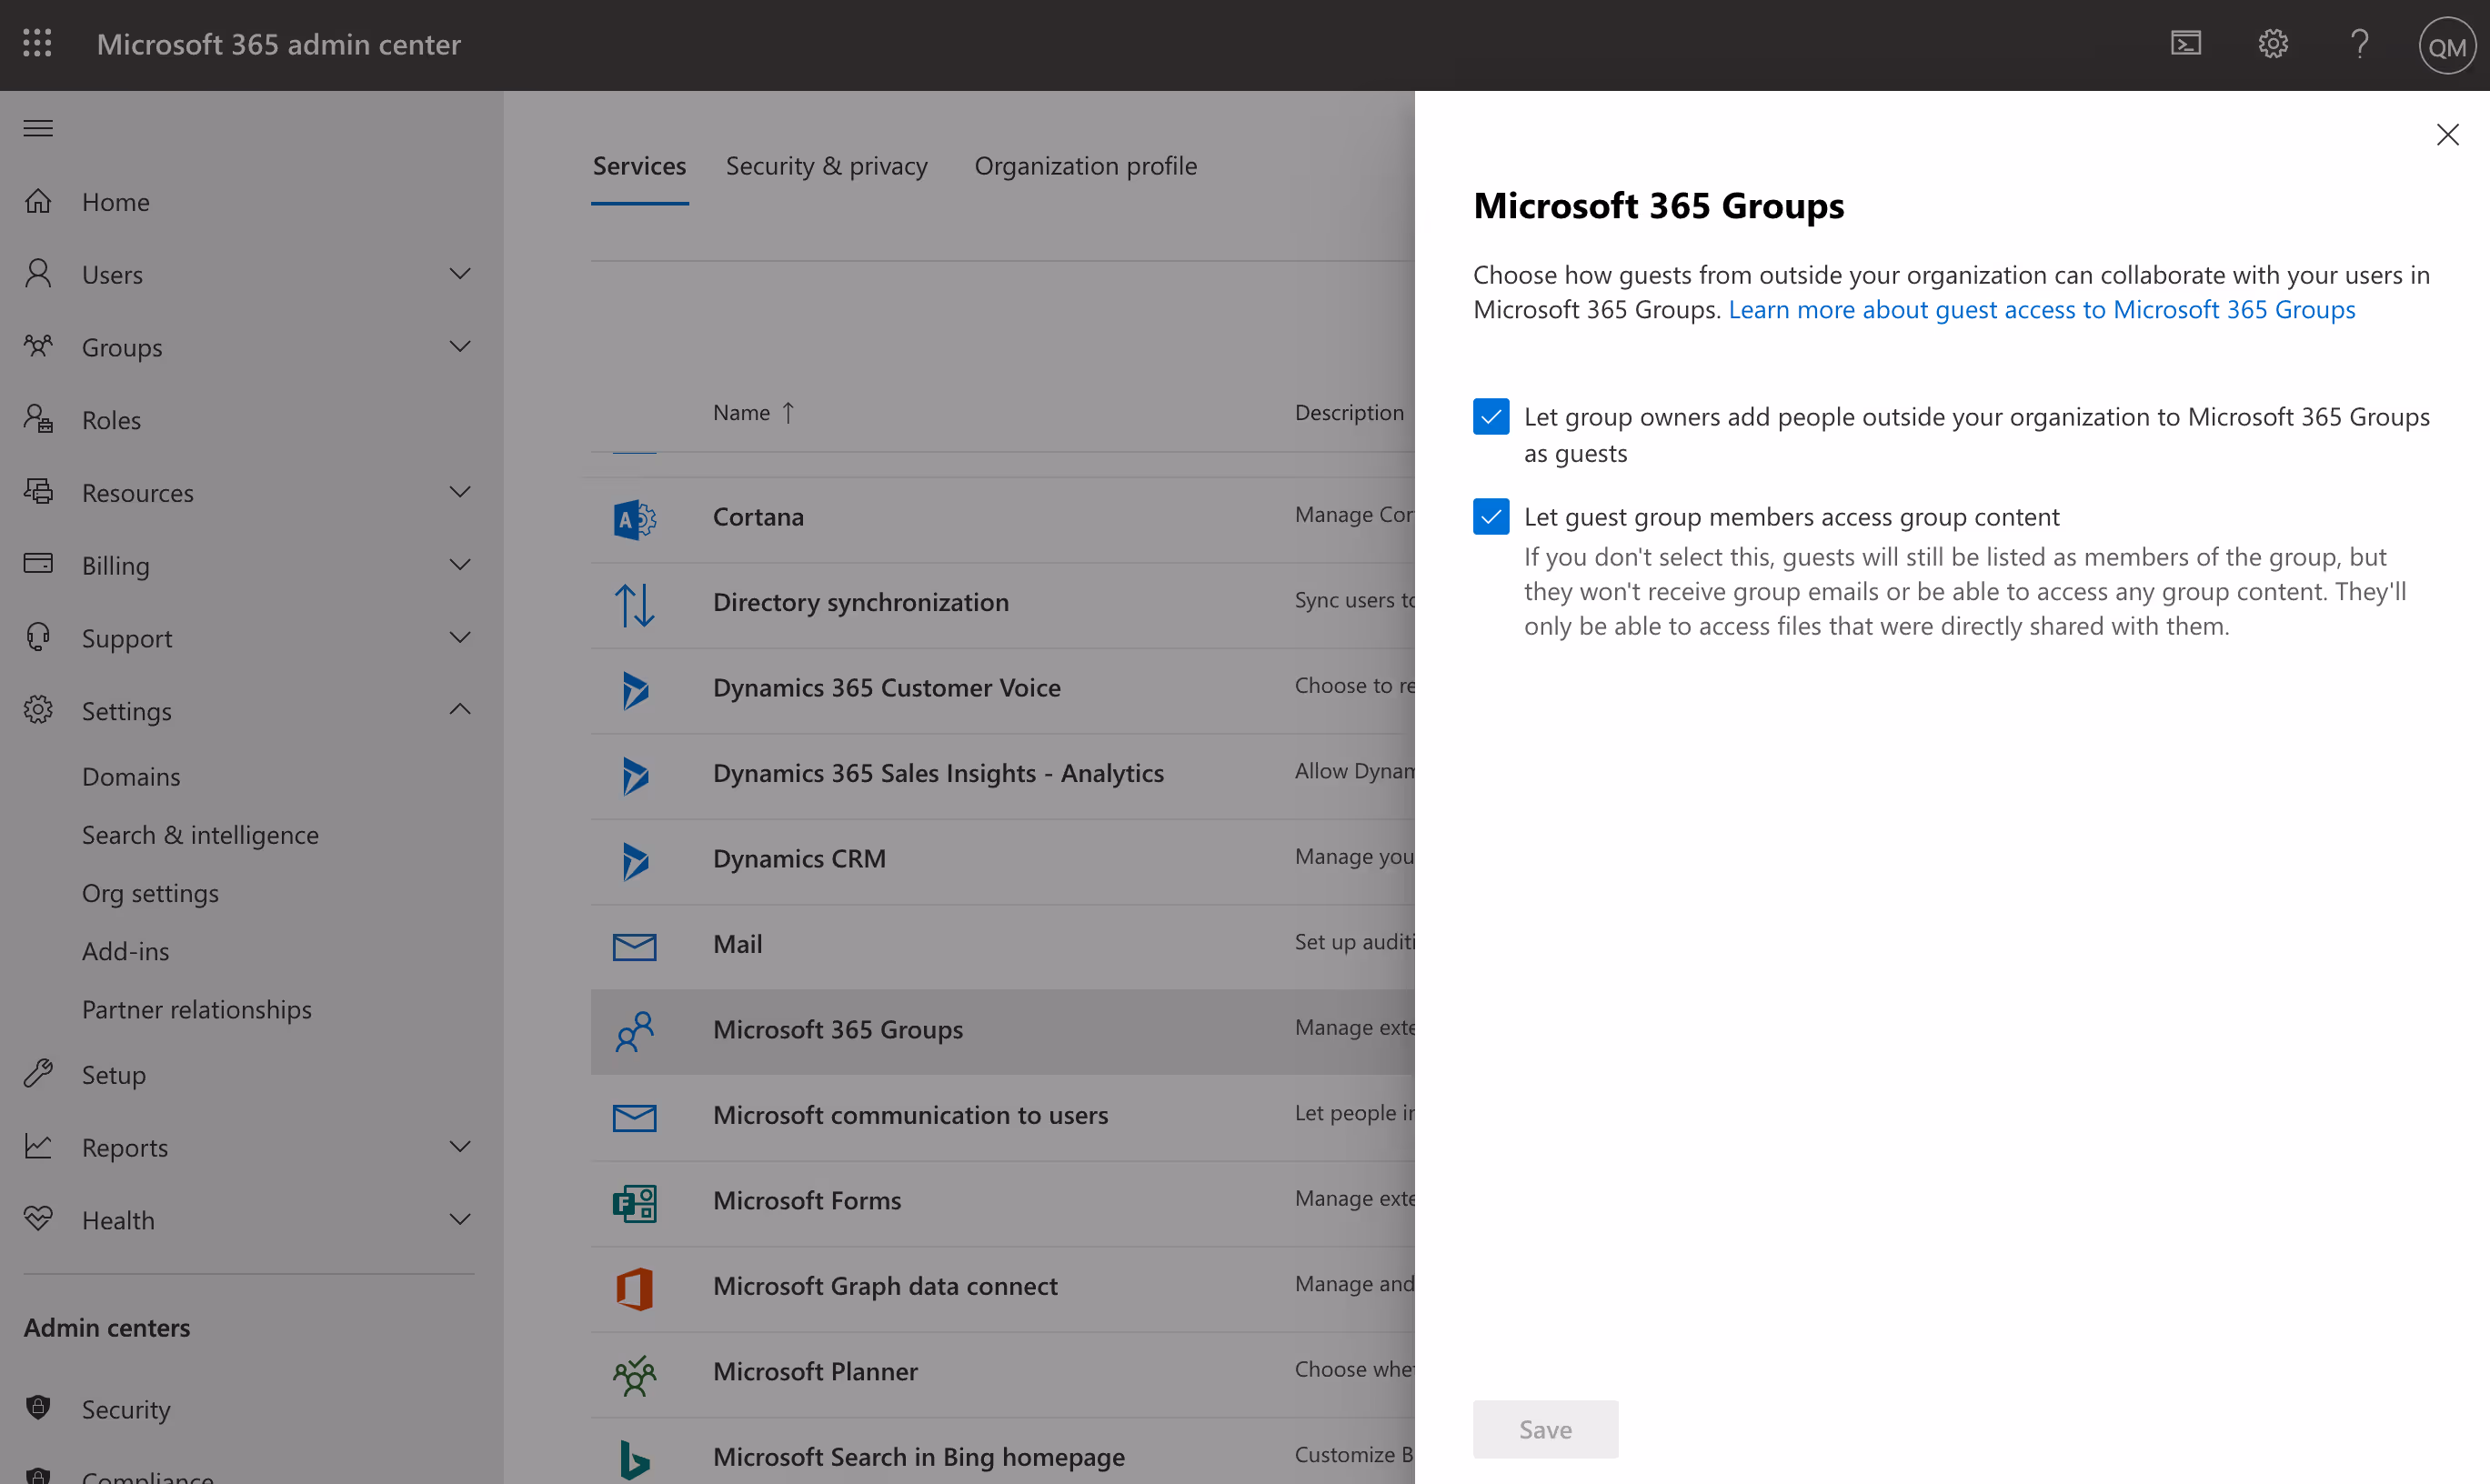
- Navigate to your Microsoft 365 admin center and expand Settings in the left navigation.
- Click on Org settings and select Microsoft 365 Groups from the list.
- Make sure the boxes are checked for both Let group owners add people outside your organization to Microsoft 365 Groups as guests and Let guest group members access group content, then click Save.
Note: If you don't select Let guest group members access group content, guests will still be listed as members of the group, but they won't receive group emails or be able to access any group content. They'll only be able to access files that were shared directly with them.
It could take up to 24 hours for the changes you made to take effect.
Level 3: Enable guest access at the Teams organization level
This one is a no-brainer: if you want to collaborate with guests in Microsoft Teams, it makes sense that you need to enable guest access in Teams.
Note: Guest access is turned on by default for any customers who have not already configured this setting. This aligns the Teams guest access capability with the rest of the suite, where the setting is already set by default.
If you want to disable guest access for your organization (although we don’t recommend it!), you will need to confirm that the guest access setting is set to “Off” instead of “On” after following the directions below.
This authorization level controls the guest experience only in Microsoft Teams. It’s important to know that Teams guest access settings are applied across your entire tenant.
To enable Teams guest access settings:
- Log in to your Microsoft 365 admin center as a global or Teams admin.
- In the left navigation menu, you might need to expand the options by clicking Show all. Once expanded, find and select Teams.
- In the Teams admin center, navigate to the left navigation pane again. Here, locate and select Users > Guest access.
- Ensure that the Allow guest access in Teams is set to On.
- While enabling guest access is the key step, there are additional settings you can explore and adjust based on your specific needs. Review these options and make any desired changes.
- Once you've enabled guest access and reviewed/adjusted the additional settings, click Save.
Level 4: Enable guest access to SharePoint Online (and OneDrive for Business)
Within the Microsoft 365 ecosystem, SharePoint is the tool for document management.
Case in point? When users access files or folders through Microsoft Teams, that content is actually stored in SharePoint or OneDrive for Business. Files and folders stored in a team’s document library or shared in a channel are actually stored in a SharePoint Online team site. And files attached to private chat sessions or a chat during a meeting or call are uploaded and stored in the OneDrive for Business account of the user who shared the files.
So, it should come as no surprise that the settings in your SharePoint admin center partly determine the guest experience in Teams. For guests to access a team’s shared files, folders, and lists, your SharePoint settings need to allow for sharing with guests.
This authorization level controls the guest experience in SharePoint Online, OneDrive for Business, Microsoft 365 Groups, and Microsoft Teams. The settings are applied across your whole tenant, including SharePoint sites connected to a Microsoft 365 group.
Good to know
- If external sharing is disabled at the SharePoint or OneDrive level (while guest access is enabled at the Teams level), external users will still be able to join a team as a guest.
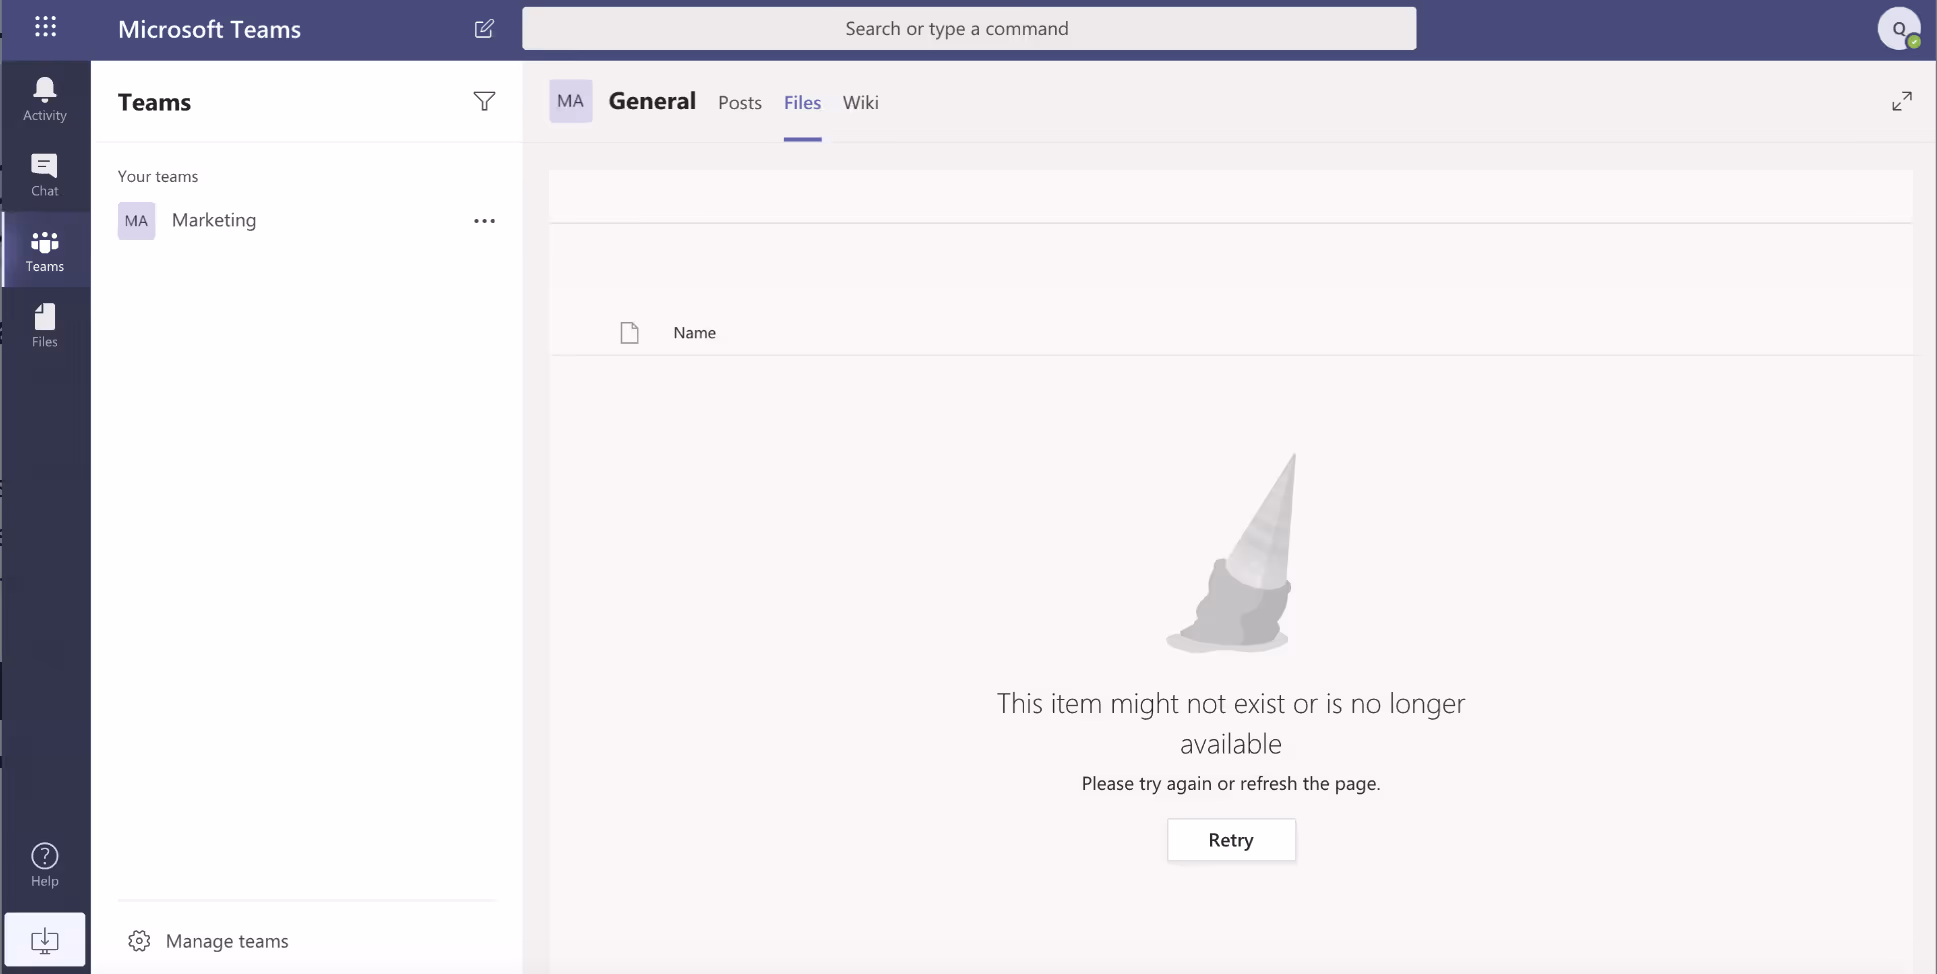
- If external sharing is disabled at the SharePoint level, external users can still join a team as a guest—but they won’t have access to any documents through the Files tab.
- Depending on how you’ve configured settings in Teams, those guests will still be able to do things like make calls, create channels, and chat. But they won’t have access to any documents through the Files tab, even if a user shares a document directly with them through a conversation.
So, if you want to collaborate on documents with guests in Teams, you need to enable external sharing at the SharePoint (or OneDrive, as the case may be) organization level.
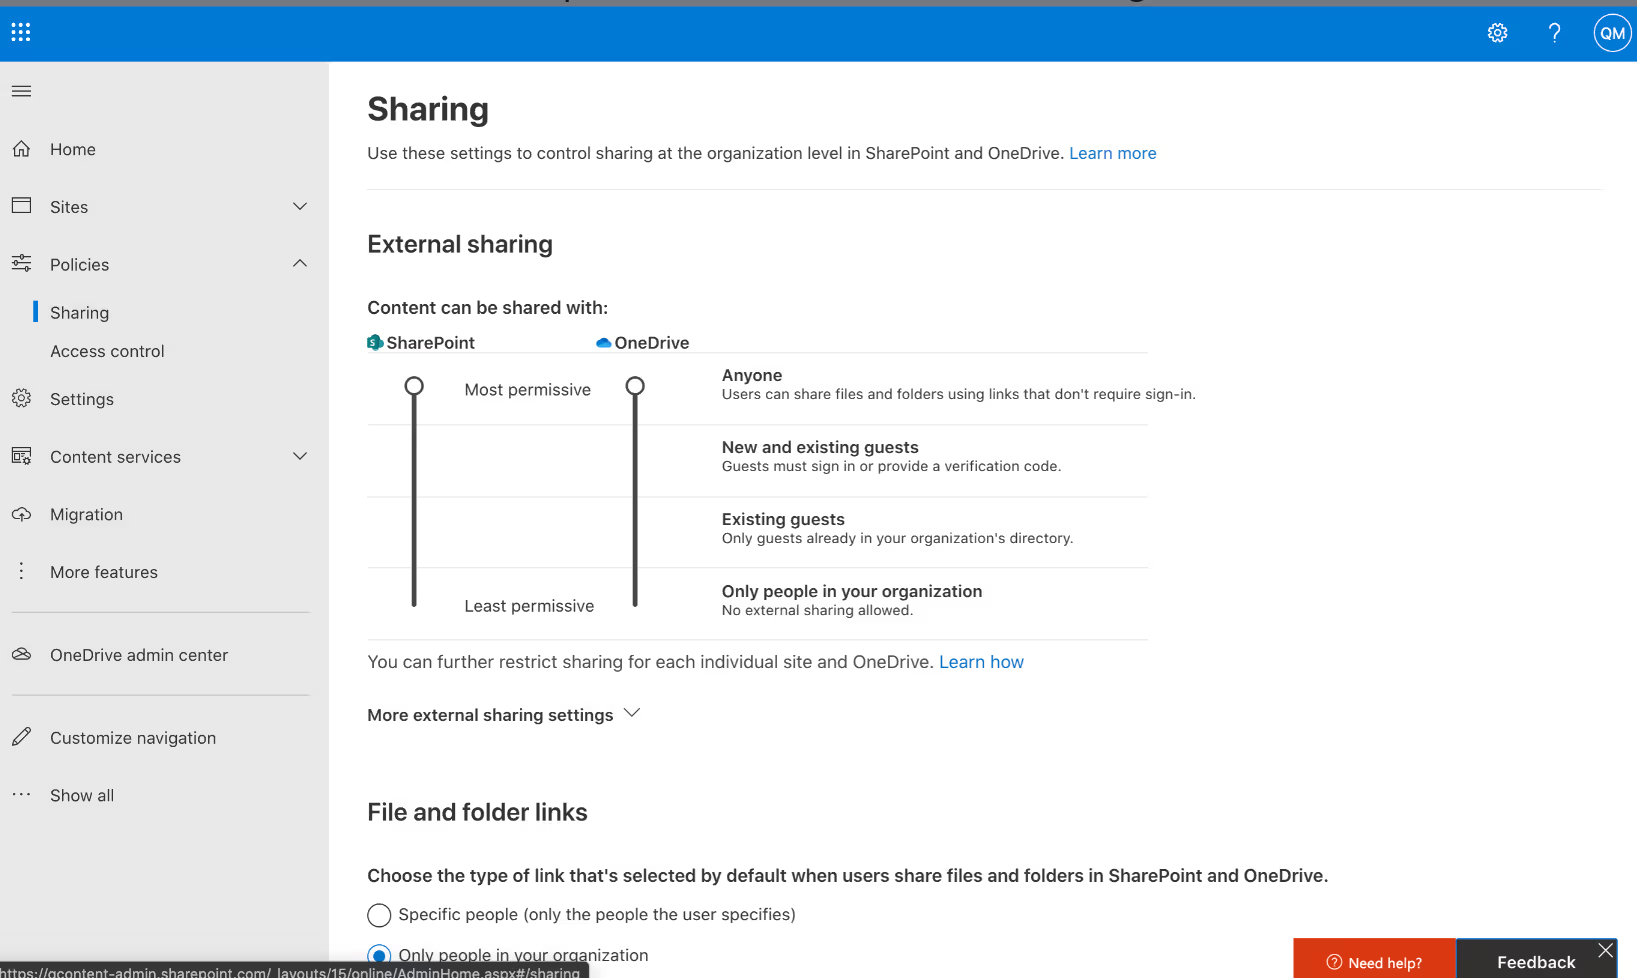
To allow external sharing at the organization level:
- Sign in to the Microsoft 365 admin center as a global or SharePoint admin.
- In the left navigation pane, select Show All (if needed) and then SharePoint.
- Under Policies, select Sharing.
- According to Microsoft, there are two ways to manage external sharing:
- Option 1: Using the sharing toggle switch (recommended)
a. Locate the Allow external sharing toggle switch.
b. Toggle the switch to On to enable external sharing.
- Option 2: Using permission levels (for more granular control):
a. Under External sharing, choose the desired permission level from the dropdown menu:
- Anyone (not recommended): Allows sharing with anyone, including unauthenticated users. (Use with caution!)
- Existing guests: Allows sharing with previously invited guests.
- Specific people: Allows sharing with specific external users by entering their email addresses.
- New and existing guests: Allows sharing with both existing and new guest users.
- Click Save.
Changes might take up to 24 hours to take effect.
We should point out that, by default, the sharing level for SharePoint and OneDrive is set to Anyone—which allows users to share files and folders with unauthenticated people.
Choose Existing guests or New and existing guests to make sure only authenticated external users can be granted access to shared content. Again, it can take up to 24 hours for changes to take effect.
Once external sharing is enabled at the organization level of your tenant, you can also manage external sharing settings on a site-by-site (i.e., team-by-team) basis. In a future blog post, we’ll discuss how to configure more granular sharing settings. Stay tuned!
Security considerations for guest access
Enabling guest access in Microsoft Teams unlocks valuable collaboration opportunities but necessitates careful consideration of security practices. Here are some key aspects to remember:
- Grant guests the least access needed for collaboration.
- Regularly review and remove inactive guest access.
- Educate team members on secure guest collaboration practices.
- Enforce Multi-Factor Authentication for all employees (internal and guests).
- Restrict guest access based on location, device, or compliance.
- Use Data Loss Prevention to prevent sensitive information sharing.
- Classify content and control access with labels.
- Track guest activity for suspicious behavior.
Best practices for managing guest access
While guest access in Microsoft Teams fosters collaboration, ongoing vigilance is crucial.
- Establish a regular schedule (e.g., monthly or quarterly) to review guest access permissions. This helps identify and remove inactive guest accounts or adjust permissions as project needs evolve. Dormant guest access can pose a security risk, so proactive review is essential.
- Implement security and compliance measures. A layered security approach safeguards your data and adheres to compliance regulations. Consider enforcing Multi-Factor Authentication (MFA) for all employees, including guests. Data Loss Prevention (DLP) also helps prevent sensitive information sharing, while Conditional Access policies restrict access based on location, device, or compliance status. These measures work together to create a secure and compliant environment for guest collaboration.
In conclusion, guest access in Microsoft Teams lets you collaborate with people outside your company. However, there are different levels of security control. This guide explains how to set it up, what to watch out for, and how to keep things secure.
FAQ
Let's address common questions you might have about managing guest access in Microsoft Teams.
How can ShareGate help in managing guest access?
ShareGate automatically finds externally shared links and guest access, so you don’t have to. This helps you see what company data is accessible to people outside your organization.
You can set policies about externally shared links and guest access based on team purpose and sensitivity, and you can also review these things at custom time intervals to make sure that the only people who have access to your data should.
How do I remove a guest from a team in Microsoft Teams?
There are two ways to remove a guest from a team in Microsoft Teams:
Method 1: using the Microsoft Teams desktop app
- Open the Microsoft Teams desktop app and navigate to the desired team.
- Click on the "More options" menu (three dots) next to the team name.
- Select "Manage team" from the menu.
- Under the "Members" tab, locate the guest you want to remove.
- Click the "X" next to the guest's name.
- Confirm the removal in the pop-up window.
Method 2: using the Microsoft Teams web app
- Sign in to the Microsoft Teams web app
- Navigate to the desired team.
- Click on the "More options" menu (three dots) next to the team name.
- Select "Manage team" from the menu.
- Under the "Members" tab, locate the guest you want to remove.
- Click the checkbox next to the guest's name.
- Click the "Remove" button at the top of the list.
- Confirm the removal in the pop-up window.
Can guests access all the features in Microsoft Teams?
No, guests in Microsoft Teams may have limited access to certain features, depending on how the organization has configured settings.
Here are some examples of features that might be restricted for guests:
- Recording meetings might be reserved for team members and not extended to guests.
- Initiating private chats with individual team members might be disabled for guests, limiting their communication to Teams channels.
- Highly sensitive content protected by sensitivity labels might be inaccessible to guests.