Microsoft 365 Groups vs. Teams vs. SharePoint explained
Table of contents
In order to master Microsoft Teams, you need to understand its interactions with Microsoft 365 Groups and SharePoint. We explain how the trio works together to enhance productivity and collaboration.
ShareGate's easy-to-use SaaS tools enable organizations to achieve more than ever before with Microsoft cloud technologies. In our guide to Microsoft Teams, we join forces with Microsoft MVPs to bring you up to speed on all things Microsoft Teams.
Microsoft 365 Groups is a membership service that allows users within your organization to collaborate across the Microsoft 365 suite. Groups works with the Microsoft 365 tools you already use, such as Outlook and Planner, to create an interface that is ideal for shared projects and group work.
Essentially, Groups lays the groundwork for productivity, and Teams builds on top of that foundation. When set up correctly, the result is an organized and efficient Teams environment where users can better communicate and collaborate to get the work done.
Groups lays the groundwork for productivity, and Teams builds on top of that foundation
To really take full advantage of Teams, you need to understand how it interacts with Microsoft’s cloud-based suite of productivity apps and services —a fact that became apparent as we developed ShareGate, our Teams management tool.
So, let’s take a closer look at how Microsoft 365 Groups, Microsoft Teams, and SharePoint interact and best practices for setting them up to keep your tenant running like a well-oiled machine.
What is Microsoft 365 Groups
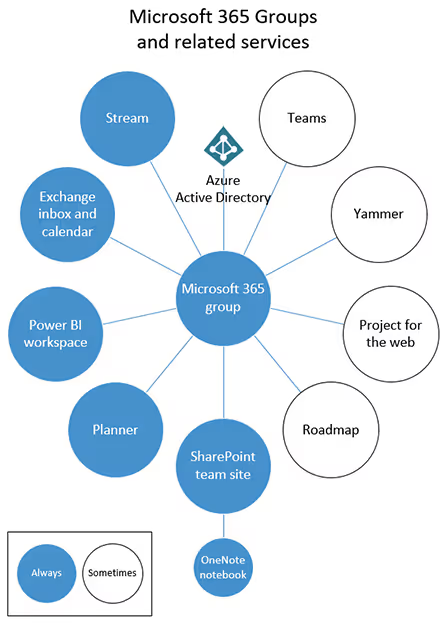
Microsoft 365 Groups functions as a membership service that powers the different Microsoft 365 teamwork apps such as Power BI, Stream, and SharePoint.
It’s a convenient way for you to set and manage users’ various roles, accesses and permissions for the teamwork apps. This means you can decide how you want users within a group to interact and collaborate within the different Microsoft 365 apps.
Fortunately, managing and creating a Microsoft 365 Group is easy with the third-party sidekick, ShareGate and its centralized interface.
Microsoft 365 Groups explained: How to use Groups and how they differ from Azure Active Directory security groups.
Groups lets you grant a group of people access to a set of associated collaboration resources.
These resources include:
- A shared Outlook inbox
- A shared calendar
- A SharePoint document library
- A Planner
- A OneNote notebook
- Power BI
- Yammer (if the group was created from Yammer)
- A Team (if the group was created from Teams)
- Roadmap (if you have Project for the web)
- Stream
By default, all users within your organization will have permission to create a group, unless you choose to disable self-service or limit this capability to specific members
Keep in mind that by limiting group creation, you are also preventing users from creating SharePoint sites, Planners, teams, Outlook group calendars, Stream groups, Yammer groups, Shared libraries in OneDrive, or shared Power BI workspaces.
We always recommend keeping self-service enabled to give your users a chance to make the most out of Microsoft’s entire productivity suite.
Groups was designed to:
- Save you from having to manually assign permissions for each resource you might use within your organization
- Simplify user collaboration by providing a select group of users easy access to shared resources
MVP tips: Getting started managing Microsoft 365 groups
In this short clip, Microsoft MVP Vlad Catrinescu (@vladcatrinescu) guides you on managing group creation. During his ShareGate webinar, Vlad gave useful tips on configuring and restricting who can create Microsoft 365 groups, as well as managing the group once it has served its purpose. Check it out:
https://www.youtube.com/watch?v=sEEBB231Iio
What is Microsoft Teams?
Microsoft Teams is a chat-based collaboration platform, also known as the “hub for teamwork” within Microsoft’s productivity suite.
This app is built on top of the Microsoft 365 Groups platform. Every time you create a team from Microsoft Teams, you’re also creating a group, in the back-end, that is associated with this team.
Alternatively, you can also create a team from an existing group knowing that the group’s membership, roles, and permissions will carry over to your newly created team.
Don’t worry, we’ll talk more about the many ways you can create a team in the next article in this series.
Teams is what users actually work in on a daily basis, but much of its functionality is derived from Microsoft 365 Groups and its associated services.
This is why Teams is sometimes referred to as the window into the Microsoft 365 productivity suite.
If you're new to Microsoft Teams and wondering what it is, Microsoft Teams is a powerful collaboration platform that allows teams to communicate and work together seamlessly.
How Microsoft Teams works with SharePoint
In order to use Microsoft Teams to its full potential, you need to understand how it interacts with SharePoint.
https://www.youtube.com/watch?v=BXxvCME8RW8
Microsoft MVP Jasper Oosterveld explains how Teams and SharePoint work together
As we previously mentioned, when you create a new team, a Microsoft 365 group gets created. In addition to this, a SharePoint site also gets created in the back-end.
While Teams allows users to communicate and collaborate in real-time, the various files and documents that are shared within a team aren’t actually stored there. This functionality is provided by SharePoint (and other services, as demonstrated in Microsoft Teams’ IT architecture).
As such, SharePoint enhances the overall Teams experience by acting as the centralized place where all the content and files that users share wihin the team are stored.
This enables users to collaborate on documents together and ensures that everyone has access to the things they need to get the job done, whenever they need it.
For example, you create the “Marketing team” in Teams to start talking to and working with your colleagues within the marketing team. Unbeknownst to you, a SharePoint site named “Marketing team” is created at the same time, which allows you and the other team members to collaborate on documents shared within the team. This is just one of the ways that SharePoint can be used.
Further Reading: How to use SharePoint Online and SharePoint Online best practices: tips, tricks & common issues to avoid
SharePoint file share: Microsoft Teams 'Files' tab
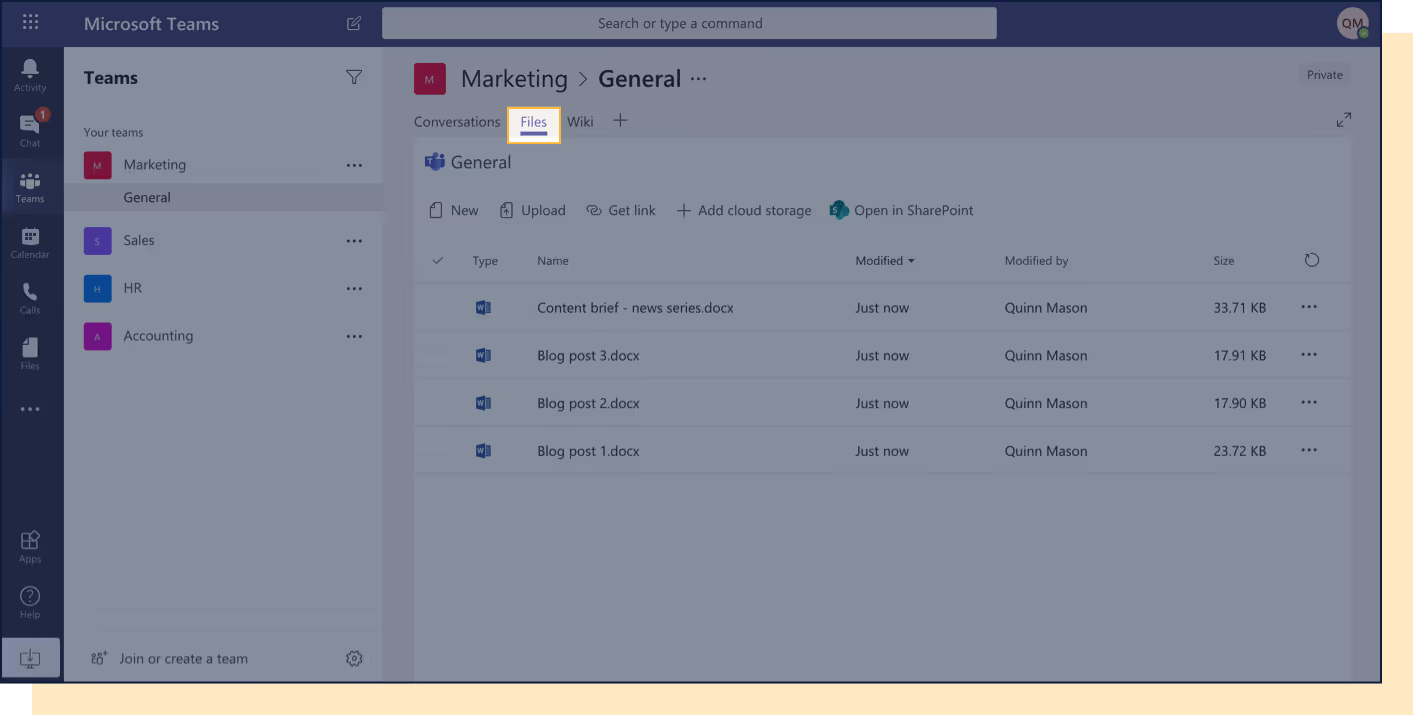
The Files tab displays all of a team’s files, which are stored in the SharePoint team site.
No surprise there, right? The out-of-the-box shared documents library is used to store the files, with each channel within the team getting its own folder.
You can work directly within the Microsoft Teams app with Files, or you can use SharePoint. That’s up to you, you're in charge!
So, to recap:
Teams is:
- A chat tool, first and foremost.
- A hub of productivity, representing a new way of collaborating.
Teams is not:
- A place to store files. The files you see stored in the Files tab aren’t stored there. It’s showing your team’s files that are stored on your team’s team site in SharePoint.
Good to know:
- Microsoft Teams and SharePoint are united by a Microsoft 365 group
- Every time you create a new team in Teams, you’re also creating a new Microsoft 365 group, Calendar, Planner, and SharePoint team site
- For every channel you create in Teams, a folder within a SharePoint document library is automatically created for you
- When you click on the Files tab within a channel in Teams, the files you see are stored in a document library on a SharePoint team site
So, to bring it full circle, Teams is the hub for teamwork, where the work gets done, SharePoint comes into the mix with its content storage and file sharing capabilities, and Groups brings it all together, uniting the two on the backend by managing how users can use these apps.
We hope that’s cleared up some confusion and that you now have a better idea of the relationship between Microsoft 365 Groups, Teams, and SharePoint. Next up, we’ll talk team creation and how to manage your active teams!
.jpg)


.svg)
%20(1).avif)












.jpg)


.png)
