Automating your SharePoint migration with PowerShell: Move file shares to SharePoint Online
.svg)

.avif)
The simplest way to migrate to Microsoft 365
Move your content efficiently with minimal downtime & maximum data fidelity!
Book demo%20(1).avif)
Master Hacks: Migrate like a pro
Check out our video series to help you turn migration projects into masterpieces!
Table of contents
**A while back, we heard about a migration project Stephen had using ShareGate and some custom PowerShell scripting. We asked him if he’d write an article detailing his script so that everyone could benefit from it.**
Migrating data is often, if not always, a complex project. So, each migration must be approached humbly. If you fail in one phase, you’ll most likely have to start the migration over again. The most complex and time-consuming phase is when you analyze data from a legacy system and map it to the destination system.
If the destination system is SharePoint, questions like these might come up: Which data types should be used for metadata? Should we use a list or a library? How do we navigate correctly to our data?
The ShareGate PowerShell cmdlets simplify SharePoint Online migration by automating repetitive migration tasks, ensuring metadata integrity, and maintaining permissions. These tasks can occur when doing simple migrations several times. Automating parts of this process minimizes the amount of errors.
A common migration task is moving documents from a Windows Server file share to a SharePoint Online document library, ensuring metadata and permissions are preserved. This is what I use it for, which is why I created the script below.
If you want to automate your Microsoft admin tasks, try these PowerShell script examples to help you boost productivity.
The SharePoint migration process
For the sake of this blog post, let’s assume we have all files from the legacy system as documents—Excel, Word, PDF files etc. When I migrate documents from file shares to SharePoint, my process goes as follows:
- Upload documents to a SharePoint test server
- Modify the documents using some custom script
- Copy the document library to the correct site as illustrated below.
- Use a custom non-PowerShell script to change created by and modified by on the documents.

Uploading documents to SharePoint
Let’s dive into the script! The first step is to import the ShareGate module, connect to your site and document library as described here.
Next, we need a CSV file to map metadata fields, ensuring the migrated files retain their original attributes in SharePoint Online. To do so, setup your profile and export it to the file system.
Next, we need to specify a path to where ShareGate should save our migration report file.
The final set of variables looks like this:
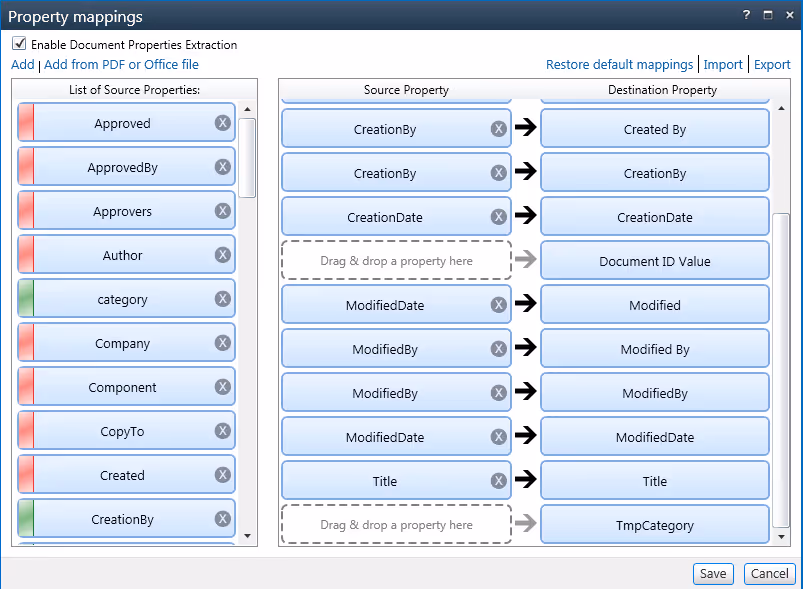
Setting the mappings
Now, we can set the mappings. For this I’ve created a function called SetMappings. I’ll set the property mappings to the file we specified in the previous step and set the group “Unresolved user or group” to System Account.
If we don’t do this, the migration will give an error on items where a User or Group could not be found. The script for this function looks like this:
Importing documents to SharePoint
With the destination SharePoint Online site and document library configured, we run PowerShell commands to upload files, track migration status, and generate a log file for troubleshooting.
If you’re migrating from SharePoint on-premises, you might need additional configurations. For that, we use the Import-Document command and Export-Report command.
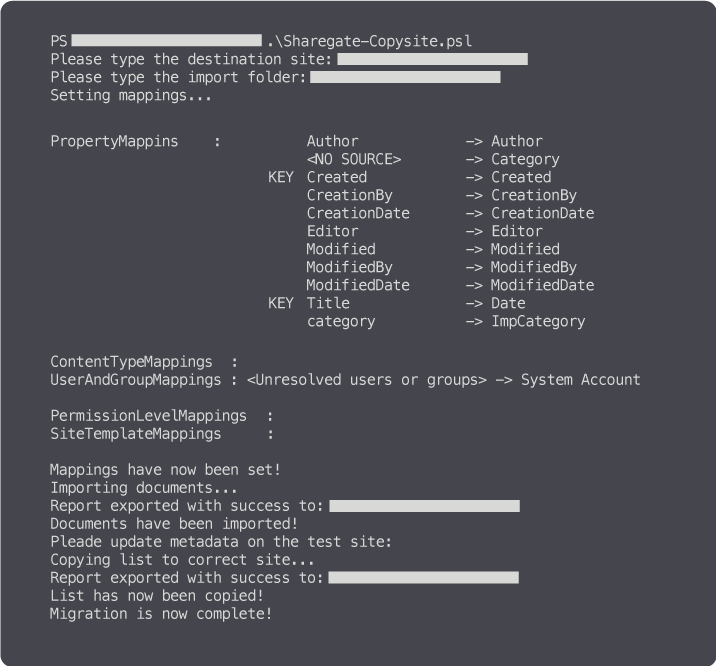
Here’s the result:
Copying the SharePoint document library
Once we’ve imported the documents to the Document Library on the test server, we’ll run any custom scripts on the set of documents manually. This could be to change some metadata or change the content of the documents.
We want to move specific files to OneDrive for individual user access or restructure them within a SharePoint site for better organization. Afterwards we can copy the document library using the function Copy-List, ensuring any linked apps continue to function properly, and then export the result.
If you’re migrating from a SharePoint server, ensure you’ll have compatibility with the newer SharePoint Online features.
Now put it all together. The script run in the command window looks like this:
This PowerShell script can be customized using PnP PowerShell to automate site collection creation, manage permissions, and enhance migration automation. IT admins with Microsoft certifications in SharePoint administration can probably find other ways to optimize this process.
You can also use PowerShell to migrate specific docs directly into SharePoint lists. One improvement could be to delete and create the document library each time the script is run, ensuring a fresh migration session for each execution. This could be run from the server, but in most cases you want to create client-side scripts.
Enhancing the script with exception handling for ShareGate PowerShell cmdlets ensures a smoother SharePoint Online migration, reducing errors and improving automation. You can also apply a predefined template to maintain consistency across site collections.
I’m not a PowerShell guy, and I haven’t really used PowerShell before, but the scripting part was pretty straight forward. I used the command index a lot and it was really helpful.
To sum it all up, for repetitive tasks in a simple SharePoint migration—such as moving documents from file shares to a Document Library using the same set of metadata—the Sharegate PowerShell commands minimize the amount of errors. Define the migration process and automate it by specifying the source location in your PowerShell script to ensure accuracy when moving data.
For more articles on file share migration you can read the following blogposts