How to schedule your SharePoint migration using PowerShell and ShareGate

Table of contents
Learn what makes a migration tool really work when moving to SharePoint Online, how to schedule a PowerShell migration task, and automation tips.
Your organization may want to adopt a new data hosting platform to empower your team to be more efficient.
But you know that embarking on a migration project means you’ll have to conquer some pretty complicated hurdles. Luckily, you can tackle them like a champ when the right tools back you.
If you’ve ever wished you could automatically execute a SharePoint migration, you’re in luck: ShareGate makes this possible!
With integrated PowerShell commands, scheduling your SharePoint migration is easier than ever.
This bite-size (but filling) 'how-to' will explore the essential elements that make a migration tool effective and beneficial for businesses transitioning to SharePoint Online. Additionally, you will discover the straightforward process for scheduling a PowerShell migration task and the top practices for automating the migration.
Steps to scheduling your SharePoint migration task
Are you excited to enhance your collaboration and productivity by leveraging the power of SharePoint Online? Of course you are. Perform these tasks to experience smooth scheduling and a successful migration with PowerShell:
- Write your PowerShell script in a text file using the ShareGate commands for using PowerShell effectively.
- Save your script as a .ps1 file. Don’t forget where you saved it!
- Create a new task in Windows Task Scheduler and apply the PowerShell script.
- Run your script, and BOOM… you’ve set up your new automated SharePoint migration task!

Jump to this ShareGate doc for detailed steps on scheduling your PowerShell migration.
Creating the PowerShell script in a text file
In our example, we want to schedule a SharePoint list to migrate after business hours to minimize the traffic created during the working day.
- First, we will create our PowerShell script in a text file.
- The script will first contain the ShareGate module we must import.
- Next, we will create variables for both the source ($srcSite) and the destination ($dstSite) to create the connection to the ShareGate SharePoint migration tool.
- Now that we connected the source and the destination sites, we will create a variable called $toCopy that will copy the SharePoint source list.
- Finally, we must copy the list to the destination site, which in our case is the variable $dstSite.
Saving the script for our SharePoint migration
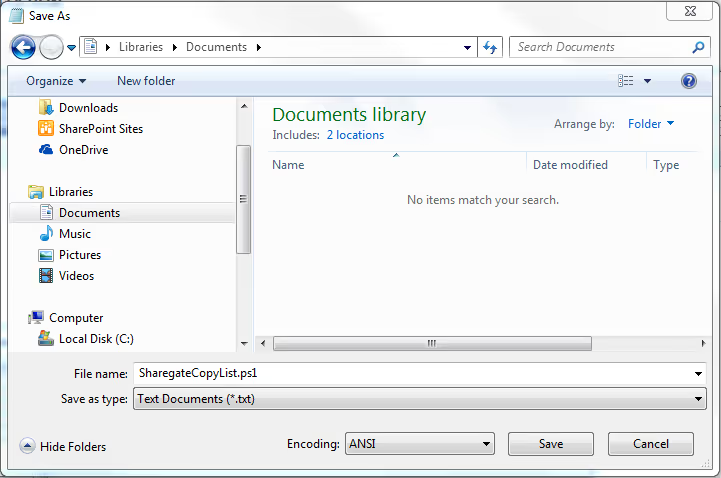
When saving the script, we want to ensure we give the file an identifiable name ending with .ps1. The .ps1 extension will allow the file to run when called by PowerShell. In our example, we will save the script on the C:.

Scheduling the SharePoint PowerShell script with Task Scheduler
To recap we have created the PowerShell script that will connect to both the source and destination sites, copy the source list and then place it into the destination site. We then saved the file with the extension (.ps1) to run in the PowerShell console.
How to automate a migration session with Task Scheduler
Windows Task Scheduler has many functions and default settings that can be optimized, including the ability to automate scripts based on the information provided. Let’s check it out:
- We will begin by launching Task Scheduler located in the Administrator Tools on the SharePoint server. We will then select “Create Task…” on the right-side actions panel.
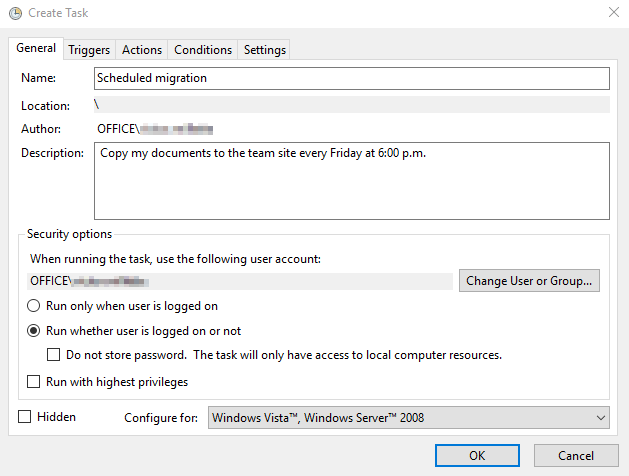
- Let’s give the task a name. In our example, we went with “ShareGate List Migration” and typed a description accurately labeling the task.
- Next, we will set up the triggers by selecting the Triggers tab.
- The trigger section tells the task when to run by frequency, date, and time. Although we did not select the advanced settings, you will notice a few selections can be checked if needed. In our example, we will only set the task to run once at a certain time and day. We must make sure we check 'Enabled' before clicking OK.
- Moving on to the Action tab, we will tell the task what script to run. The Action will be to “Start a program.” In the Program/script field, we want to enter PowerShell.exe as our program of choice. Lastly, we must enter the script’s location under the Add arguments field.
- The last tab we will modify is the Conditions tab. The only change we want to make here is to uncheck “Start the task only if the computer is on AC power” and check “Wake the computer to run this task.” Click 'OK' in the New Action box and click 'OK' again in the Task Properties box.
Once you have modified all the tabs, you should see your newly created task in the Task Scheduler’s list of tasks. You should also notice the migration status is labeled 'Ready,' along with a few other items such as the triggers, next run time, and last run time.
That wasn't so bad, right? A quick and easy way to automate your SharePoint migration is by scheduling a task through a few PowerShell commands and the Windows Task Scheduler!
Best practices for automating your SharePoint migration using Powershell
Migrating vast amounts of data to SharePoint Online may seem like an uphill battle. But automation can make the process feel like a walk in the park (assuming you like walks in the park). Here are best practices to test your automation tool’s performance and ensure an effortless transition:
Plan and prepare
- Start by planning and preparing your migration session thoroughly so you can streamline the automation process.
- Assess your existing SharePoint environment or traditional file share, including your mission-critical data, current user permissions, and customizations, to know which items you want to migrate.
- Identify the specific migration task you want to automate.
- Prioritize effective data mapping to ensure proper adjustments from your current data source location to fit your target environment in SharePoint Online.
- Check out our helpful guide to producing a powerhouse SharePoint migration plan so you can hone your planning strategy.
Use PowerShell scripts
- Choose a trustworthy tool with potent features, like PowerShell, to make automation more straightforward.
- Use SharePoint-specific PowerShell scripts to automate tasks and migration sessions like setting up new sites, moving document libraries, and managing user permissions.
- Harness PowerShell’s ability to automate repetitive or duplicate tasks, so you can speed things up and lower your odds of making mistakes.
Test and validate
- Develop a comprehensive testing plan to validate the automation scripts, setting the stage for an execution that meets your expectations.
- Test your migration process in a controlled environment, preferably a test SharePoint environment.
- Identify errors and vulnerabilities to avoid negatively impacting users and damaging or losing data.
- Regularly validate the migrated files and content. Compare it against the source to ensure your data stays accurate, complete, and high-quality.
- Check and validate user permissions, access privileges, and customized workflows.
Accelerate your SharePoint migration with PowerShell and ShareGate
Your business will manage your data more easily when you use PowerShell—paired with ShareGate—to fast-track your migration to SharePoint Online, even for automating from traditional file shares. To better handle large-scale and complex migrations, these tools will help you keep your data in mint condition throughout the process.
Make sure you take the time to develop a meticulous plan covering all of your bases, including executing a solid data cleanup pre-migration, maintaining your governance and cybersecurity needs along the way, and testing and validating your automation scripts to prevent disruptions.
Say goodbye to wasting time on bureaucratic, technical tasks! Embracing these solutions will allow your team to focus on collaborating and innovating, putting your organization ahead of the curve.


.svg)
.avif)
%20(1).avif)


