6 Power Automate examples for Microsoft 365 that will save you time and effort

Table of contents
Power Automate is a user-friendly tool for creating cloud flows that automate everyday tasks. Check out 6 Power Automate examples that can make a difference as an IT admin, and learn how to up your Microsoft 365 management game.
Microsoft Power Automate is a no-code/low-code iPaaS solution that's part of the Microsoft Power Platform line of products (it was called Microsoft Flow until 2019). As its name suggests, it helps IT save precious time by automating repetitive manual tasks. It's also an excellent tool for streamlining your business processes and ensuring productivity.
With Power Automate, you create automated workflows between apps and services—including Microsoft 365, of course—to easily synchronize files, collect data, and schedule notifications. In this article, we'll present six workflows that serve as perfect Microsoft Power Automate examples to simplify your IT admin life.
Streamline the approval processes with Microsoft Teams
The Power Automate flow creates an automated approval process whenever a new document is uploaded to SharePoint, aggregating and automating all approvals. This is the perfect solution to avoid your team sending you a message manually whenever they need to request permission for a document upload.
With this flow, you can automatically receive an approval request from your team members via Teams whenever a new document is uploaded to SharePoint. You can also automate a notification to team members when the approval is completed. Here's how to create it:
Step-by-step instructions
- From the Microsoft Power Automate menu, select the Templates section.
- Search for the template "Start approval for new documents and notify via Teams".
- In the smaller box, connect SharePoint, Teams, Approvals, Office 365 Users, and Outlook to Power Automate.
- In the SharePoint box, fill out the site address and the library where the file will be created.
- In the Teams box, determine the team and channel where people will be notified.
- Create the notification message or go with the default one.
- In the Approval box, create a title for the process and select the approval type (either if all notified people should approve the file or just the first to respond) and the assignees.
- In the Condition box, set up "Response is equal to Approve".
- In the final Teams box, set up a notification for the approval/rejection of the document by choosing the team and channel to receive it and customizing the message to be sent.
Never miss a Power BI alert again: Automate email notifications
Like Power Automate, Power BI is part of the Microsoft Power Platform. It's a powerful data visualization and analysis tool, ideal for businesses looking into making more informed decisions.
When integrated with Power BI, Power Automate allows you to create business process flows and automate repetitive tasks, such as sharing relevant Power BI alerts with stakeholders by email. Let's see how you can do it:
Step-by-step instructions
- From the Microsoft Power Automate menu, select Templates.
- Search for the "Send an email to any audience when a Power BI data alert is triggered" template.
- In the smaller box, connect Power BI and Mail to Power Automate.
- In the Alert ID box, select a Power BI data alert.
- Enter one or more email addresses to receive the notifications.
- Create the notification message or go with the default one.
- Click "Save" or add a new step.
Auto-archive items in SharePoint with Power Automate
Managing SharePoint files and documents can be a daunting task if done manually. With this Power Automate flow, you can create an auto-archive process, avoiding clutter and making life easier for users searching for relevant information in their environments.
Before you create this flow, go through this list to check a few prerequisites:
- Create a target SharePoint list to serve as your archive.
- Use an account that accesses both your source and target lists.
- Add custom columns for "Created by (author)" in the archive, so you save the information about the original content creator.
- Make sure the Content Types match between both libraries.
Step-by-step instructions
- From the Microsoft Power Automate menu, select "Create".
- Select "New flow -> Scheduled cloud flow".
- Name your new flow.
- Select the start date and the recurrence of your flow and click on "Create".
- Select "New Step," and then the "Compose" data operation.
- Click on the "Inputs" field and, in the new window, select "Expression".
- Now you'll create a reference date in the past for your auto-archive flow. In the Function field, type addToTime (utcNow(), -xx, 'yyyy'), where "utcNow" stands for the current time, "xx" is a value number, and "yyyy" is your measure of time. For example, if your reference in the past is 12 months ago, "xx" must be replaced with "12" and "yyyy" with "Months." That means your flow will automatically archive items at least 12 months old.
- Select "New Step" and then the "Get items" action.
- Enter your site address and your source SharePoint list.
- Select "New Step" and then the "Create item" action.
- Copy fields such as Title and Description to create a new item in the archive (target) list.
- Select "New Step" and then the "Delete item" action.
- Use the current item's ID to delete it from the source SharePoint list.
Create a Power Automate trigger for when a Planner task is completed
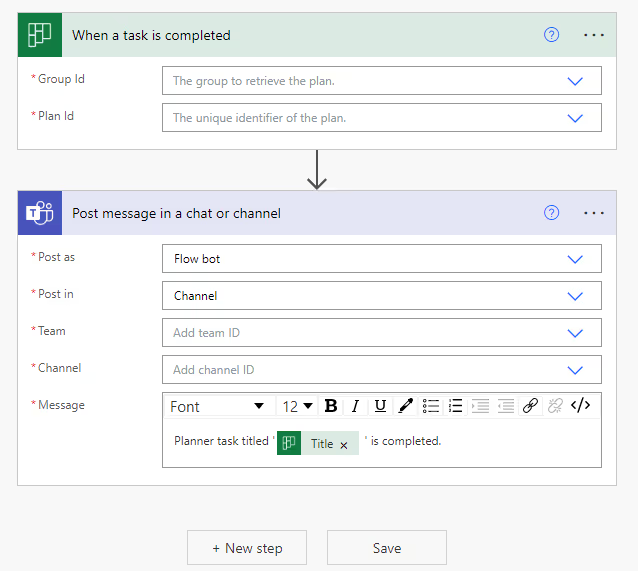
Microsoft Planner is the main solution for task management in many organizations, boasting intuitive features, and is built for collaboration. With Power Automate, project managers and team leads have even more resources to ensure everyone's on the same page—like this flow, which triggers automatic notifications when a Planner task is complete. Let's see how it goes.
Step-by-step instructions
- From the Microsoft Power Automate menu, select "Templates."
- Search for the "Post message in Teams when a Planner task is completed" template.
- In the smaller box, connect Planner and Teams to Power Automate.
- In the Planner box (green), select the group to retrieve the plan and the plan ID.
- In the Teams box (blue), select "who" will post the notification (either a bot or a user), where (in a channel, a bot chat, or a group chat), and the team and channel to receive it.
- Create the notification message or go with the default one.
- Click "save."
- To create another notification for the same plan, click on "New Step," and a new Teams box will appear.

Set up a Power Automate flow that posts adaptive cards to Microsoft Teams
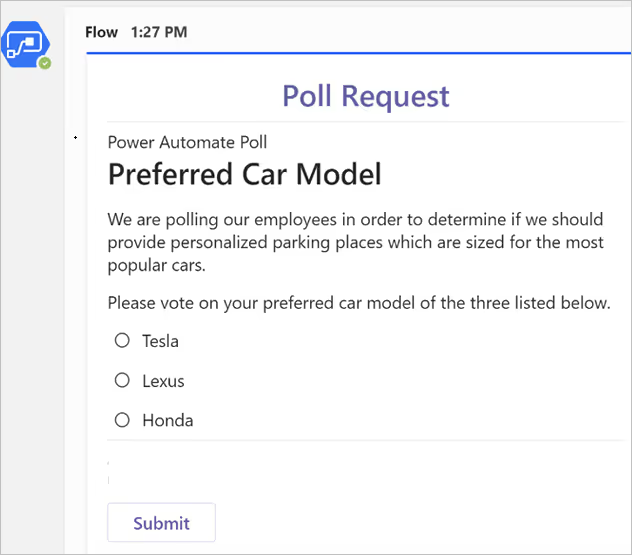
This is one of our favorite Microsoft Power Automate examples on this list. Adaptive cards are a platform-independent method to share data blocks without needing CSS or HTML customizations.
Adaptive cards are created in JSON and are converted into native UI when sent to hosts, such as Microsoft Teams, automatically adjusting to them. They create attractive virtual experiences, such as polls, forms, and snippets, helping boost engagement or generate leads.

Here's how to create a flow to share adaptive cards on Teams—in this case, to send users a poll:
Step-by-step instructions
- From the Microsoft Power Automate menu, select "Create".
- Select "New flow > Instant cloud flow".
- Name your new flow.
- Select "Manually trigger a flow" as the trigger.
- Select "Create" and then "New Step".
- Search for Teams and select the "Post an adaptive card to a Teams channel and wait for a response" action.
- Select the team and channel where you'd like to post the card.
- Paste your JSON into the message box. The JSON will depend on the action you want people to take: let's say you want to send out a poll about what movie franchise people prefer: Harry Potter, Star Wars, or the Marvel Universe. In this case, see below the basic JSON you'll want to paste.
- Replace all placeholder text in the JSON, like this:
- Header Tagline Text -> Power Automate Poll.
- Poll Header -> Favorite Movie Franchise.
- Poll Question -> Hello! Please vote on your favorite movie franchise from the following list.
- Latin text -> Add the reason or context of why you're conducting this poll, such as "We're polling our staff to choose a theme for our company's anniversary party."
- Choice 1 (replace in both places) -> Harry Potter.
- Choice 2 (replace in both places) -> Star Wars.
- Choice 3 (replace in both places) -> The Marvel Universe.
- Select "New Step" and then search for and choose one "Send an email" action.
- Select the email recipients.
- Configure your body text, replacing the words in curly brackets "{}" with dynamic tokens.
- Run a test and confirm if your flow has no errors and if it's been posted in the right Teams channel. For more troubleshooting options, check the Microsoft documentation.
{
    "$schema": "https://adaptivecards.io/schemas/adaptive-card.json",
    "type": "AdaptiveCard",
    "version": "1.0",
    "body": [
        {
            "type": "TextBlock",
            "text": "Poll Request",
            "id": "Title",
            "spacing": "Medium",
            "horizontalAlignment": "Center",
            "size": "ExtraLarge",
            "weight": "Bolder",
            "color": "Accent"
        },
        {
            "type": "TextBlock",
            "text": "Header Tagline Text",
            "id": "acHeaderTagLine",
            "separator": true
        },
        {
            "type": "TextBlock",
            "text": "Poll Header",
            "weight": "Bolder",
            "size": "ExtraLarge",
            "spacing": "None",
            "id": "acHeader"
        },
        {
            "type": "TextBlock",
            "text": "Lorem ipsum dolor sit amet, consectetur adipiscing elit.
Integer vestibulum lorem eget neque sollicitudin, quis malesuada felis ultrices.
",
            "id": "acInstructions",
            "wrap": true
        },
        {
            "type": "TextBlock",
            "text": "Poll Question",
            "id": "acPollQuestion"
        },
        {
            "type": "Input.ChoiceSet",
            "placeholder": "Select from these choices",
            "choices": [
                {
                    "title": "Choice 1",
                    "value": "Choice 1"
                },
                {
                    "title": "Choice 2",
                    "value": "Choice 2"
                },
                {
                    "title": "Choice 3",
                    "value": "Choice 3"
                }
            ],
            "id": "acPollChoices",
            "style": "expanded"
        }
    ],
    "actions": [
        {
            "type": "Action.Submit",
            "title": "Submit",
            "id": "btnSubmit"
        }
    ]
}
Provisioning Microsoft Teams with Power Automate
Automating team creation for your users is one of the key elements to reducing your IT ticket queues and making everyone happy and productive. At the end of this article, you'll see how ShareGate helps you do it with ease and security, but for now, check out this flow and see your provisioning options with Power Automate:
Step-by-step instructions
Step 1—Creating your provisioning form
- From the Microsoft Forms menu, select "New Form."
- Create a title for your form.
- Select "Add New" -> "Text" and create both the Title and Description fields in your form for users to fill out with their teams' information.
- If needed, you can add other fields to your form, such as a Choice item (for people to select between public and private teams, for example).
Step 2—Creating your flow
- From the Microsoft Power Automate menu, select "Create".
- Select "New flow -> Automated cloud flow".
- Name your new flow.
- Select "When a new response is submitted" as the trigger.
- In the Microsoft Forms box, select your form ID from the dropdown menu.
- Select "New Step," search for "form," and click on the "Get response details" action.
- Provide the form ID and the response ID from the dropdown menu.
- Select "New Step," search for "approval," and click on the "Start and wait for an approval" action.
- Select "Approve/Reject - First to respond" from the dropdown menu.
- Select a title and an assignee for the approval request.
- Select "New Step" and click on the Condition control.
- In the Condition box, set up "Outcome is equal to Approve".
- In the "If yes" outcome, choose the "Create a team" action.
- Add the team's title and description.
- To test your flow, go back to your form, click on Preview, and submit a response.
Easy task automation with Microsoft Power Automate and ShareGate
With these Microsoft Power Automate examples, you'll see the difference automated workflows can make in your daily work. You'll want to check some of ShareGate's features for even greater efficiency and security. Take a look:
- Automation—ShareGate helps you get your governance plan rolling by automating policies and everyday IT tasks. You can also engage with owners to clean up, organize, and govern your tenant.
- Provisioning—Enabling and managing a self-service environment is easier than you think with ShareGate as your sidekick. Become more agile, collaborative, and secure with our custom Teams provisioning templates and the end-user app. Provide users with the freedom they need, with your guardrails in place.
- Reporting—Monitor usage and understand what's happening in your SharePoint and Teams with our pre-built and custom reports. Use ShareGate's reporting features to pinpoint issues and take direct action to customize and fix them fast.
Before you go, what about exploring our free Microsoft 365 maturity assessment tool? It's easy: give us 15 minutes of your time (tops), and we'll give you some valuable management tips to take your Microsoft 365 environment to the next level. Ready? Let's go!


.svg)
.avif)
%20(1).avif)


.jpg)
.jpg)
