.svg)

.avif)
Put your Microsoft Teams management on auto-pilot
We identify potential issues so you can course-correct them before they escalate!
Free trial%20(1).avif)
Master Hacks: Migrate like a pro
Check out our video series to help you turn migration projects into masterpieces!
Table of contents
Power Automate lets you automate your Microsoft Teams activities and connect Teams to other apps and services, saving you from spending time on repetitive tasks. We walk through examples of how to automate tasks in Teams with Power Automate and the recommended security controls.
As an IT professional, efficiency is your middle name (or at least it’s what you strive for—when your tools allow it). Unfortunately, when overseeing so much information in your Microsoft Teams environment, it’s all too easy to fall into a trap of slow inefficiencies.
Depending on the information you’re looking for, it can be confusing and time-consuming, which means you’re spending less time focusing your attention where it’s needed most, like security and risk management, and more time on tedious tasks. What you need is automation.
Related: 6 Power Automate examples that will save you time managing your Microsoft Teams
Enter Power Automate—your efficiency savior! Your automation hero! You get the idea. It (shocker) automates repetitive tasks between apps and services in your Microsoft 365 environment, from SharePoint to email, to Teams, and more.
What is Power Automate?
You may know Microsoft Power Automate by a different name—the iPaaS platform was called Microsoft Flow until November 2019. Rebranded as part of the Microsoft Power Platform line of products, Power Automate’s moniker says it all—it’s all about the automation of repetitive tasks.
Repetitive tasks are the bane of every IT admin’s existence. Power Automate helps you synchronize files, get notifications and collect data thanks to automated workflows between your favorite apps and services.
How to install the Power Automate app in Microsoft Teams
Once you’re sold on Power Automate for Teams, the first step is to install the app. Here are step-by-step instructions.
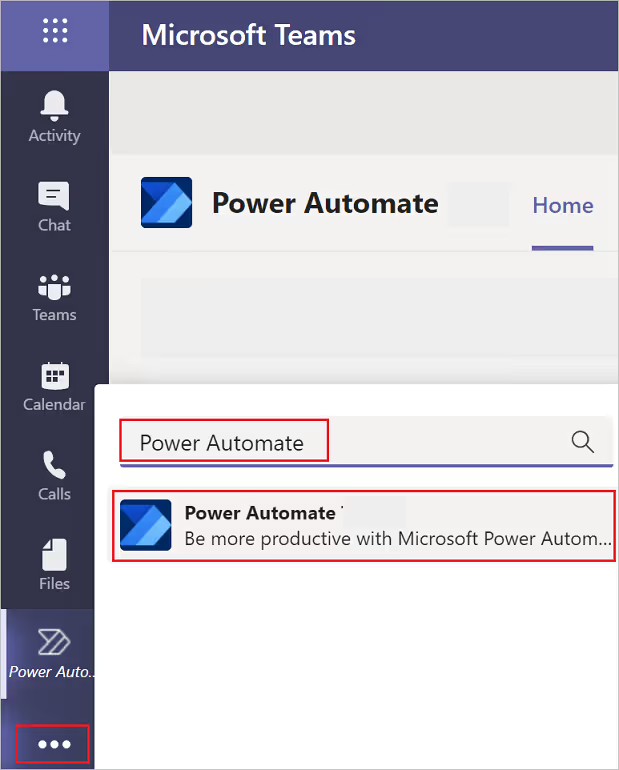
- In Microsoft Teams, select More added apps (...).
- Search for "Power Automate."
- Then select the Power Automate app.
- Click Add for me.
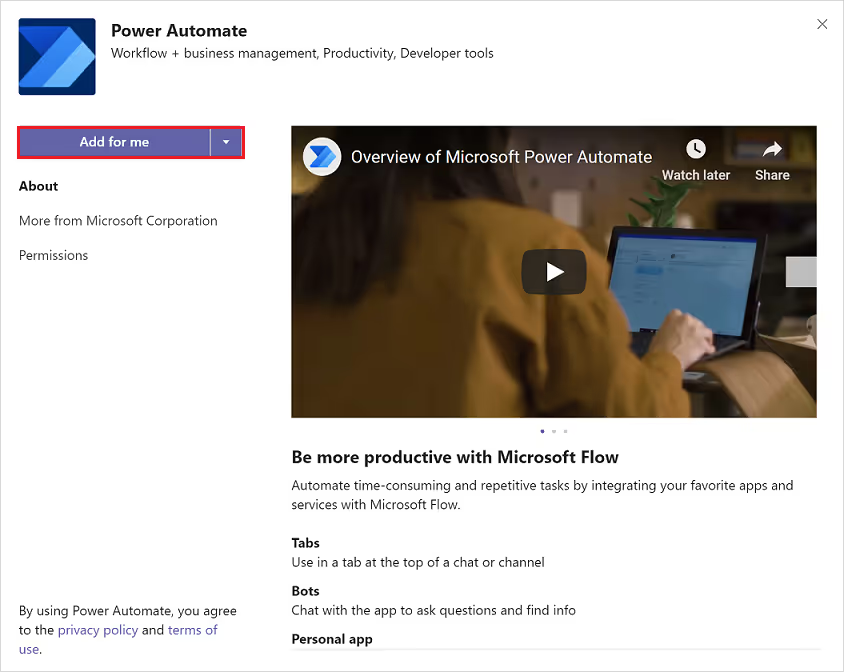
- Select your country/region, and then click Get started.
- Pin the Power Automate app in Teams for quick access: Right-click on Power Automate in the pane on the left side, then click Pin.
How to create flows in Microsoft Teams
There are a few different ways you can create flows in Microsoft Teams:
- Power Automate Flow Templates: The Microsoft Teams store offers built-in templates, making it easy to find a variety of flow templates to meet your needs and get started quickly.
- Team overflow messages: Create flows from the Teams message overflow menu.
- Power Automate app: Use the Power Automate app to create flows from templates or from scratch. Dataverse for Teams allows you to develop custom apps and workflows within Teams, which gives you the power to develop exactly what you need.
Flows created from these entry points can be managed directly in Power Automate or the Power Automate app in Teams.
Check out the official Microsoft documentation to follow the steps to creating flows in Teams.
These security controls provide protection when using Power Automate
Power Automate is on by default; which means that when it's enabled, it’s automatically connected with all Microsoft 365 applications. For an organization that requires stricter security controls, this level of flexibility might be a concern without a solid security plan.
There are security controls that you can put in place, such as creating a conditional access policy and leveraging data loss prevention (DLP).
Conditional access policies allow you to grant or block access based on user, group, device, or location, providing you with more control. The easiest way to describe conditional access policies is if-then statements; if a user wants to access a resource, then they must perform an action.
Data loss prevention policies (DLP) are another important security tool. By categorizing connections as either Business Data only or No Business Data allowed, DLPs impose limitations on the types of connectors that may be used with one another. So if a connector is added to the business data-only group, it can only be used in the same application with other connectors from that group. Power Platform administrators can create universally applicable policies.
5 ways to automate tasks in Microsoft Teams with Power Automate
By integrating Power Automate with Teams, there are many efficiency solutions at your fingertips! Here are a few examples:
1. Create an approval process to improve document management
You can streamline your team’s approval processes by aggregating and automating all approvals. You can automatically approve files by building the flows with Power Automate and Approvals app connector, which you can access in the app bar in Teams. Here are some use cases:
- Your team won’t have to worry about sending you a message whenever they need your approval. You can automatically receive an approval request from your team members via Teams whenever a new document is uploaded to SharePoint.
- You can automate a notification to team members when the approval is completed.
- You can take it a step further and automate a message in teams whenever an item in SharePoint is modified. It’s an efficient way for team members to keep track of progress and be ready for quick approvals.
Take it further: 6 fundamentals of SharePoint content management
2. Create a Teams creation workflow to keep things on track
Microsoft Teams is a powerful tool that facilitates collaboration within an organization, but it can be a nightmare for IT admins if users are given free rein over team creation without any control.
Ideally, all users in an organization should be able to create new teams. If not, they might use unapproved tools, and IT will encounter larger security issues. Uncontrolled team creation can lead to sprawl from a lack of proper governance and end-user training. You'll wind up with many infrequently used or inactive teams.
This results in inefficiency. Just think about how this might affect you and your end users, making it hard to find resources. Keeping your tenant organized and easily searchable is essential.
That’s why automation is a game-changer. The idea behind automating team creation is to bring order to the process by using guardrails, while also enabling end users to create their own spaces and improve productivity. For example, you can build an automated workflow for team creation with Power Automate and Microsoft Forms.
3. Create adaptive cards for sharing and collecting information on Microsoft Teams
Adaptive Cards are a platform-independent way to share and display blocks of data without the hassle of complicated CSS or HTML customizations.
You create adaptive cards in JSON with publicly exchangeable integrations for cloud services and apps. The JSON is converted into native UI when it is sent to a particular host, like Microsoft Teams, and then automatically adjusts to that host. Therefore, wherever information needs to be displayed as part of a business process or automation, process designers can now provide standard UI patterns.
Adaptive cards are ideal for information sharing between Microsoft Teams and other services because they can adapt to their host.
The actions currently available to create adaptive cards for Teams are:
- Directing content to Teams members or AAD users:
- Post your own adaptive card as the flow bot to a specific user: This procedure posts an adaptive card to a specific user as a flow bot. During the flow run, the card will appear in the recipient's chat and/or activity feeds after you supply an email address for the recipient. To receive these particular Adaptive Cards, a user does not need to be a member of a Teams instance. In this scenario, only the URL buttons work by rerouting to the flow's set URL.
- Post an adaptive card as the flow bot to a Teams user, like above, and wait for a response: This procedure, similar to the one described above, posts an adaptive card as a flow bot to a specified user. What’s different here is that the flow executed in this instance won't resume until the recipient answers the inputs requested in the card. Once the recipient replies, the flow continues. The flow returns dynamic content for one answer per recipient and card.
- Directing content to Teams channels:
- Post your own adaptive card as the flow bot to a channel: This procedure posts an adaptive card to a certain Teams channel as a flow bot. In this scenario, a Teams instance and the channel where the card will be uploaded will be requested. To post an adaptive card there, the flow-maker will need access to the Teams instance. In this scenario, only URL buttons work by rerouting to the flow's set URL.
- Post an adaptive card as the flow bot to a Teams channel, like above, and wait for a response: This procedure, as in the example above, posts an adaptive card as a flow bot to a certain Teams channel. However, in this instance, the flow won't resume until a channel user responds to any inputs requested by the card. Once someone in the Teams channel answers, the flow will continue, but it will only return dynamic content for one response per responder and card.
4. Provisioning Microsoft Teams using Power Automate
The following describes how to build a provisioning pipeline using Power Automate's native features.
SharePoint list: Serving as a database, a SharePoint list helps you keep track of all requests and their approval statuses. This provides all administrators with a solid overview of what is happening in the Microsoft 365 environment.
End-User Request Interface: Ensure that the appropriate permissions are set up so your end users can submit requests for new teams via the SharePoint list. For your end users to add or alter current requests, they must, at the very least, be members of the SharePoint Visitors group with Contribute access on this particular SharePoint list.
Also, ensure that the item-level permissions are set up such that each user may only see their own requests
Automated cloud flow: Power Automate will assist in automating every step of this process, from obtaining consent from the chosen list of individuals to forming a team in the event of a favorable response. It streamlines the process by eliminating the need for numerous emails and interactions between the requestor and approver.
Or - use our tool to provision your teams even faster than manually with Power Automate.
5. Get proactive
Power Automate offers helpful automation capabilities that integrate with Microsoft Teams, but they can also be complex and time-consuming. And if you’re going to allow users within a team in Microsoft Teams to invite guests, you need to think about how you can ensure that sharing and collaboration are secure. This is an important consideration when assessing Power Automate’s potential security vulnerabilities.
ShareGate wants to help IT teams manage Microsoft 365 more efficiently by empowering end users to create and manage their own resources with IT’s guardrails in place, automating repetitive and time-consuming tasks, and guiding the implementation of governance best practices. The best part? ShareGate is an out-of-the-box solution with a user-friendly UI that can help you find and fix issues in minutes.