Configure guest access settings for secure collaboration in Microsoft Teams

Table of contents
Enabled guest access in Microsoft Teams? Great! Make sure you have a strategy in place to govern its use according to your company mandates. Configure these settings and policies to help keep sensitive company data secure.
Your users are more likely to get the most out of Microsoft Teams if you keep self-service enabled. That's what we learned when we first deployed Teams here at ShareGate–user adoption improved after we removed unnecessary friction.
In fact, that realization led to our stance that you should keep self-service enabled, and ended up being central to the creation of ShareGate, our Microsoft 365 management solution.
Brush up on Teams governance best practices for secure collaboration.
While some Microsoft 365 admins think it’s better to disable external sharing entirely because of the risks associated with it, this can lead to other problems: employees turning to unapproved tools such as wetransfer, Box.com, or Google Drive to send documents—the dreaded shadow IT.
It's better to enable guest access in Teams alongside policies and rules to control its use. We recommend configuring the following settings based on your organization's needs.
Step 1: Determine how external collaborators can be invited into your tenant
Before you get into the nitty-gritty of what guests can and can't do, you need to think about how they'll be invited into your tenant in the first place.
Global admins can manage guest access experience in Teams at the highest level through your Azure Active Directory.
To configure settings for external users across your entire organization:
- Log in to the Azure portal and click Azure Active Directory in the left navigation pane
- Click User settings
- Under External users, select Manage external collaboration settings
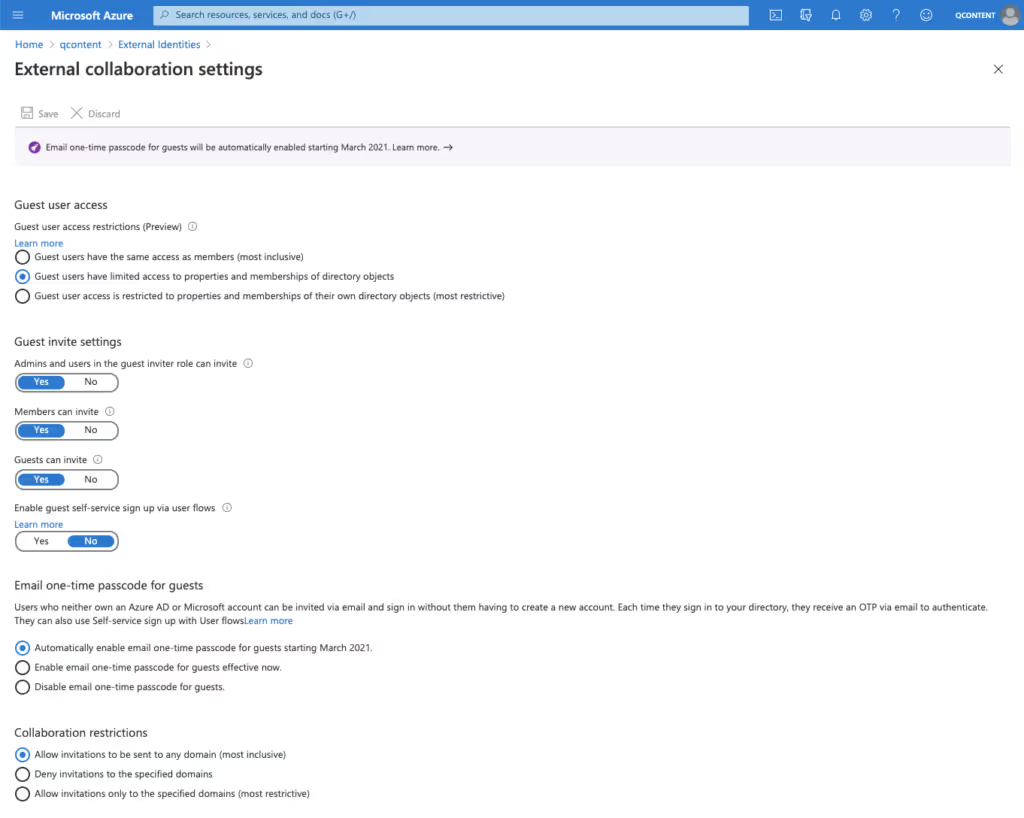
From here, you can enable the following policies:
Guest user access restrictions (Preview)
This policy determines permissions for guests in your directory.
- Guest users have the same access as members is the most inclusive option–it provides guests with the same access to Azure AD resources as member users.
- Guest users have limited access to properties and memberships of directory objects (default setting) disallows guests from permissions for certain directory tasks, like enumerating users, groups, or other directory resources.
- Guest user access is restricted to properties and memberships of their own directory objects is the most restrictive option and only allows guests to access their own directory objects.
Admins and users in the guest inviter role can invite
Select Yes to allow admins to invite guests. Selecting No disables guest access in Teams completely.
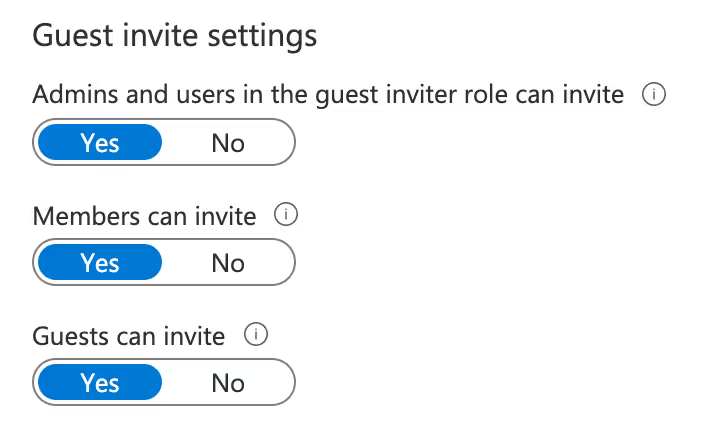
Members can invite
Choose Yes to allow all of your organization’s users to invite guests to collaborate on resources like SharePoint team sites that are secured by your Azure AD.
Selecting No means that only admins can invite guests, and it will limit the guest experience for teams that have non-admin owners: they’ll only be able to add guests once an IT admin has added them in Azure AD.
Guests can invite
Select Yes if you want to allow guests to invite other guests.
Enable Email one-time passcode for guests (Preview)
You can choose whether or not you want your users to be able to email a one-time passcode (OTP) to allow newly invited guests without an Azure AD or a Microsoft account (who also can’t log in with Google federation) to be authenticated via an email code roundtrip as a first-factor authentication.
As of November 2021, Enable email one-time passcode for guests is the default option. This setting allows users to send email OTP.
The more restrictive option, Disable email one-time passcode for guests, prevents users from sending email OTP.
Collaboration restrictions
These settings let you control where guest invitations can be sent according to domain.

Allow invitations to be sent to any domain is the most inclusive option, meaning users can send invitations to external users without restrictions.
The other two options are more restrictive, allowing or blocking invitations to specific domains. Choose Deny invitations to specific domains if you want to allow users to share freely for the most part—they’ll only be blocked from sending invites to the domains you choose.
If your employees only ever need to collaborate with a handful of other businesses, you could select Allow invitations only to the specified domains to limit external collaboration to users in those domains. This is the most restrictive option, so in most cases we’d recommend choosing one of the first two.
Discover permission roles in Microsoft Teams to help you gain a deeper understanding of each role's capabilities, enabling you to effectively manage your team and collaborate seamlessly.
Step 2: Configure guest access in Microsoft Teams
Let’s assume you’ve already turned on guest access in the Teams admin center (Org-wide settings > Guest access). If you’re just starting off in Teams and haven’t explicitly disabled it, remember that as of February 2021, guest access is enabled by default.
If you've already disabled it and want to enable guest access, follow the instructions in our blog post on how to enable guest access in Teams.
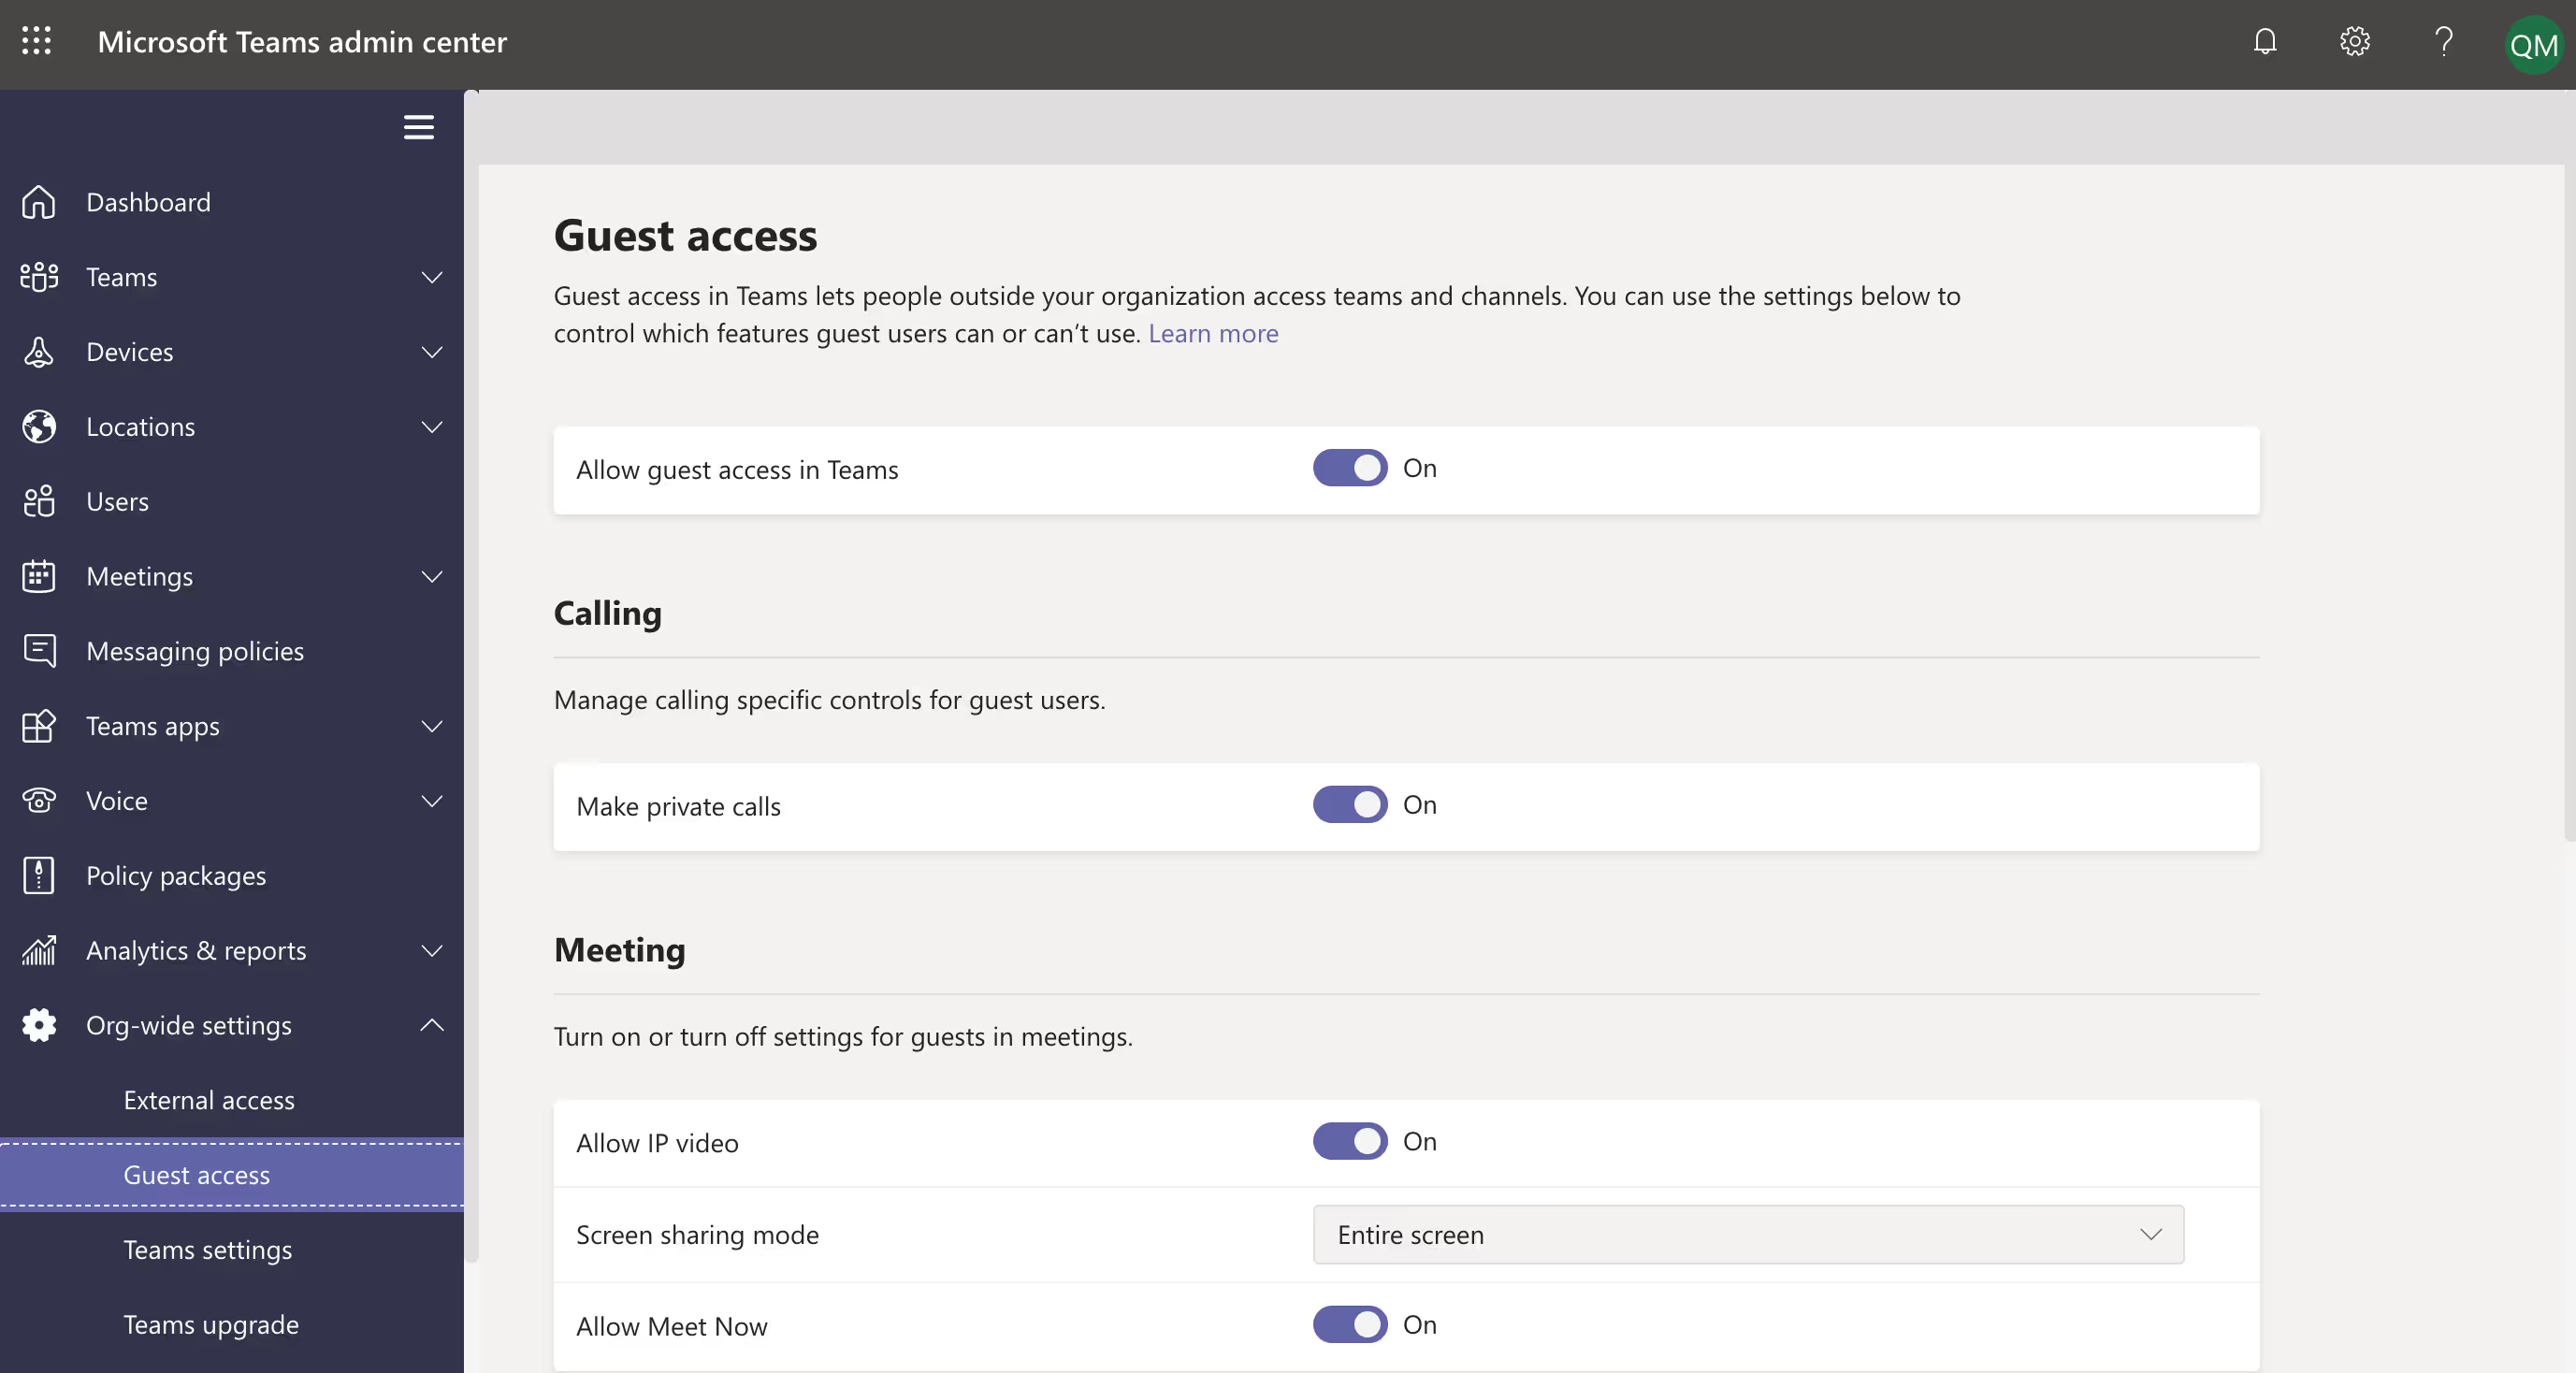
Once guest access is enabled, people outside your organization can access teams and channels they've been invited to join. But you can further configure settings to control specific features guests can access, such as:
- Calling: Do you want to allow your guests to make private calls?
- Meetings: Do you want to allow guests to use IP video, screen sharing mode, and/or Meet now?
- Messaging: Do you want to allow guests to chat, edit or delete sent messages, and/or use things like GIFs and memes in conversation?
Configure guest user permissions for individual teams
Depending on their purpose, you probably have at least a few teams in your tenant that have different security requirements.
Maybe your marketing team does everything in-house while your procurement team is in constant contact with outside vendors, for example.
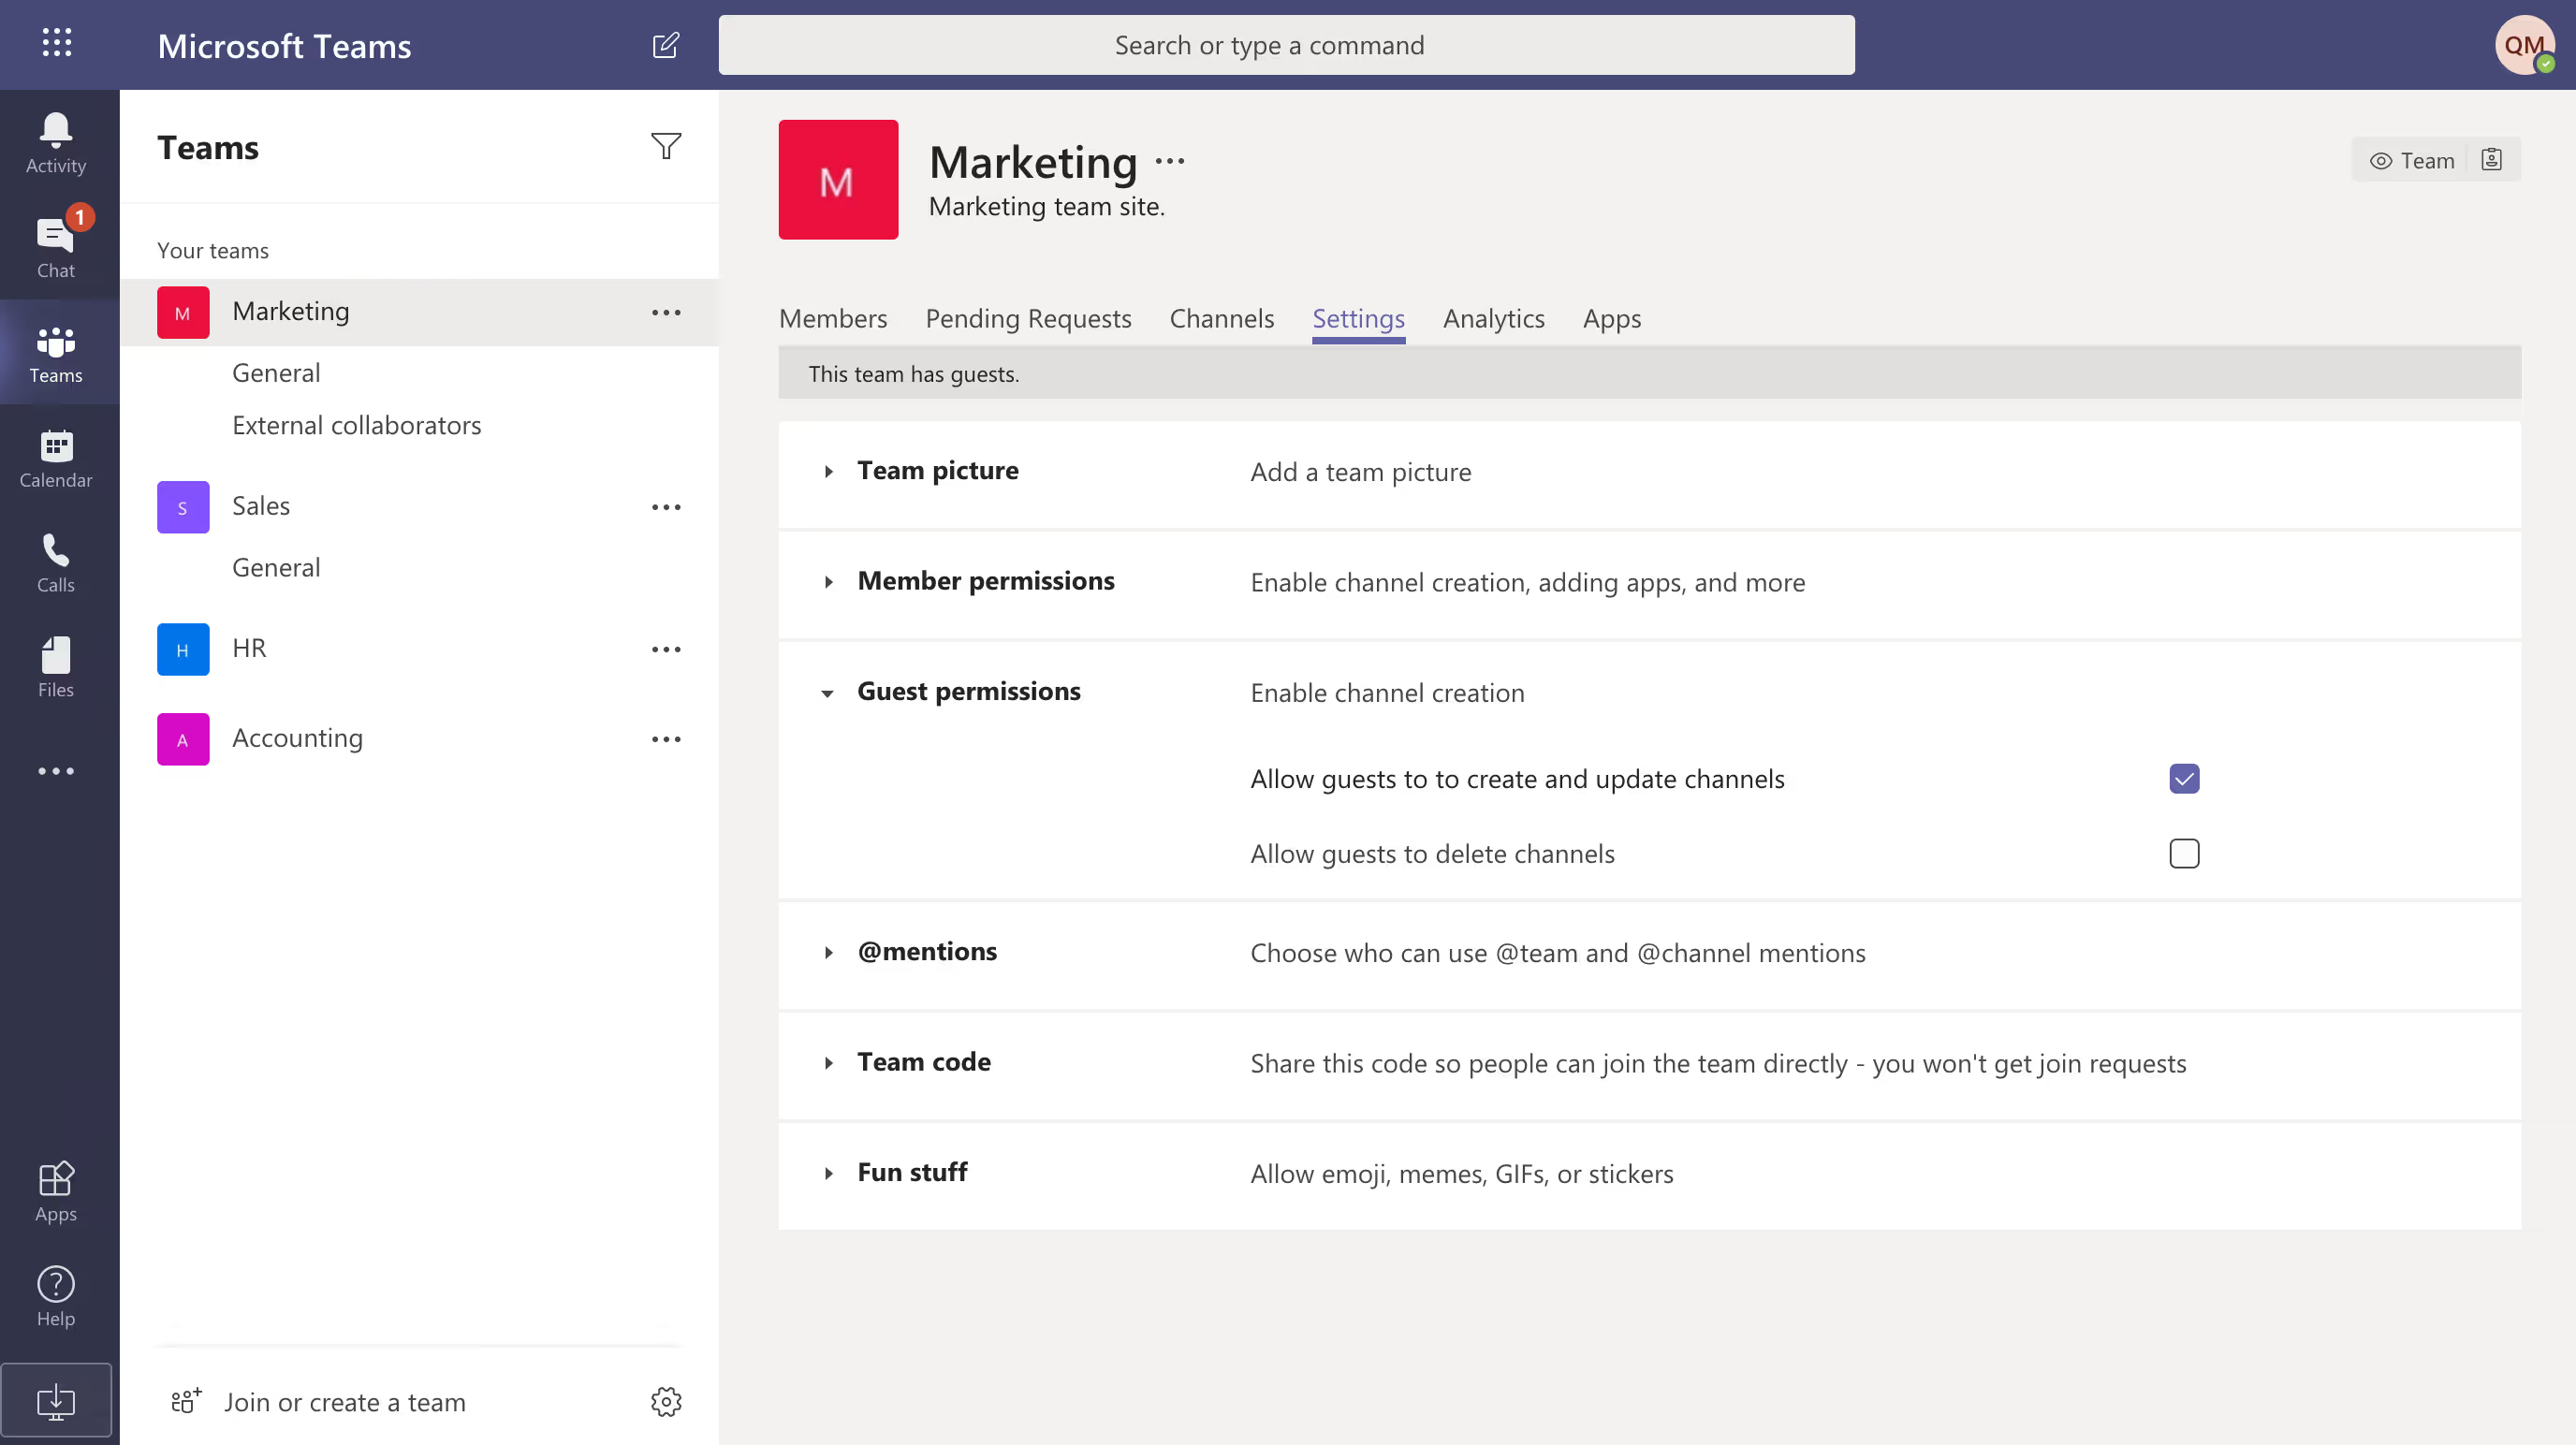
In the Settings tab for a team within Microsoft Teams, admins and team owners can configure team-specific guest permissions, including the ability to:
- Create and update channels
- Delete channels
Step 3: Configure guest access in SharePoint settings
Teams is an all-in-one collaboration hub with chat capabilities—and while files can be shared, Teams is actually not the "home" for these files. When users access files or folders through the Files tab in Microsoft Teams, that content is actually stored in SharePoint.
This means that you need to head over to the SharePoint admin center to configure settings around what guests can access.
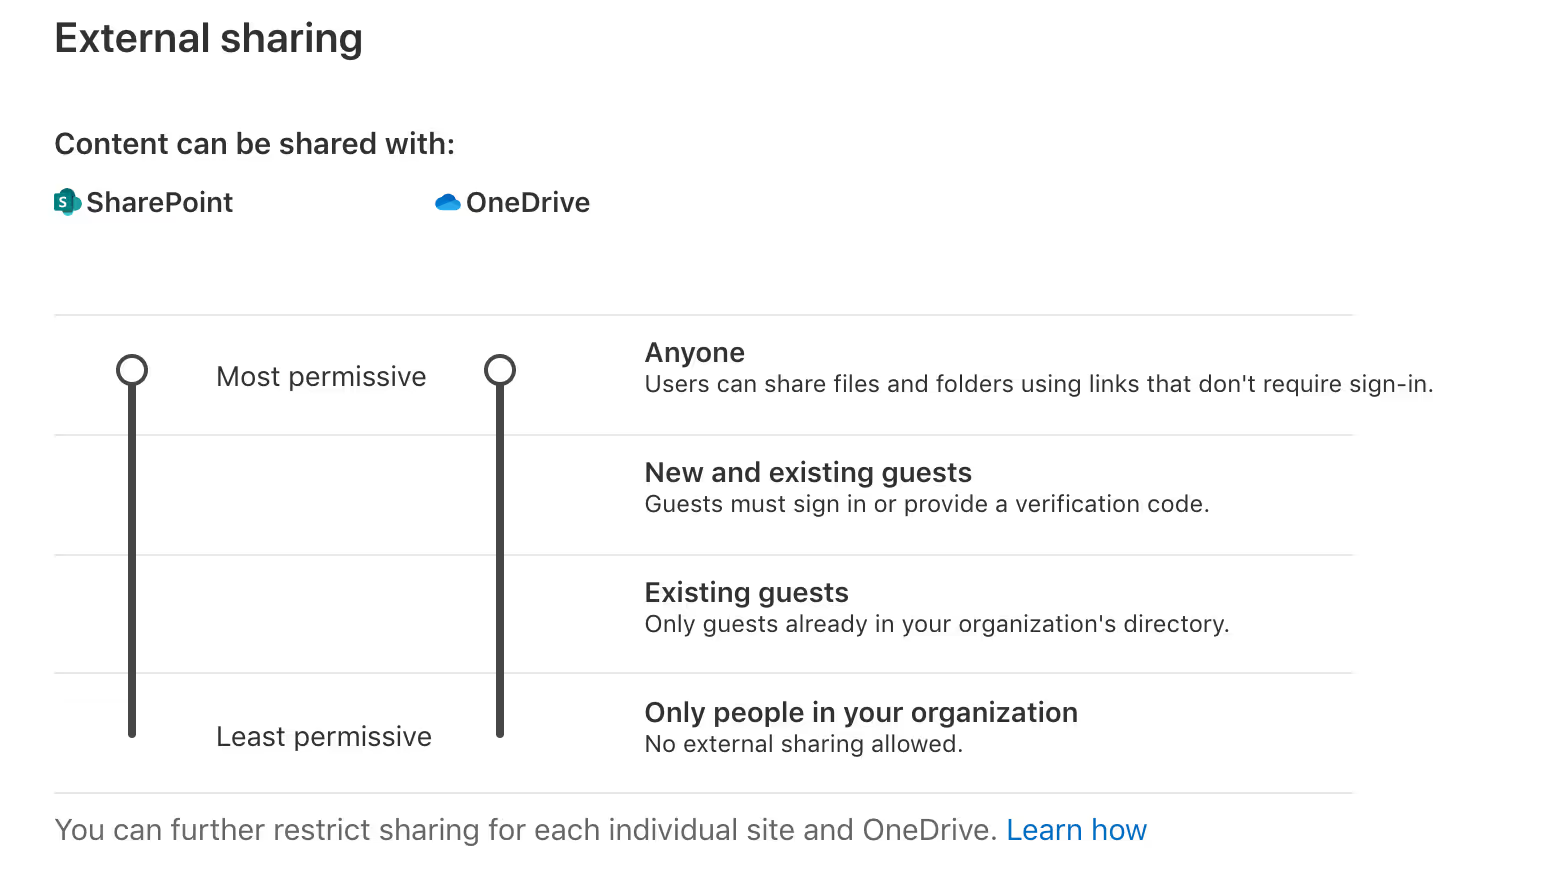
SharePoint Online lets you control external sharing settings for your entire organization as well as for individual team sites:
- Organization level sharing settings: Decide whether to allow users to share content anonymously or limit sharing to authenticated external users. These settings are applied across every SharePoint site (and thus every team) in your tenant.
(SharePoint admin center > Policies > Sharing) - Site level sharing settings: Apply more restrictive sharing settings on a site-by-site (i.e. team-by-team) basis.
(SharePoint admin center > Sites > Active sites > select the site in question. Then select Policies and click on Edit under External sharing)
If a site's external sharing option and the organization-level sharing option don't match, the most restrictive value will always be applied—so to maintain a culture of external sharing, think about the most permissive setting needed by any site in your organization when configuring sharing at the organization level.
To keep external collaboration in Teams secure, we recommend that you configure the following SharePoint sharing settings:
- Limit sharing to authenticated external users
- Change your default sharing link type
- Choose additional SharePoint settings based on the needs of your organization
Limit sharing to authenticated external users
If you want guest users in Teams to have access to a team's SharePoint documents, it's a good idea to limit external sharing to authenticated users only. That way, guests can't turn around and forward an anonymous link to someone else.
Sharing with authenticated external users
Content—including lists, libraries, and complete sites—can be shared directly with specified external users. With this method, external collaborators are sent an invitation by email and prompted to sign in using an account from a trusted provider (or in some cases, a verification code) in order to access the content in question.
Once the invitation is accepted, the collaborator is typically added to your organization's Azure Active Directory as a guest user, but will only have access to the specific elements you shared with them. If you've shared an entire site, they'll have access to everything in it, so the responsible team or owner should make sure it's free of sensitive content.
To restrict sharing to authenticated external users, select the New and existing guests or the Existing guests only sharing options in your SharePoint admin center.
We recommend choosing New and existing guests whenever possible—otherwise, users have to wait for an admin to add new guests to your directory.
Additional security settings for sharing via anonymous link
When you share a document or file via an anonymous link, permission to access your content is given to the link, not to a specific user. That means that anyone with access to the shared link can view and edit the relevant files, and they can forward the link freely as well.
But maybe you have a PR team that needs to share press releases on a regular basis. Or you have another department that needs to publicly share information with a wide reader base.
If you absolutely have to enable anonymous sharing, we recommend that you configure additional security settings, like Link expiration and Link permissions.
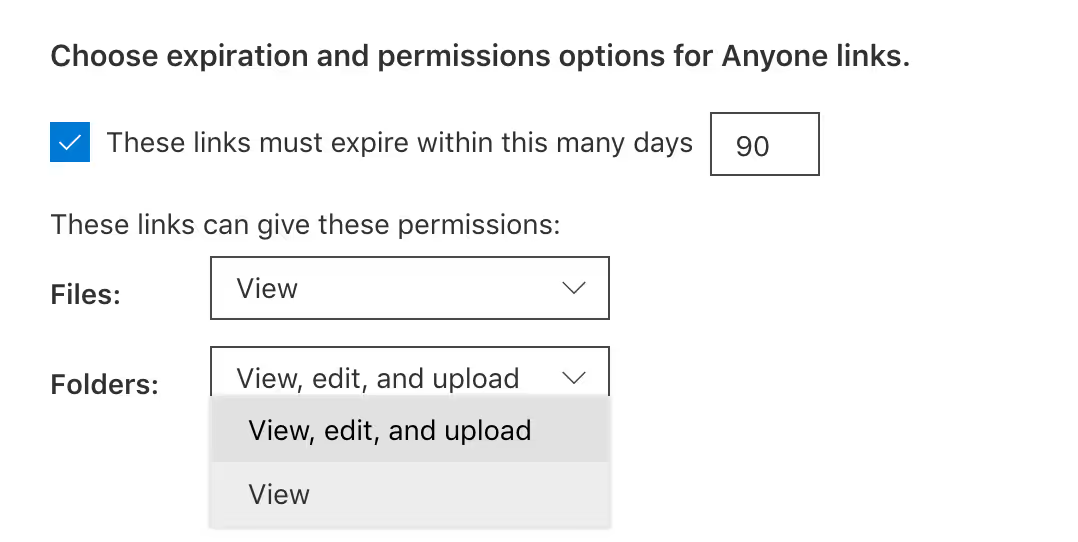
Even with these additional security measures in place, you should be wary of anonymous sharing—you won't be able to tell if sensitive information is being shared with unsuitable users outside your organization.
Change your default sharing link type
Instead of placing unnecessary restrictions, you can nudge users towards a more secure sharing option by defining which type of sharing link is selected by default when users share files and folders.
Users can still change the type of link to another option before sharing (so long as it's enabled); however, changing the default option can help prevent accidental and unnecessary anonymous sharing.
You can choose any of the following link types as the default:

- Specific people: This is the safest option if your users collaborate frequently with people outside your organization. This type of sharing link can be used to grant a guest user access and requires them to authenticate.
- Only people in your organization: Choose this option if you think that most of your sharing in your organization takes place between your own users.
- Anyone with the link: This type of sharing link grants anonymous access to anyone who has access to the link. You can only use this link type if you have the Anyone sharing setting enabled.
Choose additional SharePoint settings based on the needs of your organization
The following three sharing policies can also be enabled at the SharePoint authorization level:
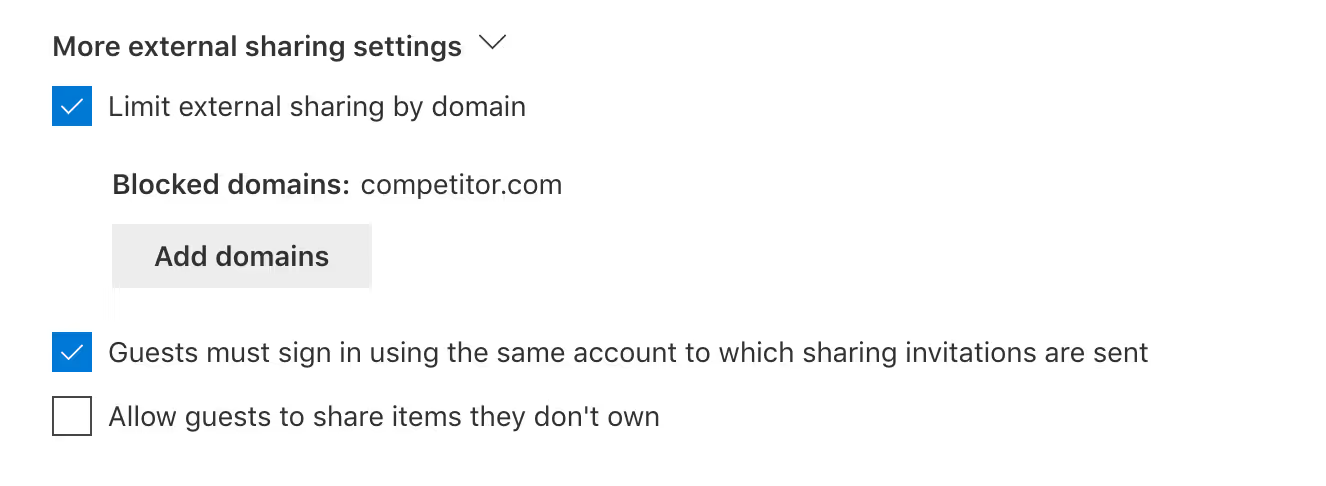
- Limit external sharing by domain: Just like you can restrict collaboration at the Azure AD level, you can choose to allow sharing generally—except for with a few specified domains of your choosing. You could also go the other way and choose the more restrictive option: block sharing except for the domains you include. This setting can be configured org-wide as well as at the individual site level.
- Guests must sign in using the same account to which sharing invitations are sent: Because guests can, by default, receive an email invitation at one account and sign in with another, you can enable this policy to limit external users to one account.
- Allow guests to share items they don't own: By default, guests can only share items if they have full control permissions. Only check this box if you want to let external users share documents they didn't create.
The two settings listed under Other settings are turned on by default at the organization level—and in most cases, we recommend that you keep them enabled.

- Show owners the names of people who viewed their files in OneDrive: If this option is disabled, the owner of a shared file will no longer see info on the file card, such as which users viewed the file without editing it, the number of views on the file, and the number of people who have viewed it.
- Let site owners choose to display the names of people who viewed files or pages in SharePoint: This setting determines whether site owners can allow users with access to see details about who has viewed something on its file card. Note that it's turned off by default at the site level for existing sites. We recommend that site owners only turn this feature on for team sites that don't have sensitive information.
Empowered, self-service collaboration in Microsoft Teams
Instead of shutting down external sharing, you should leverage the power of self-service to drive user adoption in productivity apps like Microsoft Teams. That's why we recommend keeping external sharing and guest access enabled.
Of course, securing sensitive data involves more than just flipping a switch. Once guest access in Teams is enabled, it's crucial to have the right settings and policies in place. Configuring your settings according to the needs of your organization ensures that external collaboration remains productive and secure.


.svg)
.avif)
%20(1).avif)


.jpg)
.jpg)
