.svg)

%20(1).avif)
Master Hacks: Migrate like a pro
Check out our video series to help you turn migration projects into masterpieces!
Table of contents
Wondering how to find a scalable middle-ground for security in Teams? We explain three ways to configure custom security settings for each Microsoft team.
In the wake of a widespread shift to distributed work in 2020, companies are still grappling with how best to maintain security through governance—especially in cloud-based productivity tools like Microsoft Teams.
While some Microsoft 365 admins think locking everything down will help mitigate security risks, this approach could actually end up making the problem worse. If people can't do what they need to with IT-approved tools, they'll turn to other solutions, which negatively impact user adoption and could result in shadow IT.
Ideally, you want to give users the freedom to create new resources and get their work done as they see fit. But you don't want that freedom to come at the cost of creating a security risk for your business. So, how can you loosen security requirements for some teams while enforcing stricter rules for others?
In the course of developing ShareGate's Microsoft Teams security features, we did a ton of research into container-level data protection. And a large part of that process included looking at the available security settings and data classification policies in Microsoft 365.
To help you choose the best fit for your organization, we share what we learned and walk you through three different ways to apply custom security settings at the level of each team...
Here are three ways to configure custom security settings for your Microsoft teams:
- Manually configure security settings for each Microsoft team Microsoft Teams is actually a unified interface overlying other Microsoft 365 apps and services. That means you need to configure settings in multiple admin centers—and through several levels of authorization—if you want to set up custom protection for each team.
- Configure custom security settings using sensitivity labels through MIP Sensitivity labels through the Microsoft Information Protection (MIP) framework can be used to classify a team and enforce protection settings based on that classification. However, enabling this feature for Teams requires an Azure AD Premium license and a fair bit of PowerShell scripting.
- Collaborate with owners to apply custom security settings to each Microsoft team Work with owners to define each team's level of sensitivity and automatically apply the right security settings to all of your teams and Microsoft 365 groups.
1. Manually configure security settings for your Microsoft teams
For file protection that balances security with ease of collaboration, Microsoft recommends keeping self-service features like guest access and external sharing turned on, then configuring teams and their associated SharePoint sites with additional protection where necessary.
Remember: Microsoft Teams is actually a unified interface overlying other Microsoft 365 apps and services like SharePoint Online (which stores the content in each team's document library) and Microsoft 365 Groups (the cross-application membership service for a team's related workloads).
That means you need to configure settings in multiple admin centers—and through several levels of authorization—if you want to set up custom protection for each team.
Configure team privacy settings in the Teams admin center
To change the privacy settings for a team from public to private (or vice versa):
- Navigate to the Microsoft Teams admin center as a global or Teams administrator.
- Management tools for teams are under the Teams node (in the left-hand navigation, select Teams > Manage teams).
- To edit settings for a specific team—including privacy settings—select the team by clicking to the left of the team name, and then select Edit in the top right corner of the screen.
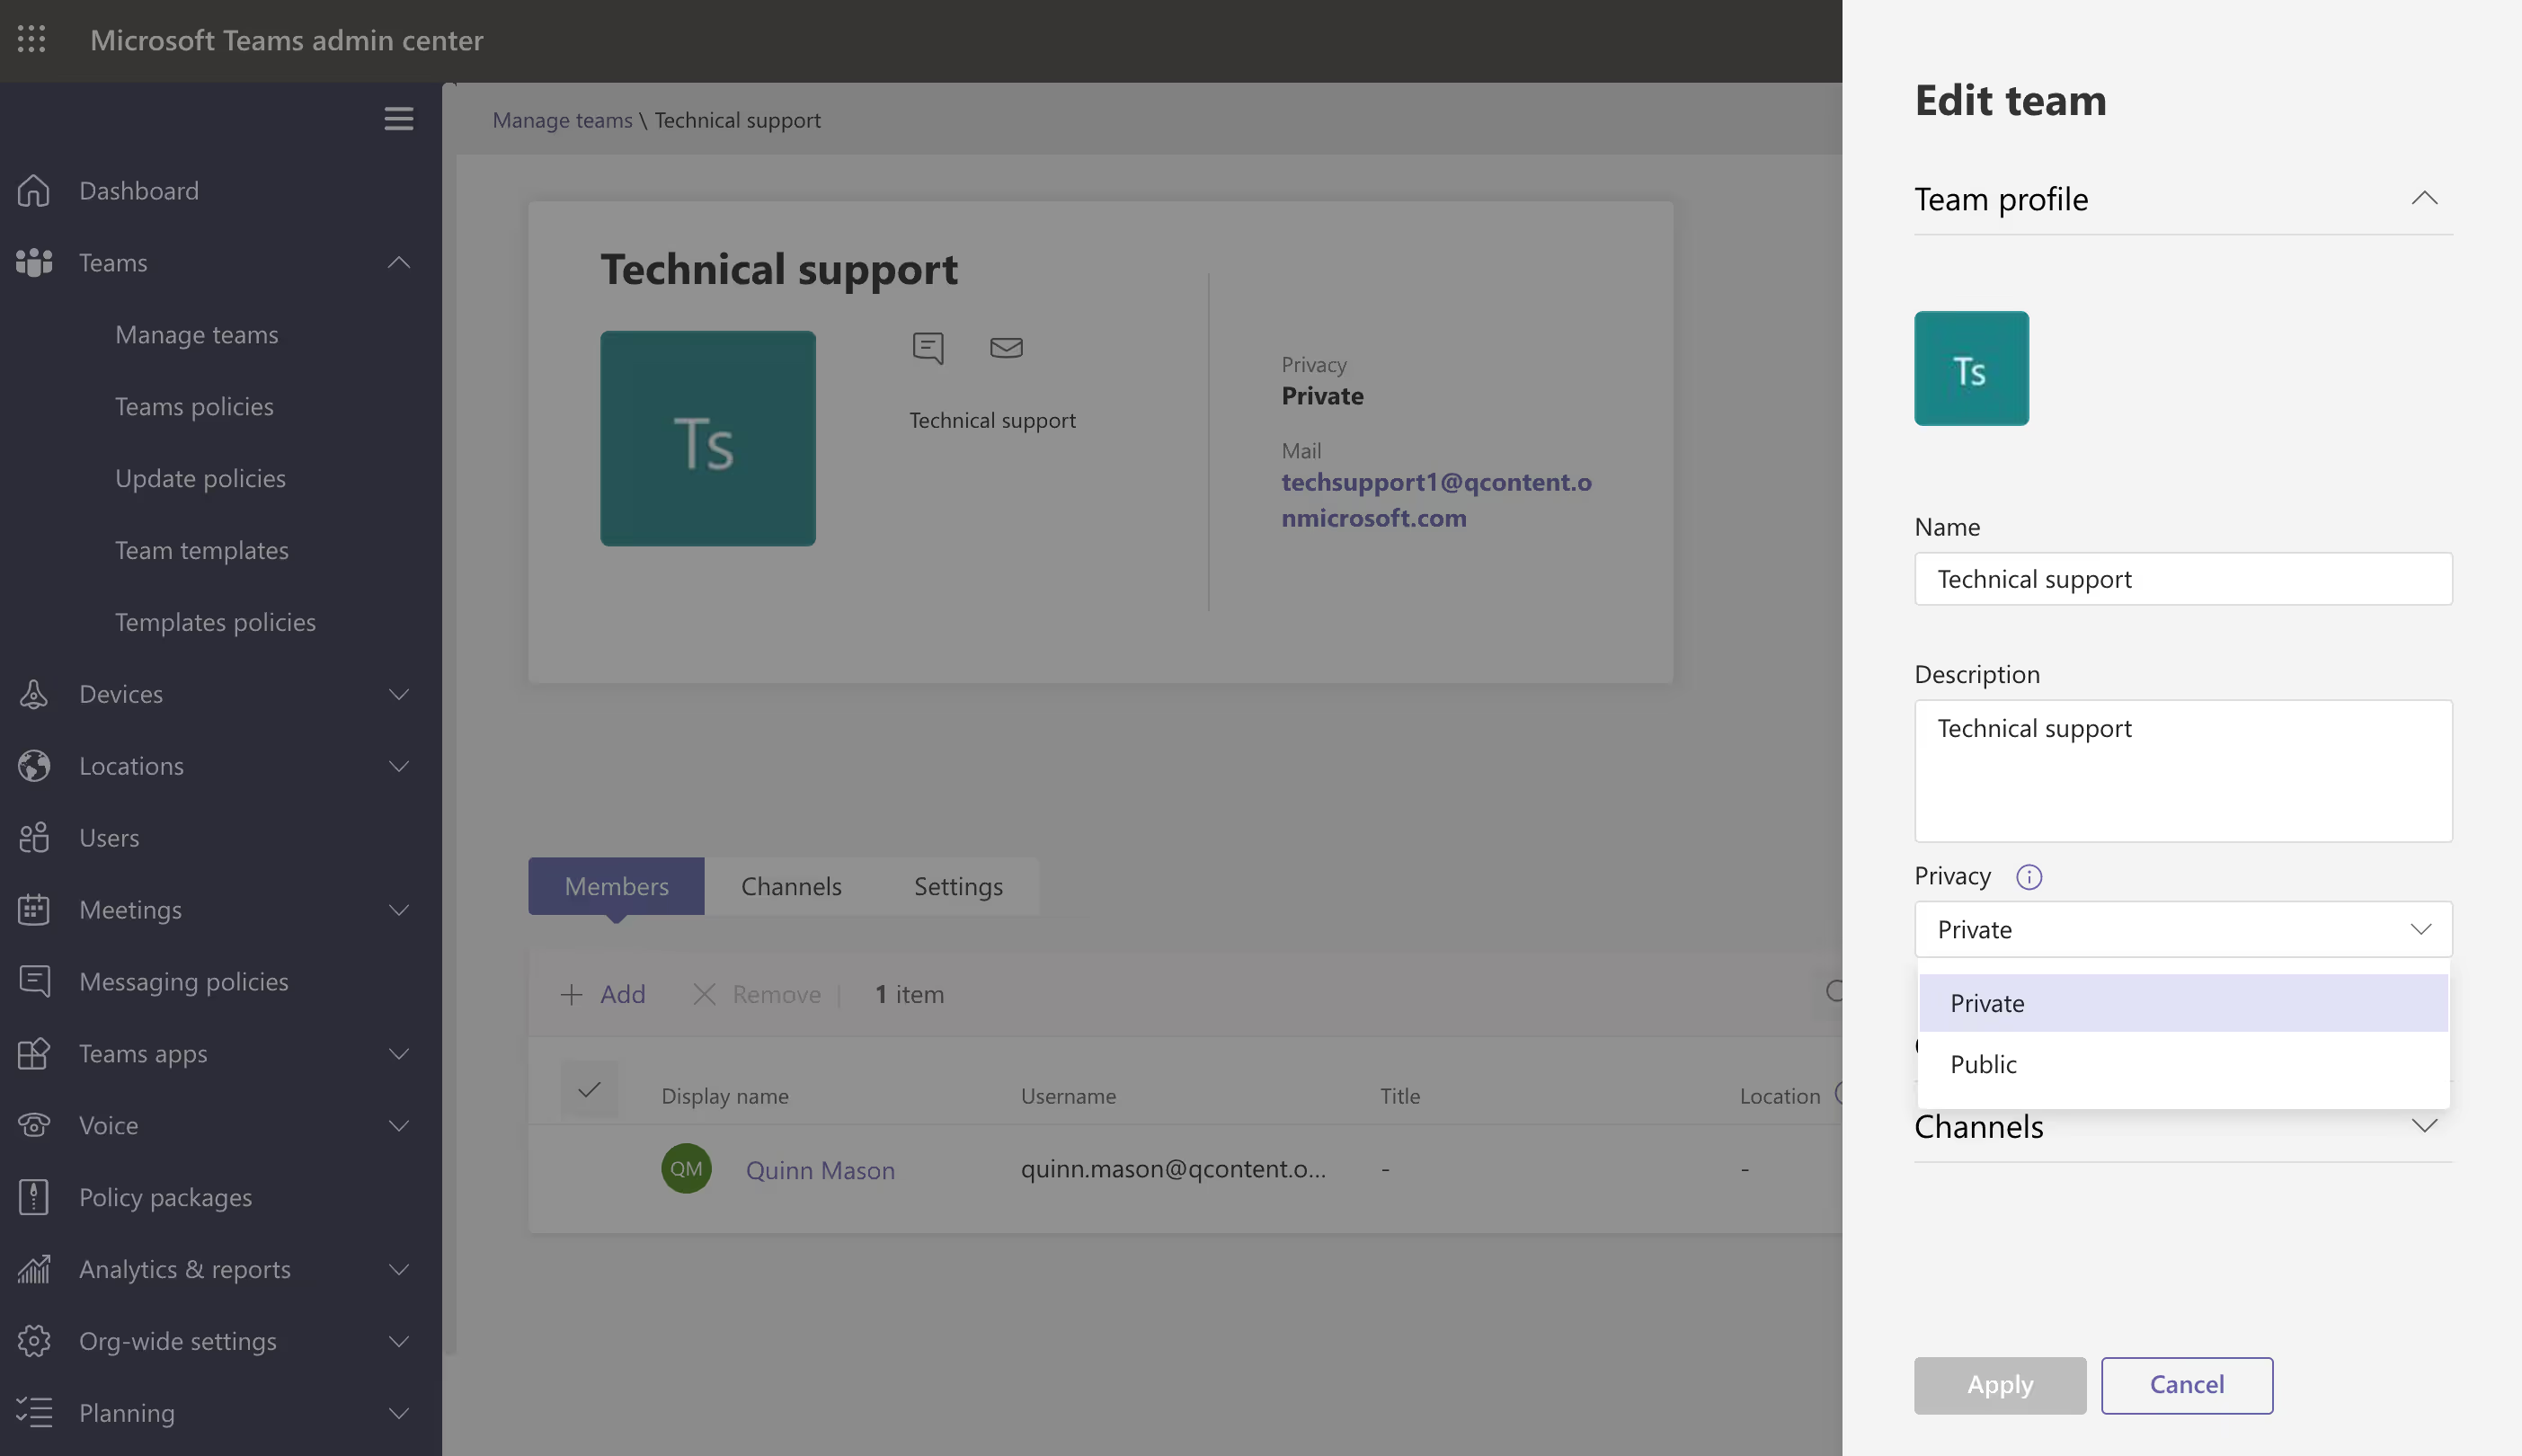
Team owners can also change their team's privacy settings directly in the Teams app by clicking More options next to the team name > Edit team.
Configure guest access in the Teams admin center
Turning on guest access depends on settings in Azure Active Directory, Microsoft 365, SharePoint, and Teams. For more information, see our blog article on how to control guest access at every authorization level.
Microsoft Teams has a master on/off switch for guest access. To control this master switch:
- Head to the Microsoft Teams admin center as a global or Teams administrator.
- Management controls for guest access are under the Org-wide settings node (in the left navigation, select Org-wide settings > Guest access).
- Set Allow guest access in Microsoft Teams to On.

Since guest access settings in the Teams admin center are applied to all of the teams in your tenant, your best bet is to keep guest access enabled and apply additional security settings to teams that require extra protection.
Configure site-level sharing settings in the SharePoint admin center
Every team in Teams has an associated SharePoint site where the documents visible in a channel's Files tab are stored. The SharePoint site retains its own permission management, but is linked to team permissions. For example, team owners are automatically included as site owners and team members are included as members in the associated site.
To change the sharing settings for a SharePoint site:
- Sign into the SharePoint admin center as a global or SharePoint administrator.
- Management controls for SharePoint sites are under the Sites node (in the left-hand navigation, select Sites > Active sites).
- To edit settings for an individual site—including sharing settings—select the site by clicking to the left of the site name, and then select Sharing.
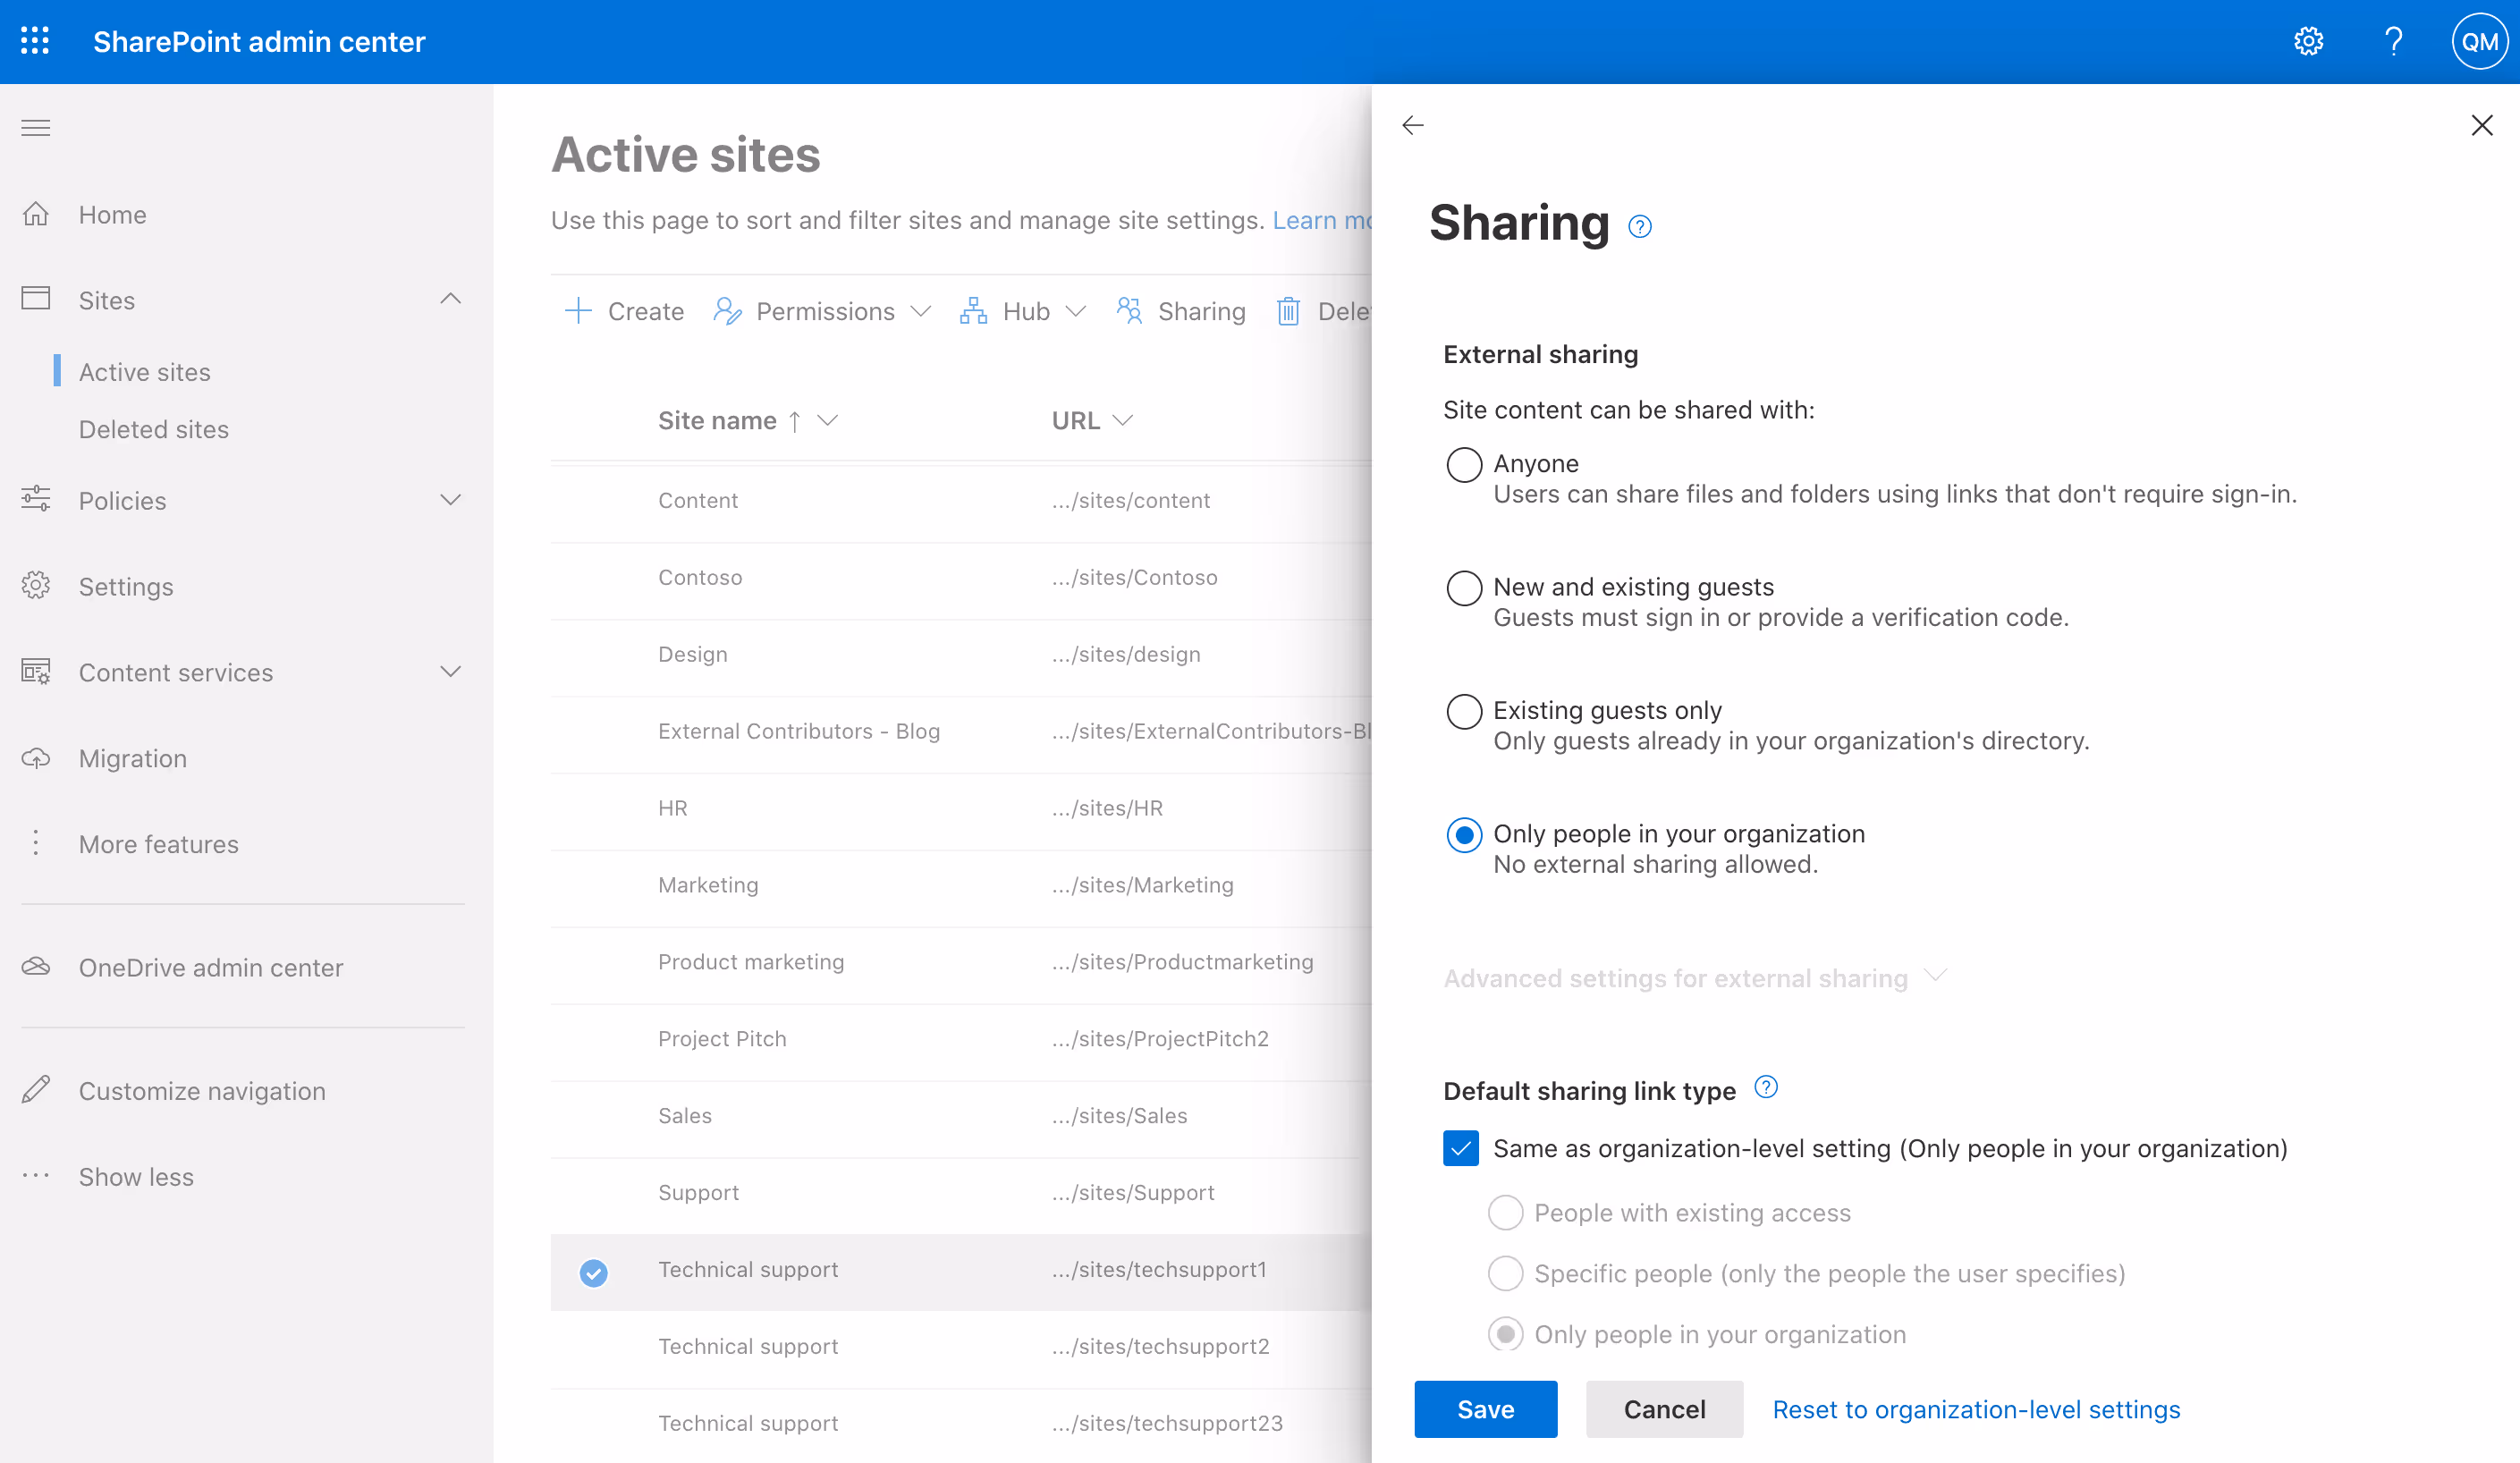
From here, you can:
- Choose an alternate external sharing option
- Limit the sharing of the site by domain
- Change the default sharing link type, permissions, or expiration setting for the site
Adjusting all of the back-end controls that manage different aspects of a team's security and guest sharing settings is time-consuming! It involves switching between multiple admin centers to get everything set up—and at the end of the day, there's nothing to prevent team owners from changing privacy settings or continuing to create new teams with security settings that need to be fixed.
This brings us to our second option...
2. Configure custom security settings using sensitivity labels through MIP
To simplify the multi-step process laid out in the first option, Microsoft suggests applying sensitivity labels to sensitive- and highly sensitive-tier teams.
Sensitivity labels through the Microsoft Information Protection (MIP) framework can be used to classify a team and enforce protection settings based on that classification. That way, instead of adding blanket restrictions at the organization-level, you can easily add additional, targeted protection settings only where they're needed.
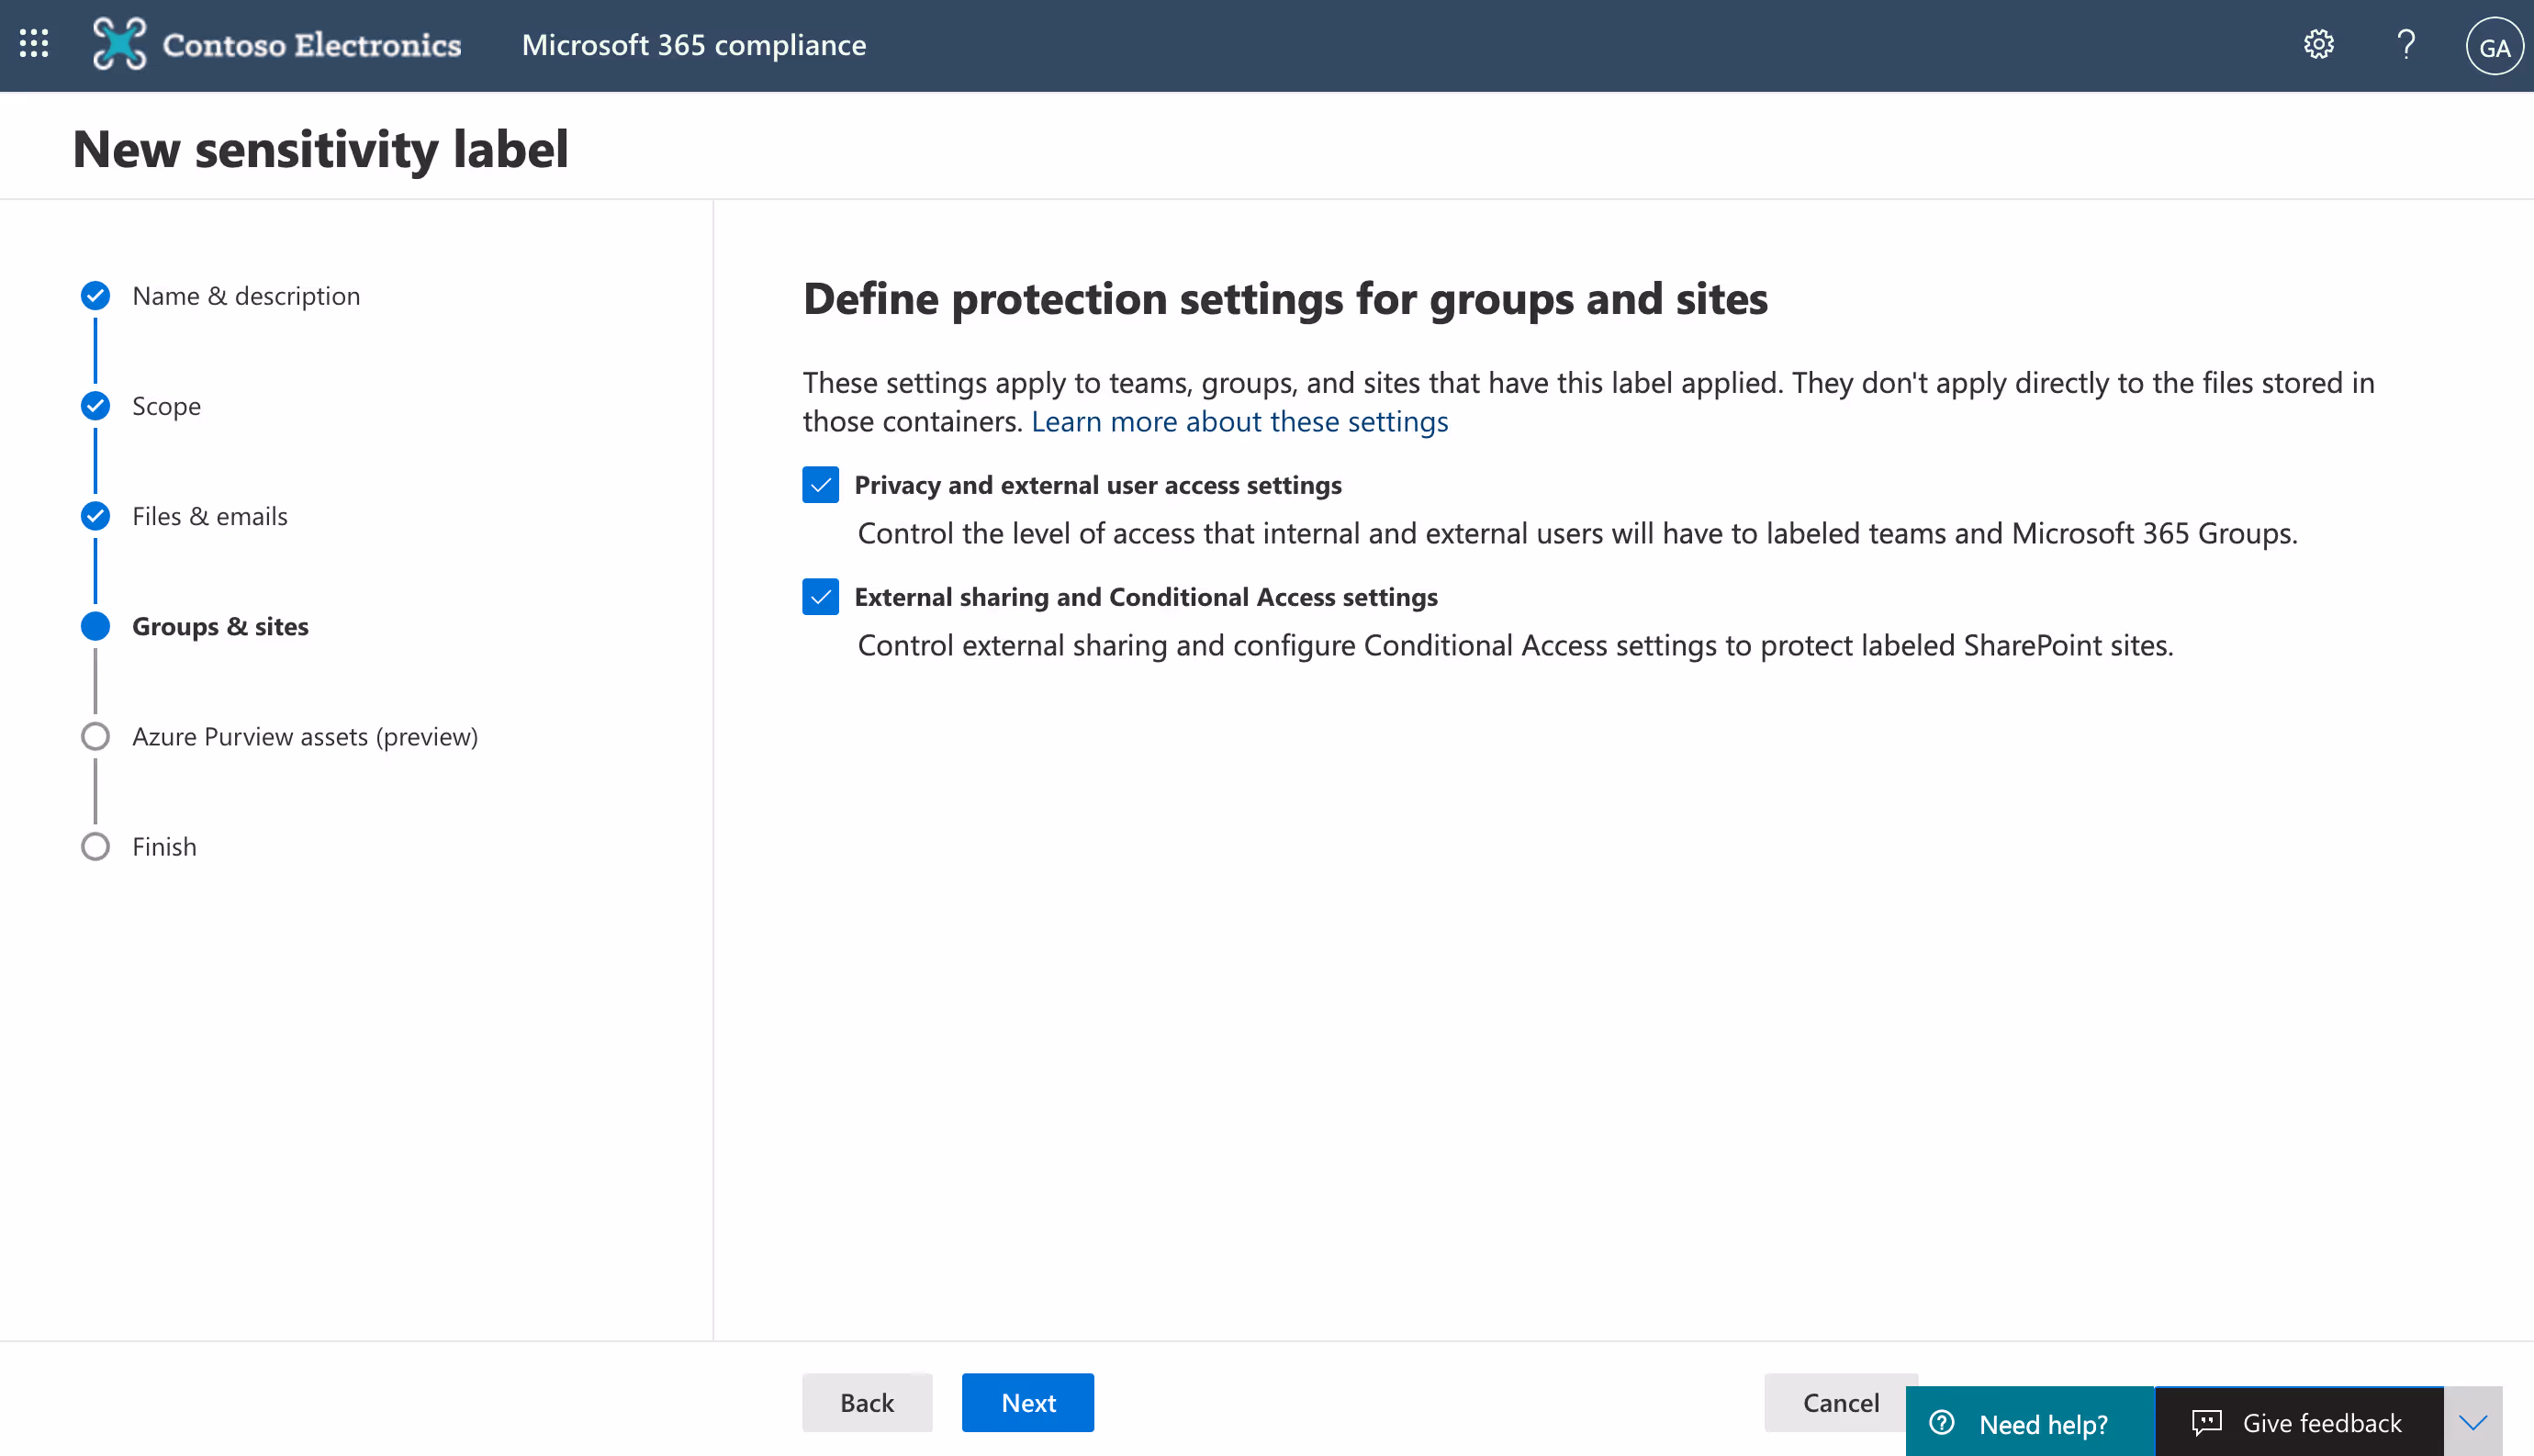
Within a single sensitivity label, you can configure the following security settings for a team where the label is applied:
- Privacy (public or private) of team sites and Microsoft 365 groups
- External user access
- External sharing from SharePoint sites
- Access from unmanaged devices
Once you've published sensitivity labels with "Groups & sites" settings enabled, users can select from a list of those labels when creating a new team in Microsoft Teams. The service automatically applies the same sensitivity label to the associated Microsoft 365 group and SharePoint team site, so this method certainly saves time compared to configuring each team's security settings manually.
To use this method, you'll need to:
- Configure group settings using PowerShell by following the steps in Microsoft's Azure Active Directory cmdlets for configuring group settings documentation
- Enable sensitivity labels for containers and synchronize labels (requires at least one active Azure Active Directory Premium P1 license in your Azure AD organization)
Configure privacy, guest access, and external sharing settings via sensitivity labeling in the Microsoft 365 compliance center
Here's a quick rundown of the steps; for the full process check out our blog post on how to use sensitivity labels with Microsoft Teams.
- Go to the Microsoft 365 compliance center. Make sure you're signed in as a global admin for your organization.
- Sensitivity labeling controls are under the Solutions node (in the left-hand navigation, under Solutions, select Information protection).
- To edit settings for an existing label, select the label by clicking to the left of the label name and then select Edit label. To create a new label, click on + Create a label to open the New sensitivity label wizard.
- On the Define the scope for this label page, check the box next to the Groups & sites option to configure settings that apply to Microsoft 365 groups and sites for Teams and SharePoint.
- Follow the prompts in the wizard for the label settings.
Sensitivity labeling through MIP is a great feature for organizations with Azure AD Premium licensing that are just moving into Microsoft Teams. However, if your organization has been using Teams of Microsoft 365 Groups for a while, then you might find yourself frustrated with the amount of manual work involved in assigning labels to all your existing groups and teams—especially if you're not a fan of PowerShell.
Not only that, but as an IT admin you're probably not the best person to determine the sensitivity level of every single team. You're going to have to reach out to each team's owner and either ask them to assign a label to their team in the Teams app or relay that information back to you. And if you ask them to assign a label themselves, what are the chances that everyone will follow through?
3. Collaborate with owners to apply custom security settings to each Microsoft team
Security should be everybody's responsibility in the distributed workplace, not just IT's. Owners are the ones who best understand the purpose and sensitivity level of their teams—they should be held accountable for the resources they create.
With ShareGate, our automated governance platform for Microsoft Teams, you can empower end users to make certain security-related decisions on behalf of their team. That way, security is truly a team effort!
ShareGate enables you to manage the following security settings the team level:
- Privacy status: Set to "Public" or "Private"
- External sharing: Set to "Anyone", "New and existing guests", "Existing guests", or "Only people in your organization"
- Guest access: Set to "Guests allowed" or "Guests not allowed"
You can manage these settings yourself directly in-app—no need to bounce between multiple admin centers!—or configure group sensitivity labels that best fit your business needs to apply the correct security settings automatically.
Configure custom security settings for a group sensitivity label in ShareGate
ShareGate's "Group sensitivity" feature lets you protect company data by allowing you to manage and automatically apply custom security settings to your groups and teams based on their level of data sensitivity.
As a starting point, you can use our default group sensitivity labels, or you can choose to create your own!
To manage group sensitivity labels in ShareGate:
- Log in to the ShareGate app as a Microsoft 365 global admin for your organization.
- Group sensitivity labels are configured on the Settings page (click Settings in the top menu > select the Categorization tab on the left > scroll down to the Group sensitivity section).
- Click on the pencil icon that appears when you hover over an existing sensitivity to edit or delete it, or click + Create group sensitivity to create a new group sensitivity.

Once you've defined your group sensitivity labels, you can manually add labels to your teams (or change a previously applied label) directly in the app.
If your tenant already has a ton of existing teams, though, manually adding labels could still add up to a lot of time-consuming work for IT—especially if you're not in a position to know the sensitivity level of every single team.
Let's see if we can't make this process even easier...
Automatically collect information from owners about their team's level of sensitivity
Owners are the ones who best understand how their team is being used—that's why ShareGate lets you empower team owners you trust to make decisions about the purpose and sensitivity of their teams! After all, they know why they created their team as well as the kind of information that will be shared between its members.
Once you've set up your group sensitivity labels in ShareGate, simply activate our Teams chatbot and sit back. The bot does all the heavy lifting for you!
Here's a quick rundown of how it works:
- Shortly after an owner creates a new team, our chatbot automatically reaches out to ask them for the team's reason of creation and level of sensitivity.
- The bot presents them with the options you've pre-populated as well as each one's description, making it easy for owners to make an educated decision.
- Once the owner has answered the bot, the security settings that correspond to the group sensitivity label they selected will automatically be applied to their group/team.
For more details on how to set up the bot, head to our support documentation on using the ShareGate Teams bot.
With group sensitivity labels in ShareGate, you can easily apply custom-fit security settings to each of your Microsoft teams. And our Teams chatbot helps simplify the process even further by reaching out to owners on behalf of IT—and all without the need for PowerShell or premium licensing for Azure AD!
And if you want owners to only assign a purpose OR a sensitivity tag, you can do that easily now that we’ve split up the policies, which allows you to manage them independently.
🔒 Locking everything down won't cut it: Enroll in our free Microsoft 365 security course and learn how to secure your tenant without it taking over your IT team's workload.
For more details to help assess which container-level classification and protection feature is the right fit for your organization, check out our blog post comparing ShareGate's group sensitivity labels and Microsoft Information Protection sensitivity labels.