How to use/apply sensitivity labels with Microsoft Teams

Table of contents
Wondering how to get started using sensitivity labels with Microsoft Teams? If you’re ready to use unified labeling to protect your organization’s Teams content in Microsoft 365, follow these steps.
When it comes to keeping sensitive data secure in Microsoft Teams, Microsoft 365 has a built-in feature that lets you classify and protect your data at the container level: sensitivity labels through the Microsoft Purview Information Protection (MIP) solution.
👉Free course alert! How to balance security and end-user productivity, without it taking over your entire IT team’s workload.
Overall, Microsoft Purview gives users an incredible, centralized option for simplifying how they manage sensitive data. Specifically, with sensitivity labels, you have a tool for classifying data across your organization and then enforcing protection settings based on that classification.
For employees, that sensitivity will appear as a tag in the various apps they use, such as Microsoft Teams, SharePoint, and Office.
As a Microsoft Teams admin, when you apply sensitivity labels at the container level, you can regulate access to any sensitive organizational content created while your users collaborate within teams. And since admins can apply these labels at the individual team level, there’s no need to implement unnecessary blanket restrictions that could negatively impact user adoption and result in people turning to other, unapproved tools.
This handy how-to guide outlines the simple steps to start using sensitivity labels in Microsoft 365 to protect your organization’s Teams data. Let’s go!
Follow these steps to get started using sensitivity labels with Microsoft Teams:
- Enable sensitivity labels for containers and synchronize labels. To apply published labels to groups (and, by extension, teams), you first need to enable the feature in Microsoft Entra. You will also need to synchronize your sensitivity labels to Microsoft Entra ID.
- Configure "Groups & sites" settings in the sensitivity labeling wizard. Once you’ve enabled sensitivity labels for containers, you can now configure protection settings for groups and sites in the Microsoft Purview portal.
- Publish sensitivity labels that are configured for sites and groups. To make a new sensitivity label visible for employees in teams and sites, publish it by creating a label policy in the Microsoft Purview portal.
1. Enable sensitivity labels for containers and synchronize labels
Since this feature leverages Microsoft Entra functionality, you’ll need to enable sensitivity labeling for containers (i.e., teams and sites) there before you can configure these settings in the sensitivity labeling wizard. Formerly known as Azure Active Directory, Microsoft Entra ID is the company’s identity and access management service.
Enable sensitivity labels for containers in Microsoft Entra ID
Follow these steps to enable the feature in Microsoft Entra:
1. Open a PowerShell prompt on your computer.
2. Run the following commands to prepare to run the cmdlets:
Install-Module Microsoft.Graph -Scope CurrentUser

Install-Module Microsoft.Graph.Beta -Scope CurrentUser
3. Connect to your tenant by running the following cmdlets:
Connect-MgGraph -Scopes "Directory.ReadWrite.All"
4. Retrieve the current group settings for the Microsoft Entra organization and display the current group settings by running the following cmdlets:
$grpUnifiedSetting = Get-MgBetaDirectorySetting -Search DisplayName:"Group.Unified"
Note: If someone at your organization already enabled the sensitivity label previously, you will see EnableMIPLabels = True. If that happens, you don’t need to do anything. If you haven’t yet created group settings for your Microsoft Entra organization, you’ll encounter a blank screen. In that case, you’ll need to first create the settings. You can use PowerShell cmdlets to configure your group settings - simply follow the steps in Microsoft’s documentation for creating group settings in Microsoft Entra ID.
5. Next, run the following cmdlet to apply the new settings:
$params = @{

     Values = @(

 	    @{

 		    Name = "EnableMIPLabels"

 		    Value = "True"

 	    }

     )

}


Update-MgBetaDirectorySetting -DirectorySettingId $grpUnifiedSetting.Id -BodyParameter $params
6. Finally, you’ll need to run the following cmdlet to verify that the new value is present:
$Setting = Get-MgBetaDirectorySetting -DirectorySettingId $grpUnifiedSetting.Id

$Setting.Values
Synchronize your sensitivity labels to Microsoft Entra ID
You will also need to synchronize your sensitivity labels to Microsoft Entra ID. To do that, follow these instructions:
1. Connect to Security & Compliance PowerShell using the Exchange Online PowerShell module with or without multi-factor authentication (MFA).
2. Next, run the following command to ensure you can use your sensitivity labels with Microsoft 365 groups:
Execute-AzureAdLabelSync
2. Configure "Groups & sites" settings in the sensitivity labeling wizard
Once you’ve enabled sensitivity labels for containers, you can now configure your Groups & sites protection settings in the sensitivity labeling wizard in the Microsoft Purview compliance portal.
Until you enable this support, you will be able to see the settings in the wizard, but you can’t configure them.
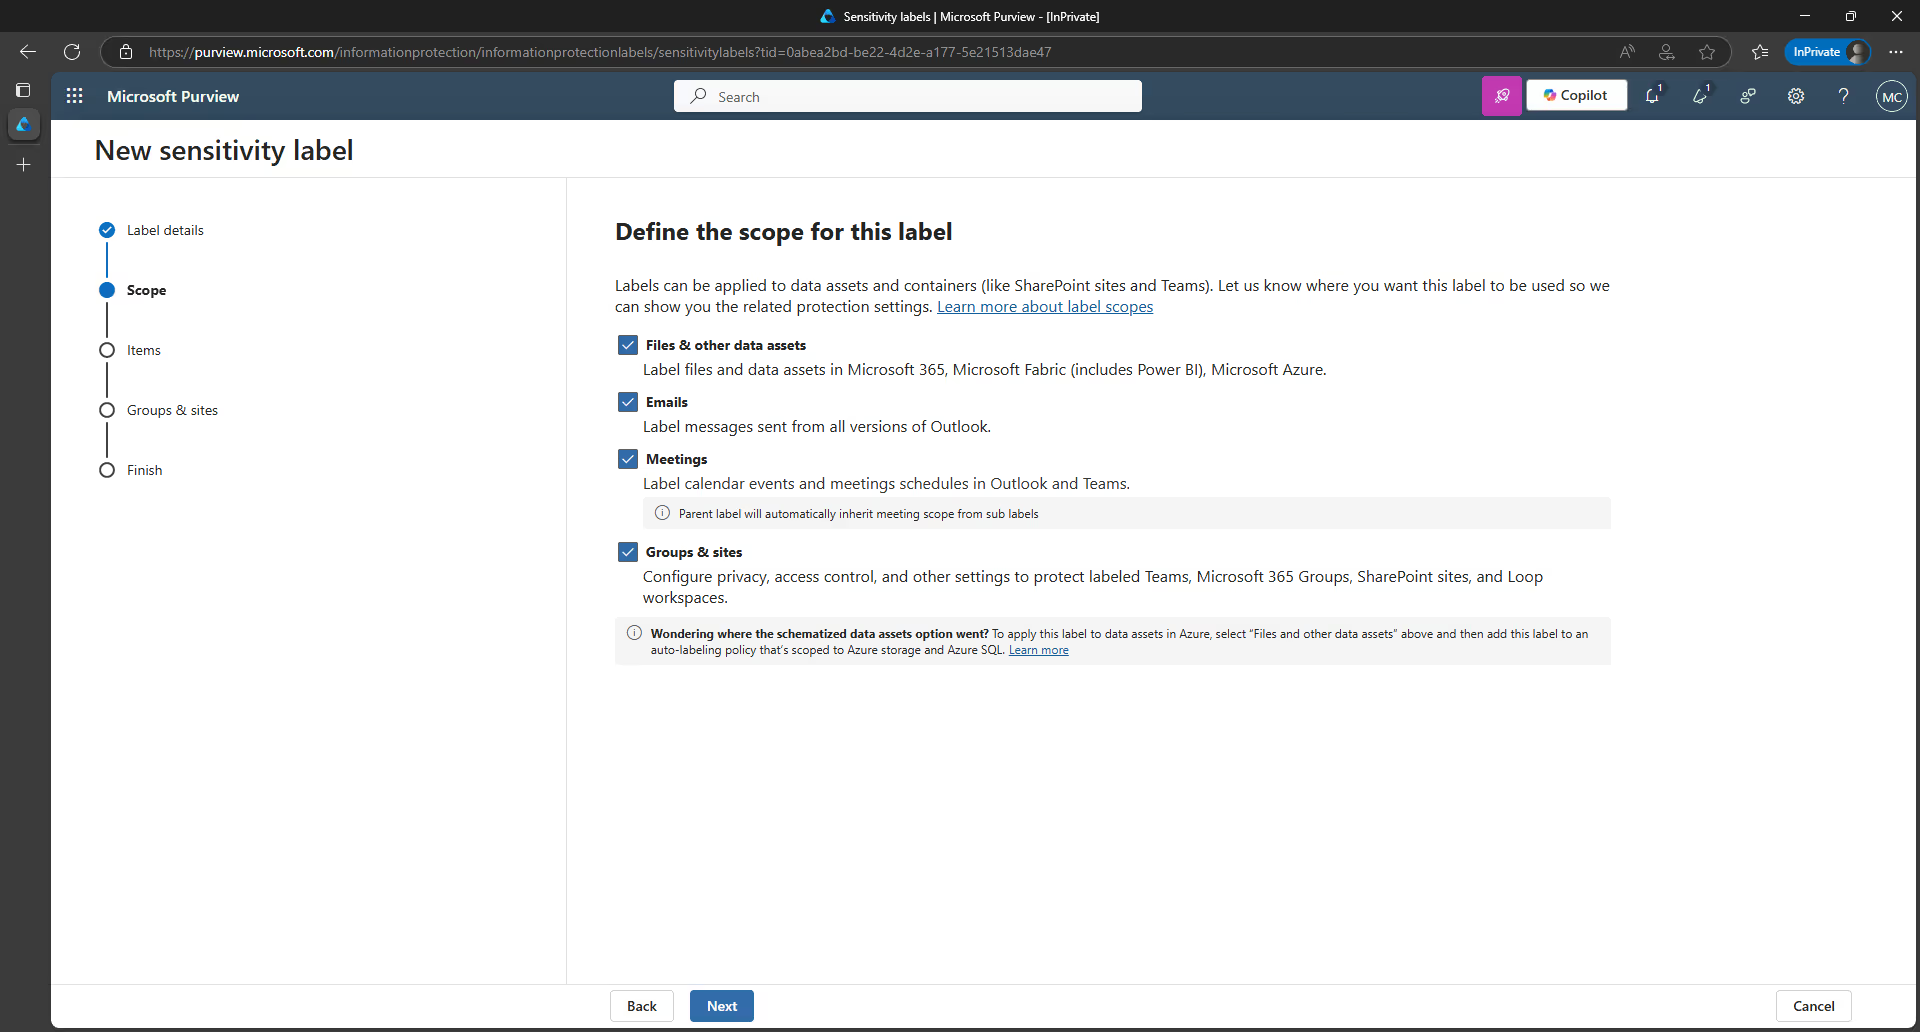
Once enabled, you can configure protection settings for Groups & sites and Items within a single sensitivity label:

For example, if you want a label called “Confidential”, you can configure the Items settings to apply content marking to any documents with that label. You can also configure the Groups & sites settings to restrict external access when you apply that label to a container.
You can also separate your labels by scope if you want. When you only select the Groups & sites scope for a label, it won’t be displayed in Office apps that support sensitivity labels and can’t be applied to files and emails.
According to Microsoft, separating labels can be helpful for both employees and administrators but can also make label deployment more complicated. It really depends on what works best for you!
For the purposes of this blog article, we’ll focus on the Groups & sites settings for a sensitivity label.
Follow these steps to configure "Groups & sites" settings for a sensitivity label:
1. Navigate to the Labels page in the portal. (Solutions > Information protection > Sensitivity labels)
2. Once on the Labels page, start configuring your new sensitivity label by clicking on + Create a label.

Note:
You can also choose to configure “Groups & sites” protection settings for an existing sensitivity label. To edit an existing label, select it, and then select the Edit label button. You can then jump ahead to step 4.
3. On the Provide basic details for this label page, clarify the purpose of your new sensitivity label by filling out the Name, Display name, Label priority, and Description for users fields.
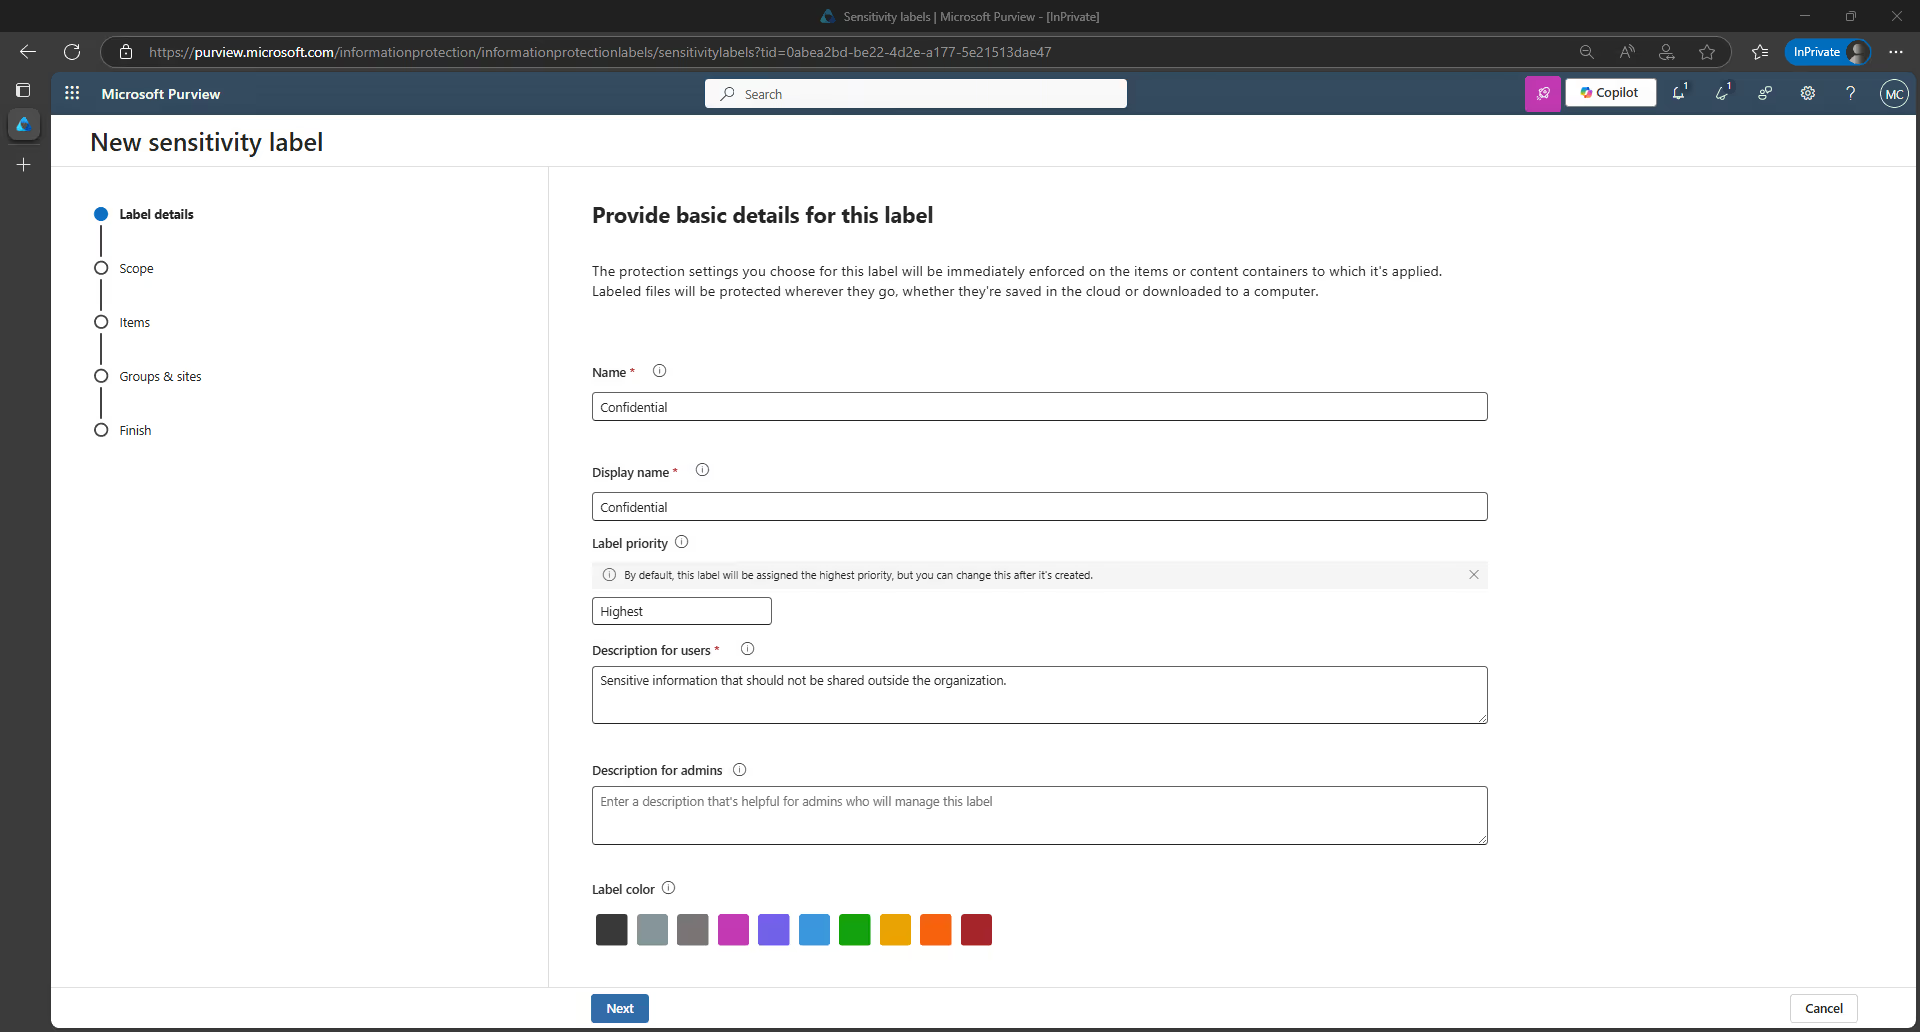
Pay special attention to the Display name and Descriptions for users fields, as this is the content that employees will see. Then, click Next.
4. On the Define the scope for this label page, the options you select will determine the label’s scope for the settings that you can configure and where they will be visible when published.

- If Items is selected, you can configure settings in this wizard that apply to apps that support sensitivity labels, such as Office Word and Outlook. If this option isn’t selected, the wizard will display the first page of these settings but you won’t be able to configure them and the labels won’t be available for users to select in these apps.
- If Groups & sites is selected, you can configure settings in this wizard that apply to Microsoft 365 groups and sites for Teams and SharePoint. If this option isn’t selected, the wizard will display the first page of these settings but you won’t be able to configure them and the labels won’t be available for users to select for groups and sites.
Since we’re focusing on using sensitivity labels with Teams in this scenario, check the box next to Groups & sites. Then, click Next.
5. Next, you need to define the protection settings for your sensitivity label, which will include:
- External sharing and conditional access
- Privacy and external user access
- Private teams discoverability and shared channel controls
6. If you selected the Privacy and external user access page, you will be prompted to configure these settings:

Privacy settings:
- You can choose to make your default setting Public if you want anyone in your organization to be able to access the team where you’ve applied this label. Or, you can:
- Choose Private if you want to restrict access to only approved members in your organization.
- Select None for situations where you want to use the sensitivity label to protect the container’s content but still want to let users configure the team's privacy settings themselves.
When you select either the Public or Private settings, your chosen setting will automatically replace any previous privacy setting that might be configured for the team. Then, it locks the privacy value so that you can only change it by first removing the sensitivity label.
If a label is removed, its privacy setting remains, but the team owner has the power to change it again.
External user access settings:
- You can choose whether or not the team owner can add guests to the group. By default, this box is unchecked.
When you’re finished, click Next.
7. If you selected External sharing and conditional access settings, you will be prompted to configure these settings on the next page:
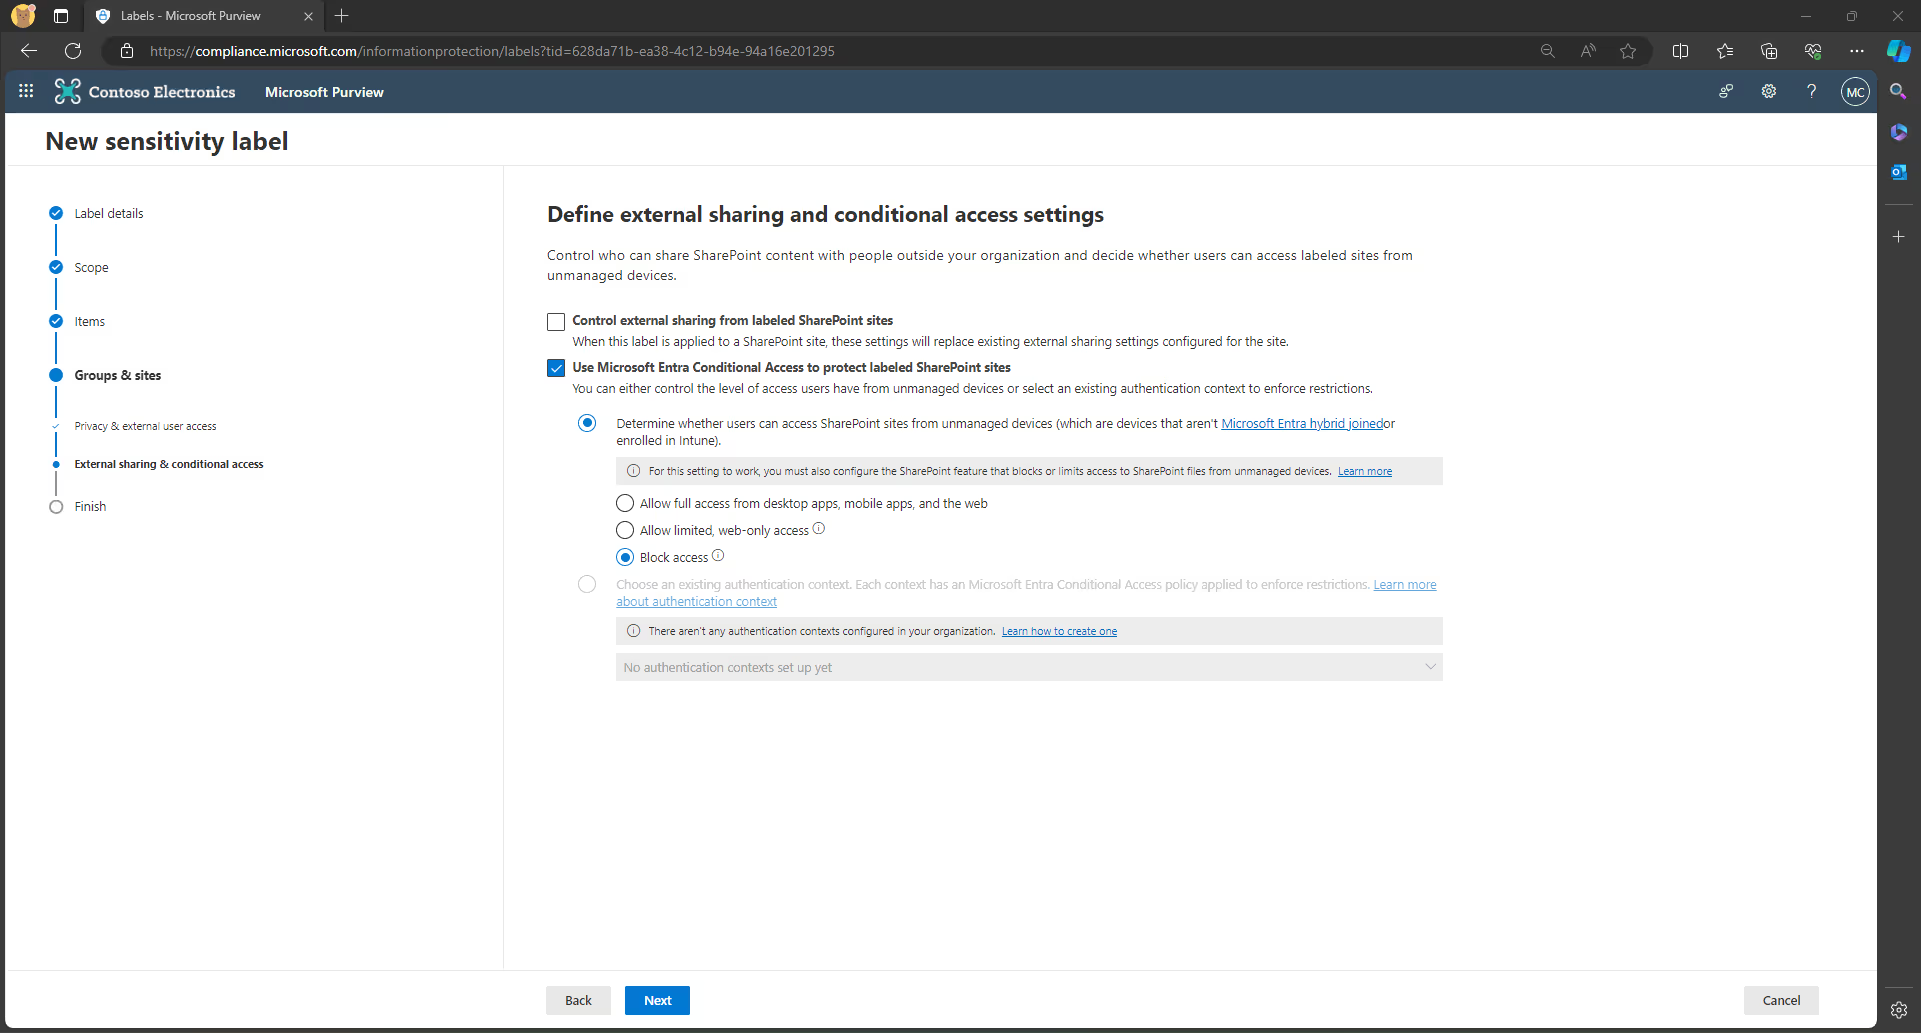
Control external sharing from labeled SharePoint sites setting:
- Select this option, then choose how you want to customize it, by either allowing external sharing:
- For anyone
- New and existing guests
- Existing guests
- Only people in your organization
- This setting is currently in preview.
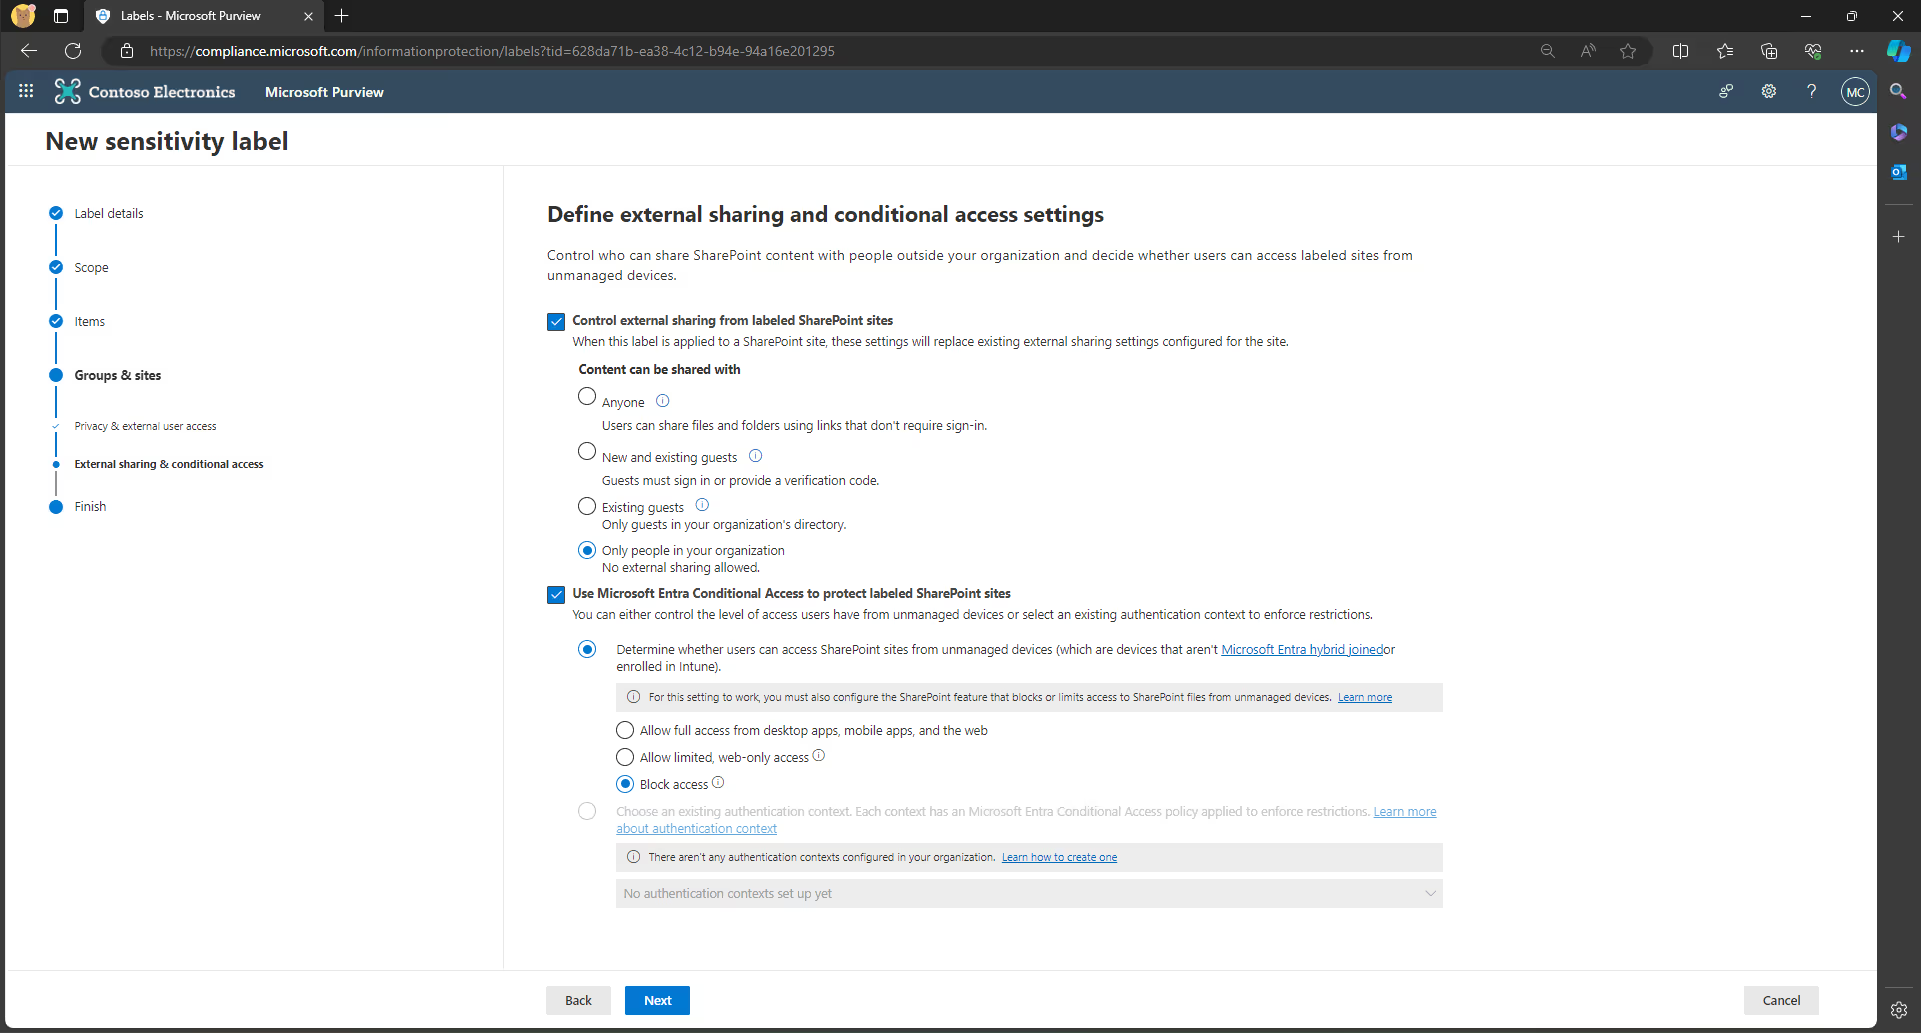
Use Microsoft Entra Conditional Access to protect labeled SharePoint sites setting:
- This setting allows you to determine whether users can access SharePoint sites from unmanaged devices (devices that aren’t hybrid Microsoft Entra joined or enrolled in Intune).
- Select either:
- Allow full access from desktop apps, mobile apps, and the web
- Allow limited, web-only access
- Block access
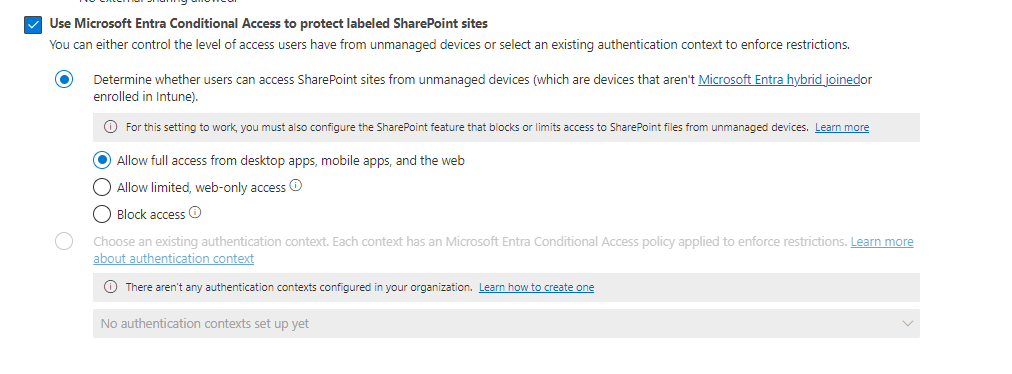
Note: As you can see from the image above, this setting requires you to configure the SharePoint feature that blocks or limits access to SharePoint files from unmanaged devices. You can find more information on how to control access from unmanaged devices in Microsoft’s official SharePoint documentation.
When you're finished configuring settings on this page, click Next.
8. If you selected Private teams discoverability and shared channel controls, you will be prompted to configure these settings on the next page:
Private teams discoverability setting:
You can select the checkbox for “Allow users to discover private teams that have this label applied” so that users with permission to discover private teams can discover a private team with this sensitivity label. If you don’t select this option, then the private team with this sensitivity label can’t be discovered by all users.
Teams shared channels setting:
Here, you can choose to allow or prevent other teams from being invited to the shared channels of the original team with the applied sensitivity label, with the option of restricting access to:
- Internal only
- Same label only
- Private team only
Note: These options have a dependency on the settings on the previous Privacy and external user access page - so you may need to change your selections if you select an incompatible option.
9. Follow the prompts in the labeling wizard until you get to the Review your settings and finish page. If everything is configured how you want it, click on Create label.
3. Publish sensitivity labels that are configured for sites and groups
The final step is to publish the sensitivity labels you’ve created by adding them to a sensitivity label policy (also done in the Microsoft Purview compliance portal > Solutions > Information protection).
When you assign a user a sensitivity label policy that includes these labels, they will be able to select one of them for sites, groups, and, by extension, teams.
Related reading: Secure collaboration & governance best practices for Microsoft Teams
Follow these steps to publish sensitivity labels by creating a label policy:
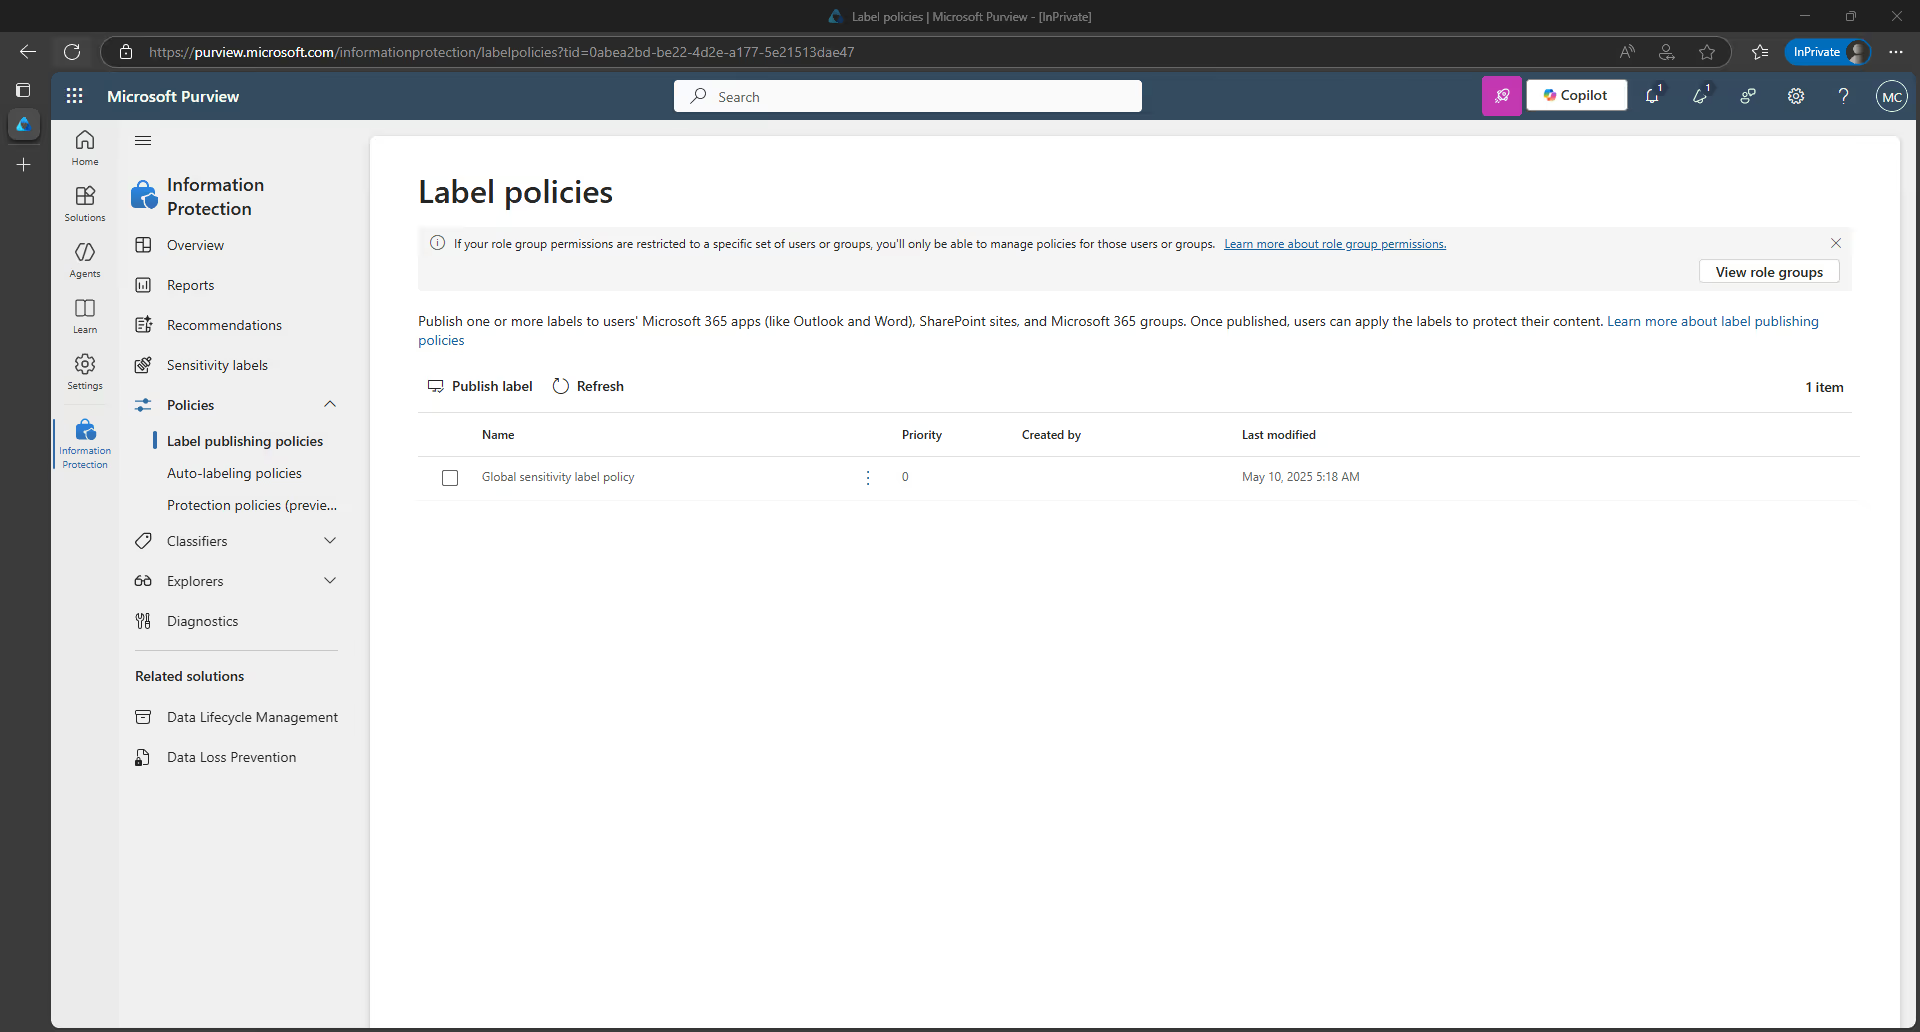
1. In the Microsoft Purview compliance portal, navigate to the Label policies tab. Then click, on Publish labels to start the “Create policy” wizard:
2. On the Choose sensitivity labels to publish page, select the link titled “Choose sensitivity labels to publish”. Select the labels that you want to make available in apps and to services—in this scenario, in Teams—and then click on Add.

3. Review the selected labels. Select Edit if you want to make any changes. Otherwise, click Next.
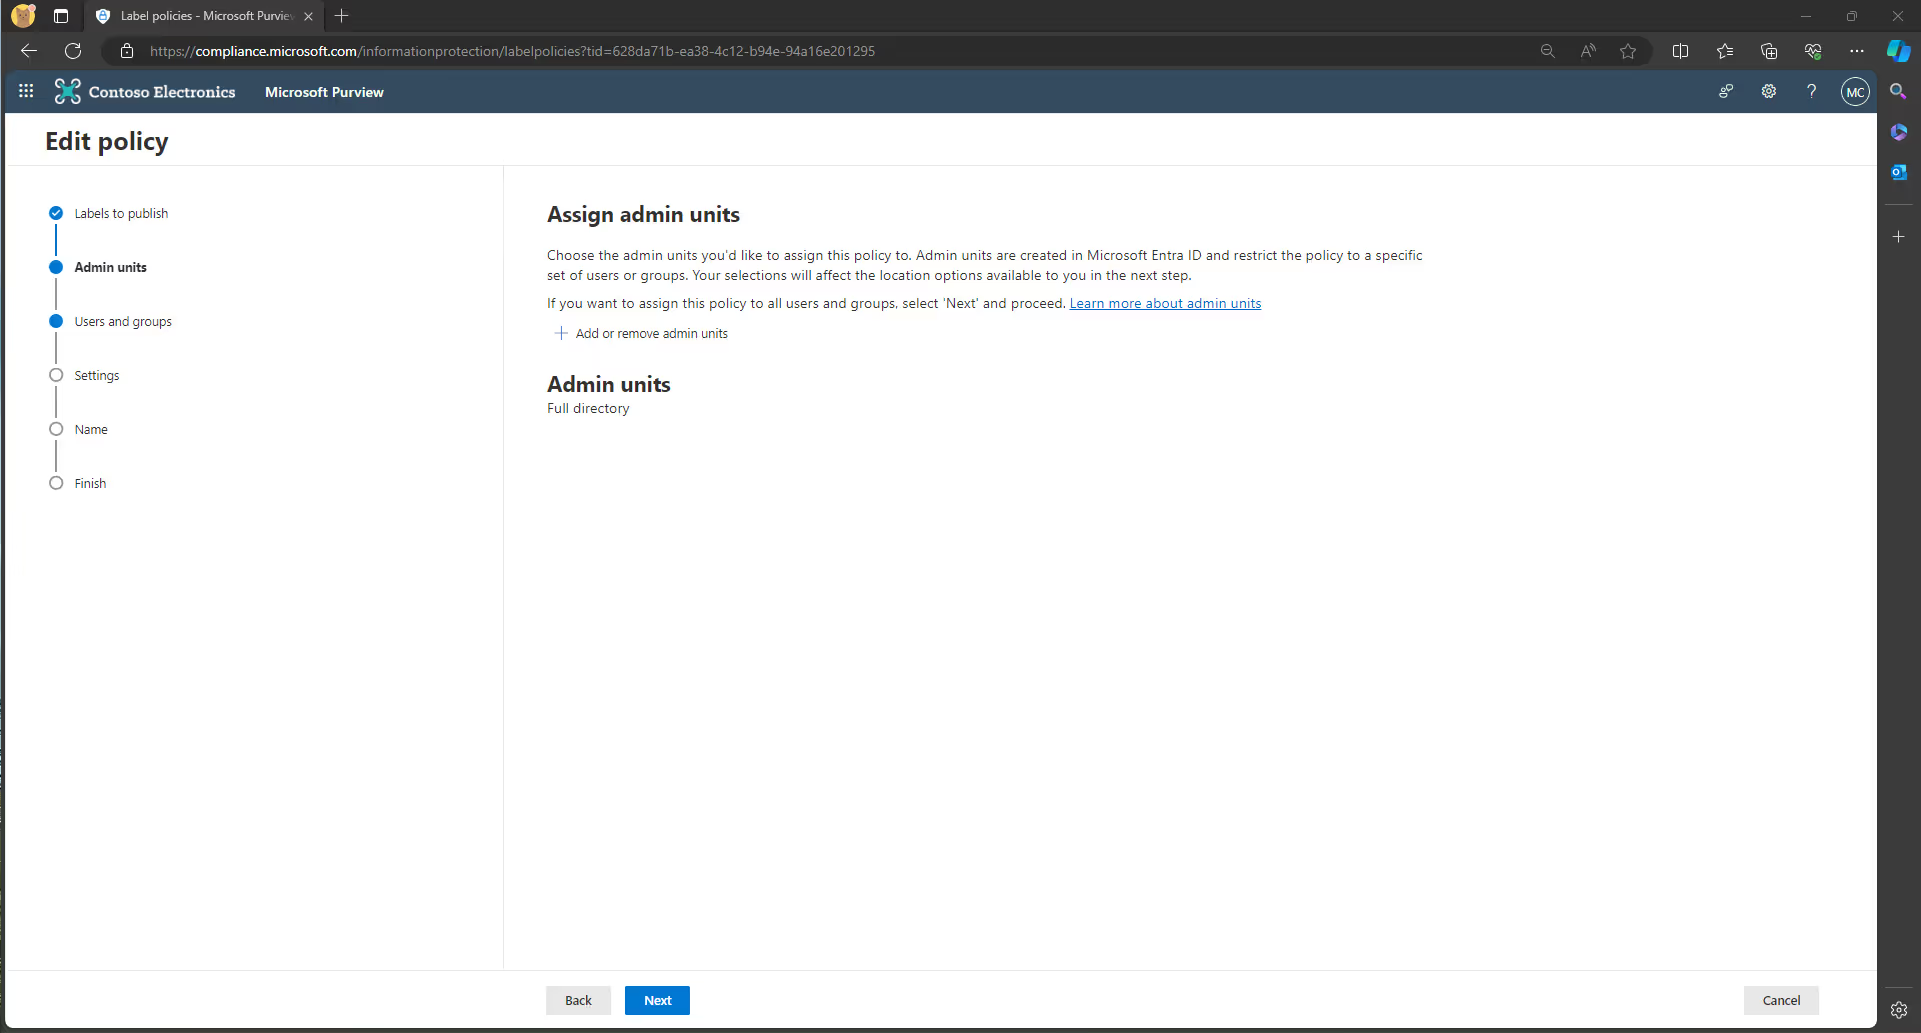
4. Here, you have the option to Assign admin units. This feature allows your organization to subdivide into smaller units, and then assign an administrator to specifically manage solely the members of their unit. Then, when you select administrative units here, you can automatically restrict your label policy to specific users. You need to create these admin units in Microsoft Entra ID.
5. On the Publish to users and groups page, decide who can access your selected labels. If you want to publish them to all users and groups, then you can just click Next.

However, if you want to make the selected labels available to specific users, distribution groups, mail-enabled security groups, or Microsoft 365 groups, then select Choose users or groups and follow the prompts before continuing.
6. Follow the prompts to configure the policy settings, then click Next.

You will only be able to see policy settings that match the scope of the labels that you selected. Check out the official Microsoft documentation for more details on what label policies can do.
7. Follow the wizard's prompts to name your policy and review your settings. When you’re finished, click on Submit.
Sensitivity labels: a game-changer for everyone!
Completing the wizard automatically publishes the label policy. The users who are assigned this sensitivity label policy will now be able to see the included label and select it for sites and groups—as well as teams in Microsoft Teams!
Configuring and publishing sensitivity labels to be used with Microsoft Teams lets you classify and protect sensitive data at the container level—in this case, at the level of individual teams. By integrating the sensitivity labeling feature directly within a user’s regular workflow in Teams, you can stay on top of security without standing in the way of their productivity.
It’s a win-win situation—for employees, and for IT!


.svg)
.avif)
%20(1).avif)



.png)

