

.svg)

.avif)
The simplest way to migrate to Microsoft 365
Move your content efficiently with minimal downtime & maximum data fidelity!
Book demo%20(1).avif)
Master Hacks: Migrate like a pro
Check out our video series to help you turn migration projects into masterpieces!
Table of contents
SharePoint migrations can be intimidating. So, we evaluated the SharePoint Migration Tool on how it supports the migration process.
Is the SharePoint Migration Tool (SPMT) enough to complete your migration successfully?
We’ll walk you through the steps and benefits of using the SPMT for a relatively simple project. We also cover the tool’s limitations, how to assess whether it suits your migration needs, and guide you on effectively leveraging it if you use it.
Related: A side-by-side comparison of the ShareGate SharePoint Migration tool vs. SPMT
SharePoint Migration Tool (SPMT) features
Microsoft developed its SharePoint Migration Tool (SPMT) to simplify migrating on-premises SharePoint Server sites to SharePoint Online and Microsoft 365.
The tool can migrate:
- SharePoint sites created in SharePoint Server 2010, 2013, 2016, and 2019 and SharePoint Foundation 2010 and 2013.
- Workflows created in SharePoint Server 2010 and SharePoint Designer 2010 and 2013.
Its basic features include:
- Content migration: Migrate data to SharePoint Online, Teams, and OneDrive for Business from your on-premises SharePoint server and document libraries, file shares, and other cloud storage platforms. (Ex: files, folders, documents, and lists.)
- Configuration migration: Migrate basic configurations like site structure, permissions, and metadata from your SharePoint Server to SharePoint Online.
- Easy-to-use interface: The newer navigation simplifies the migration process, ensuring accessibility for users of all technical levels.
- Error handling and reporting: At a basic level, the tool tracks migration progress and flags issues.
Compare ShareGate vs. SPMT: A side-by-side migration tool comparison
How to use the Microsoft SharePoint Migration Tool
Microsoft 365 subscribers can access the SPMT for free and get started quickly with its minimalist UI.
Here’s what configuring a site migration involves:

Step 1: Sign in to your tenant.

Step 2: Select Add new migration.
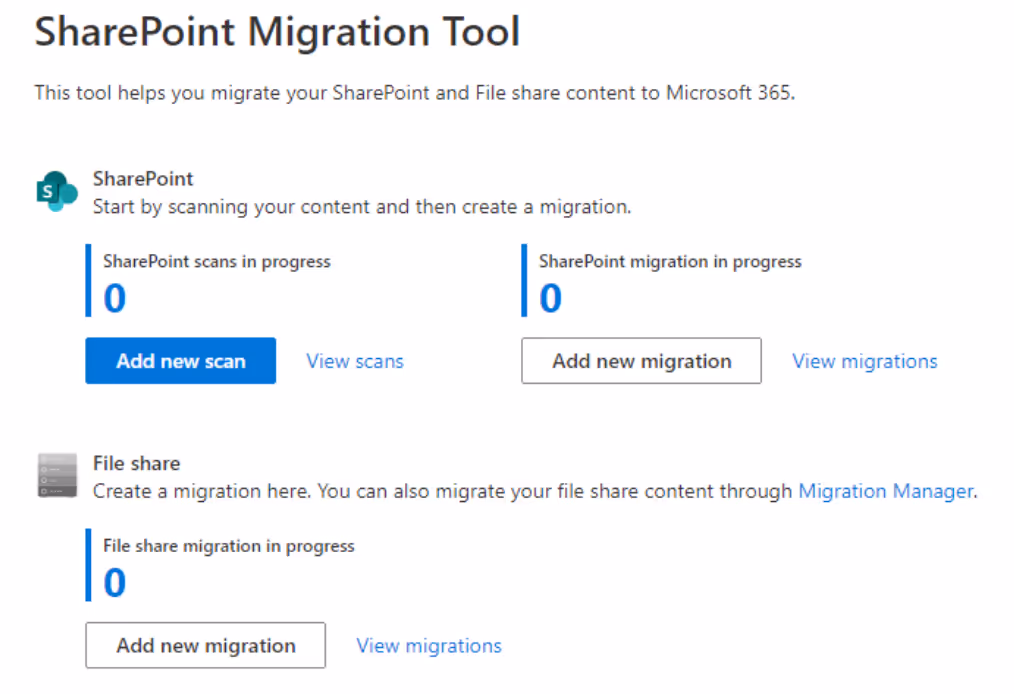
Step 3: Select your method.
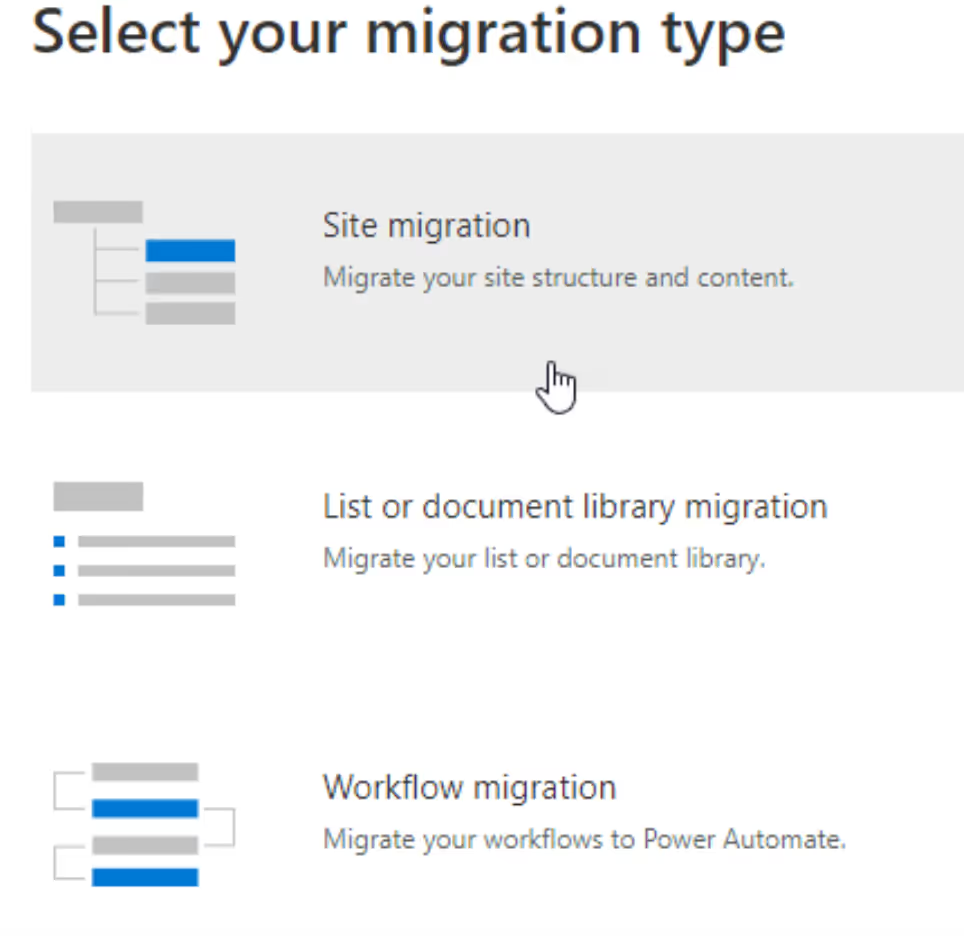
Step 4: Select your migration type
Step 5: Enter the URL of the SharePoint Server site to migrate.
Step 6: Choose SharePoint under “select a destination.”
Step 7: Select a site structure. (Your choice may require additional configuration steps!)
Step 8: Review your migration.
Step 9: When you’re done tweaking your settings, click Start and let the tool run.
Step 10: Monitor your migration process’s progress via the tool’s built-in reporting. (Unfortunately, it’s hard to investigate errors. We migrated one folder containing seven files and ended up with many reports.)
Step 12: After migration, save your settings to rerun the task later, copying only new or updated files. For the first migration, adjust this setting before submission, as it will apply to all future tasks
Once completed, you can only close the tool; navigation to previous screens isn’t available. Pretty frustrating!
Overall, the Microsoft SharePoint Migration Tool works well for smaller migration projects. However, many organizations need more intuitive features for a successful SharePoint migration from on-premise to online.
Exploring SharePoint Migration tool limitations
Understanding the SharePoint migration tool’s limitations helps with effective migration planning:
- You can decide whether it’s the best tool for the job.
- If you decide to use it, you can proactively develop appropriate strategies to mitigate potential challenges.
Limited compatibility
The tool only supports migrations from certain newer SharePoint Server versions and SharePoint Online and won’t work well if your organization uses legacy SharePoint Server versions and other document management systems.
No support for custom or complex solutions
The SPMT also doesn’t directly support custom solutions like workflows, complex web parts, or branding. It also doesn’t guide you through the migration process, making enhancing security and preserving data integrity harder if you have an intricate setup.
During migration planning, assess your current environment's complexity against the SPMT's limitations to see if you need alternative approaches or third-party tools for your SharePoint migration.
Limited granularity and mapping options
The SPMT also lacks detailed mapping options for custom metadata and managed properties, leading to data loss or inconsistency.
Managed metadata is critical to the SharePoint Online environment, so you may need other options if the SPMT can’t accurately transfer your metadata and properties.
File size limitations
The tool supports a 250 GB file size maximum for SharePoint migrations. These file size limitations may lead to performance issues, timeouts, and a long migration process.
There’s also no way to bulk manage content, including migrating customized metadata in a document library or run multiple migration instances concurrently on the same machine.
Handling and reporting
The SPMT's reporting is limited and confusing, and the user experience needs improvement. It lacks detailed insights into specific migration errors or exceptions. And it requires manual investigation, making complex issues hard to diagnose and requiring extra time to thoroughly test and monitor that everything transfers correctly.
Lack of automation
If your SharePoint migration requires sophisticated scheduling, content transformation, or systems integrations, you'll need to set these up manually, which is time-consuming.
Yes, it’s possible to automate parts of your migration with Microsoft PowerShell. However, doing so requires significant technical expertise. Even if you have those skills, it could still mean losing valuable time on maintaining scripts that never fully automate the migration process, rather than supporting meaningful business objectives.
Instead, a third-party fully-automated solution like ShareGate Migrate can accelerate your migrations. It’s packed with best practices that guide you at every stage of the journey.
How to determine whether the SharePoint Migration Tool is right for you to SharePoint Online
Follow these best practices to help decide if you should use the SharePoint Migration Tool (SPMT) for your migration:
- Thorough planning: Planning is critical to any successful SharePoint migration. Evaluate the tool’s limitations against your specific migration scenario, either to proactively identify problems or realize you need another option.
- Evaluating compatibility: During your migration planning, verify the SPMT’s compatibility with your source and target environments.
- Assessing customization needs: Does the SPMT support your current system’s custom workflows or SharePoint sites? There aren’t a lot of workarounds, so if not, you’ll need an alternative approach to avoid painstaking manual labor. A third-party tool like ShareGate can provide a highly customized environment.
- Conducting pilot migrations: Pilot migrations help you test the SPMT’s capacity to address your needs and identify additional unanticipated issues.
- Data validation: Does your data maintain integrity and accuracy throughout the migration process? Catching this early helps you quickly resolve data issues or decide if you need a different approach.
- Exploring third-party tools: Options like ShareGate Migrate can automate much of the work. Get started quickly with our user-friendly interface and simple workflows. No PowerShell required, but if cmdlts are your thing, we still got you! In just one tool, ShareGate Migrate handles all migration workloads including SharePoint, Teams, Exchange, Box, Google, file shares, and more. With the option for concurrent migrations to accelerate transfer throughput with multiple machine migrations running in parallel, it makes any migration easier and faster, especially those involving large, complex SharePoint environments.
TL;DR: Microsoft SharePoint Migration Tool cheat sheet
Discover if the SharePoint Migration Tool suits your needs with this comprehensive list of its capabilities and limitations:
Supported sources
- On-premises file shares
- SharePoint 2010, 2013, 2016 and 2019
- SharePoint Foundation 2010 and 2013
- SharePoint Designer 2010 and 2013 workflow
- JSON and CSV files for bulk uploading migration tasks
Supported destinations
- SharePoint Online
- OneDrive
- Microsoft Teams
Required permission levels
- Migrate at the organization level: Global or SharePoint Admin
- Migrate at the site collection level: Site Admin
Supported items
- Sites and subsites
- Various list templates and libraries
- Documents, images, and other files
- User profiles and permissions (although there are limitations)
- Search indexes and crawl data
- Managed metadata and taxonomy from SharePoint 2013
- Pages in the site asset library
- SharePoint web parts
Unsupported items
- Cross-tenant migrations
- A site without content
- Setting template for destination site
- Master pages
- InfoPath forms
- Customer New/Edit/View forms
- Custom content types, pages, and solutions
- Custom workflows and certain OOTB workflows
- Hidden taxonomy lists and style libraries
SPMT features
- All migration features available via PowerShell cmdlets
- Save migration sessions and resume them later. (You can’t edit initial settings though!)
- Incremental migration mode
- NEW TO SPMT 4.0: Line up multiple migrations without having to wait for the migration process to finish to work on other tasks in the tool
- Migrate to and from specific subfolders
- Auto-create vanilla lists and libraries if missing from your destination site
- Support for bulk migrations using JSON or CSV files
- Pre-migration scanning
- Support for user mapping
- Filtering options
SPMT limitations
- No scheduling feature
- No content export or export to enhance metadata while migrating
- No bulk editing capabilities
- Doesn’t migrate customized lists or libraries
- Doesn’t support running multiple instances per machine
- Several factors can affect migration speed, from network and internet bandwidth to the metadata associated with the migrated content. (Keep in mind that Azure import speeds tend to be highly variable!)
- Logs files in CSV and text files on disk, and there’s no built-in search or filtering
- No built-in support available for the free SPMT, although Microsoft’s FastTrack service (included with an eligible SKU purchase) provides support for data migrations to SharePoint Online.
Enhancing SharePoint migrations with ShareGate
While the SPMT can make your SharePoint migration easier, you may need a more robust tool to handle larger and more complex migrations. That’s why so many organizations rely on ShareGate Migrate.
Avvenire’s success with ShareGate: Reducing SharePoint migration time
Avvenire is a solutions provider specializing in Microsoft technologies that uses ShareGate Migrate for all client SharePoint server migrations. With ShareGate’s migration tool, Avvenire reduced migration time by 15% for its Fortune 500 clients, even for the most complex migrations.
Particularly, ShareGate Migrate’s Source Analysis report helped Avvenire do this by identifying and fixing potential issues before their migrations. The SPMT doesn’t provide this feature.
Migrate faster, smarter, and simpler
Though the SharePoint Migration Tool has an intuitive interface, its file size limitations and other constraints make it challenging for complex scenarios beyond simple file share migrations, like migrating a large or highly customized SharePoint environment.
Theoretically, you could do your SharePoint migration manually instead. But this will be an exhausting and frustrating journey because this approach also only works best for the simplest migrations.
A third-party option like ShareGate Migrate, paired with a migration checklist, is your best bet. ShareGate Migrate will simplify any Microsoft 365 migration project from day one with a single, trusted tool to accelerate your migration from planning through to adoption.


.avif)


.avif)


