Getting started with Microsoft Purview: A practical guide to securing data in Microsoft 365
.svg)

%20(1).avif)
Master Hacks: Migrate like a pro
Check out our video series to help you turn migration projects into masterpieces!
Table of contents
In my last article, I talked about the hidden risks of ignoring Microsoft Purview, like uncontrolled shadow AI, oversharing, and outdated data.
Many organizations recognize these risks but overlook proper data protection using Microsoft Purview. Often, it’s because the pain isn’t felt yet, ownership is unclear, or employees worry Purview will slow them down.
That’s why in this article, we’re getting practical. I’ll walk you through the essential steps to start protecting sensitive data in Microsoft 365 using Purview—how to find what you have, classify and protect it, and roll out sensitivity labels across your organization.
Let’s go!
Quick-start checklist: Follow the steps to uncover AI usage across your environment, assess risk, and take action using Microsoft tools
Stage 1: Discovery
Find where your sensitive data lives
Before you can protect your data, you need to know where it is and what it contains.
Start by reviewing your data security policies. These should define what counts as sensitive information in your organization and how it should be classified and protected.
For example, depending on where your organization operates, your list might include:
- Government-issued identification numbers (e.g., social security, national ID, or citizen service numbers)
- Driver’s license or vehicle registration numbers
- Passport numbers
- Physical or mailing addresses
- Tax identification or VAT numbers
If you’re in healthcare, you might add medical terms and conditions and lab test terms. The key is to define the types of data that matter to your organization and document them clearly. Describe them in detail with specific keywords, characters, or numbers. Then, you can create your own sensitive information types with the following Microsoft Purview tools:
Here's a breakdown of each tool:
Once your sensitive information types are defined, head into Content Search under the Purview eDiscovery solution.

In our example, we’ll search for passport and driver’s license numbers.
On the Content Search page, click on Create a search.
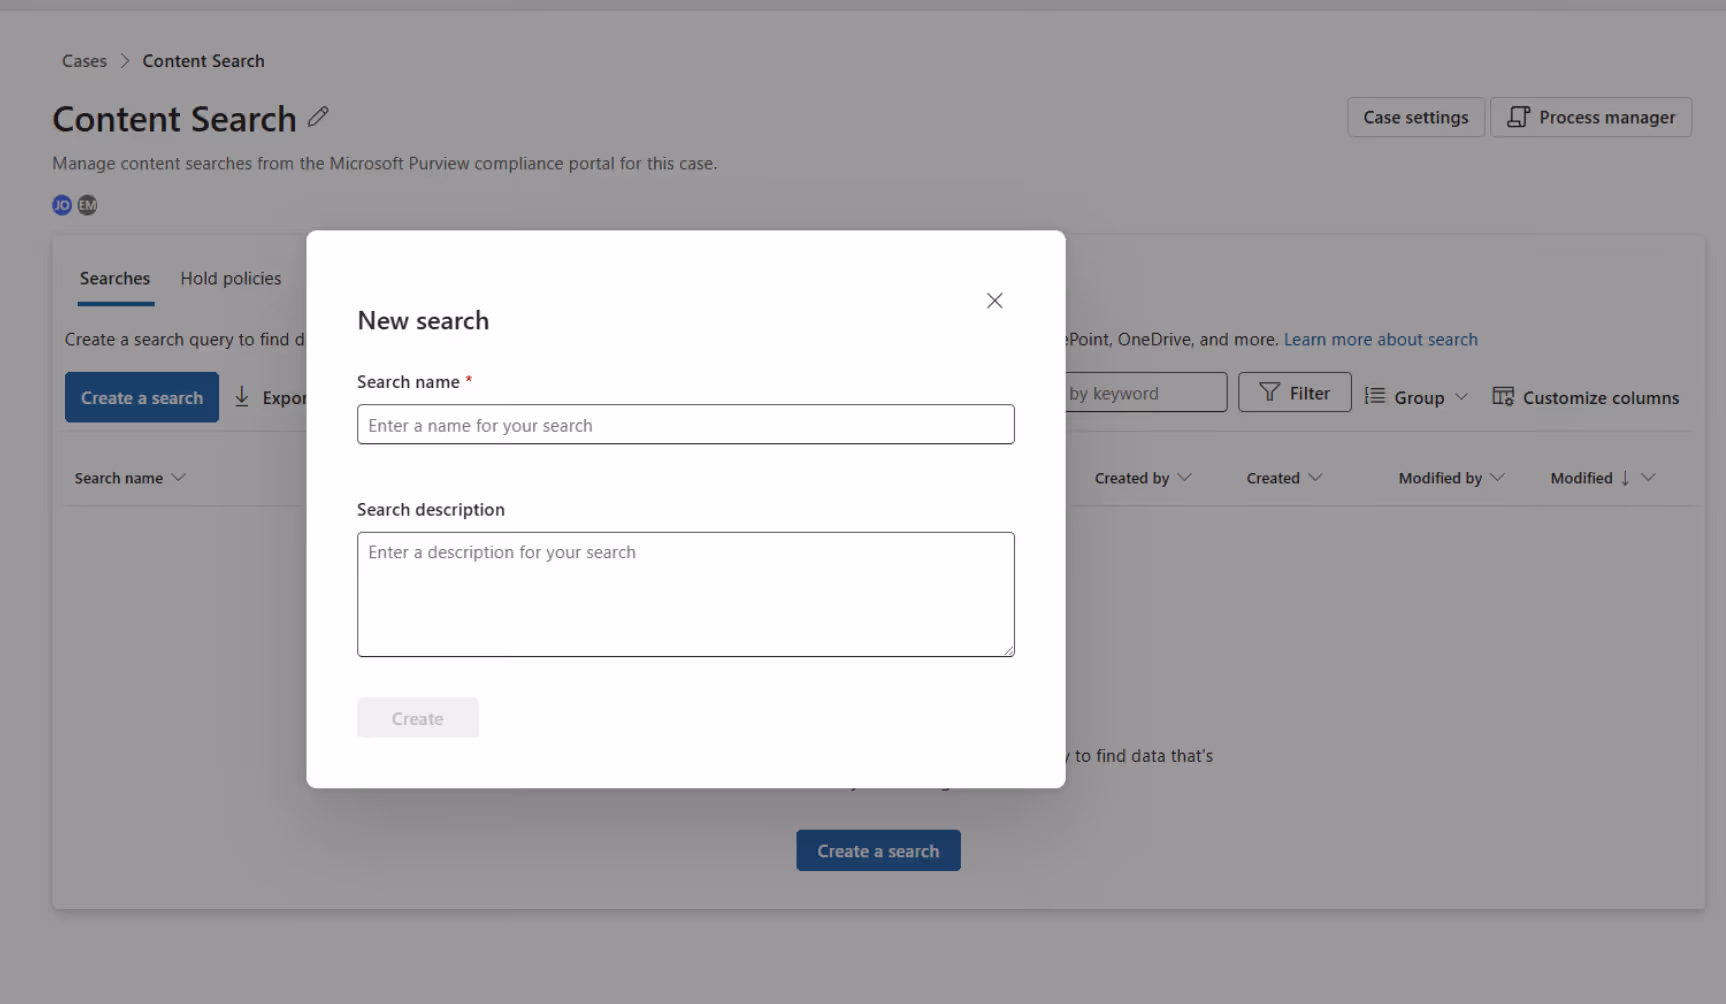
Enter a unique name for your search. Then, click on Create.
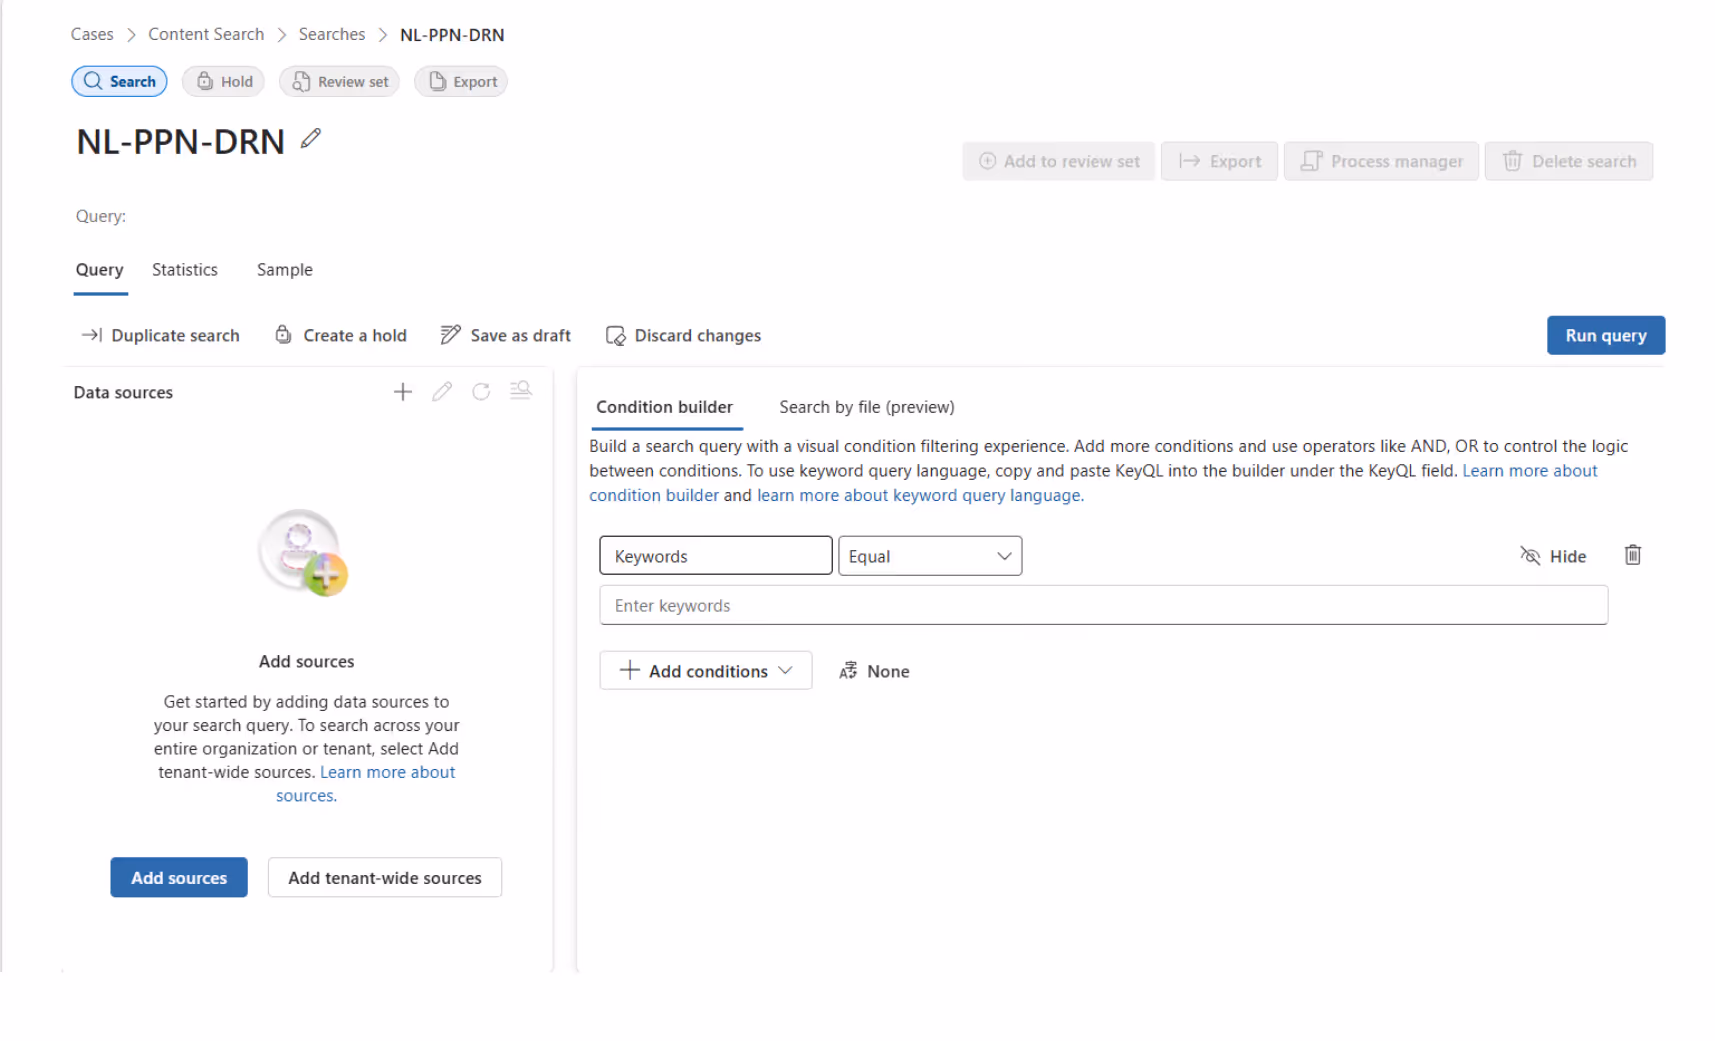
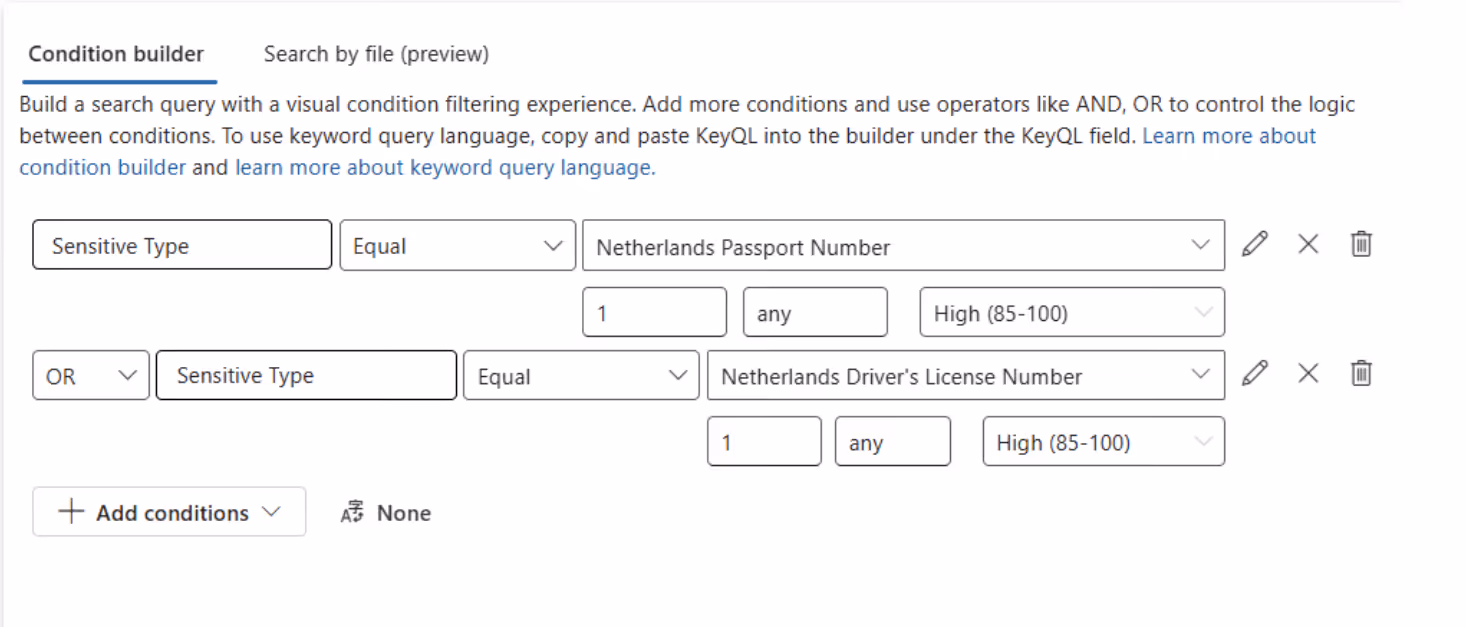
The “Condition builder” will, in our example, search for driver’s license and passport numbers in SharePoint and OneDrive.
1. Delete the Condition keyword
2. Then, click on Add conditions
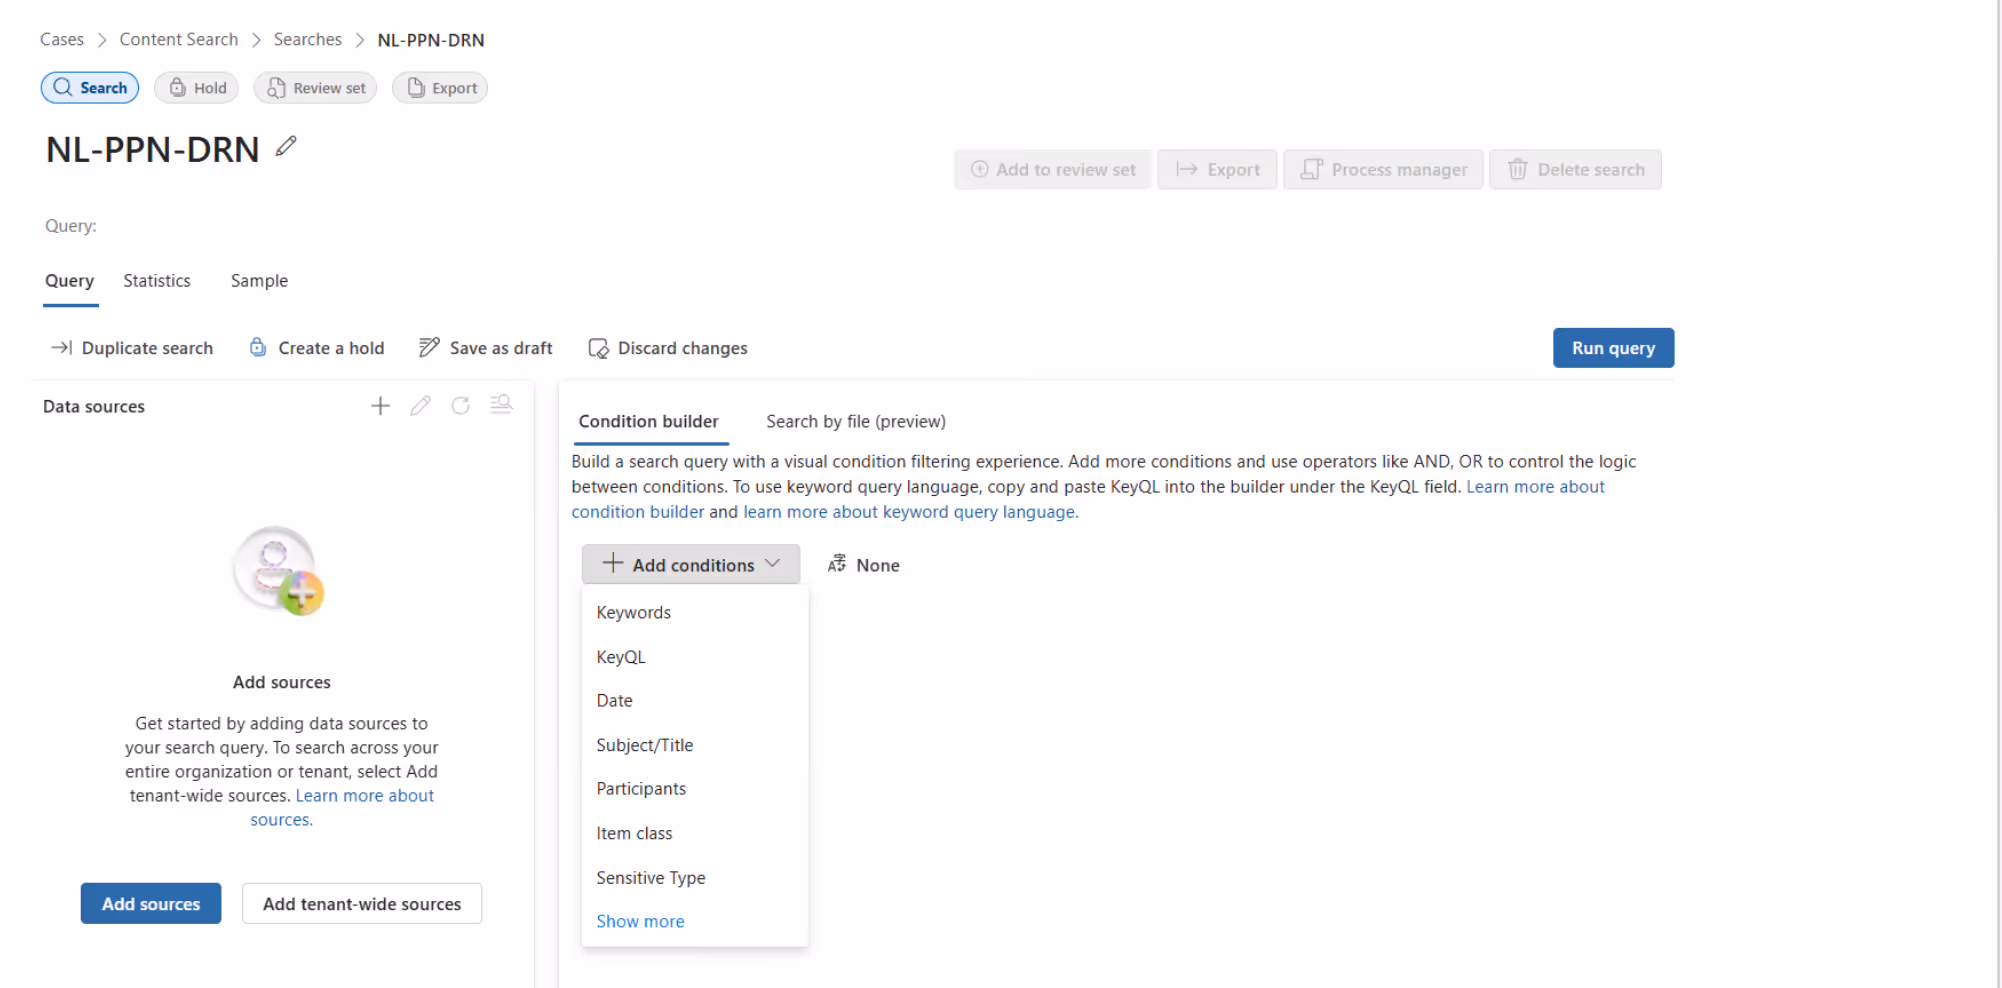
You can use an extensive list of conditions:
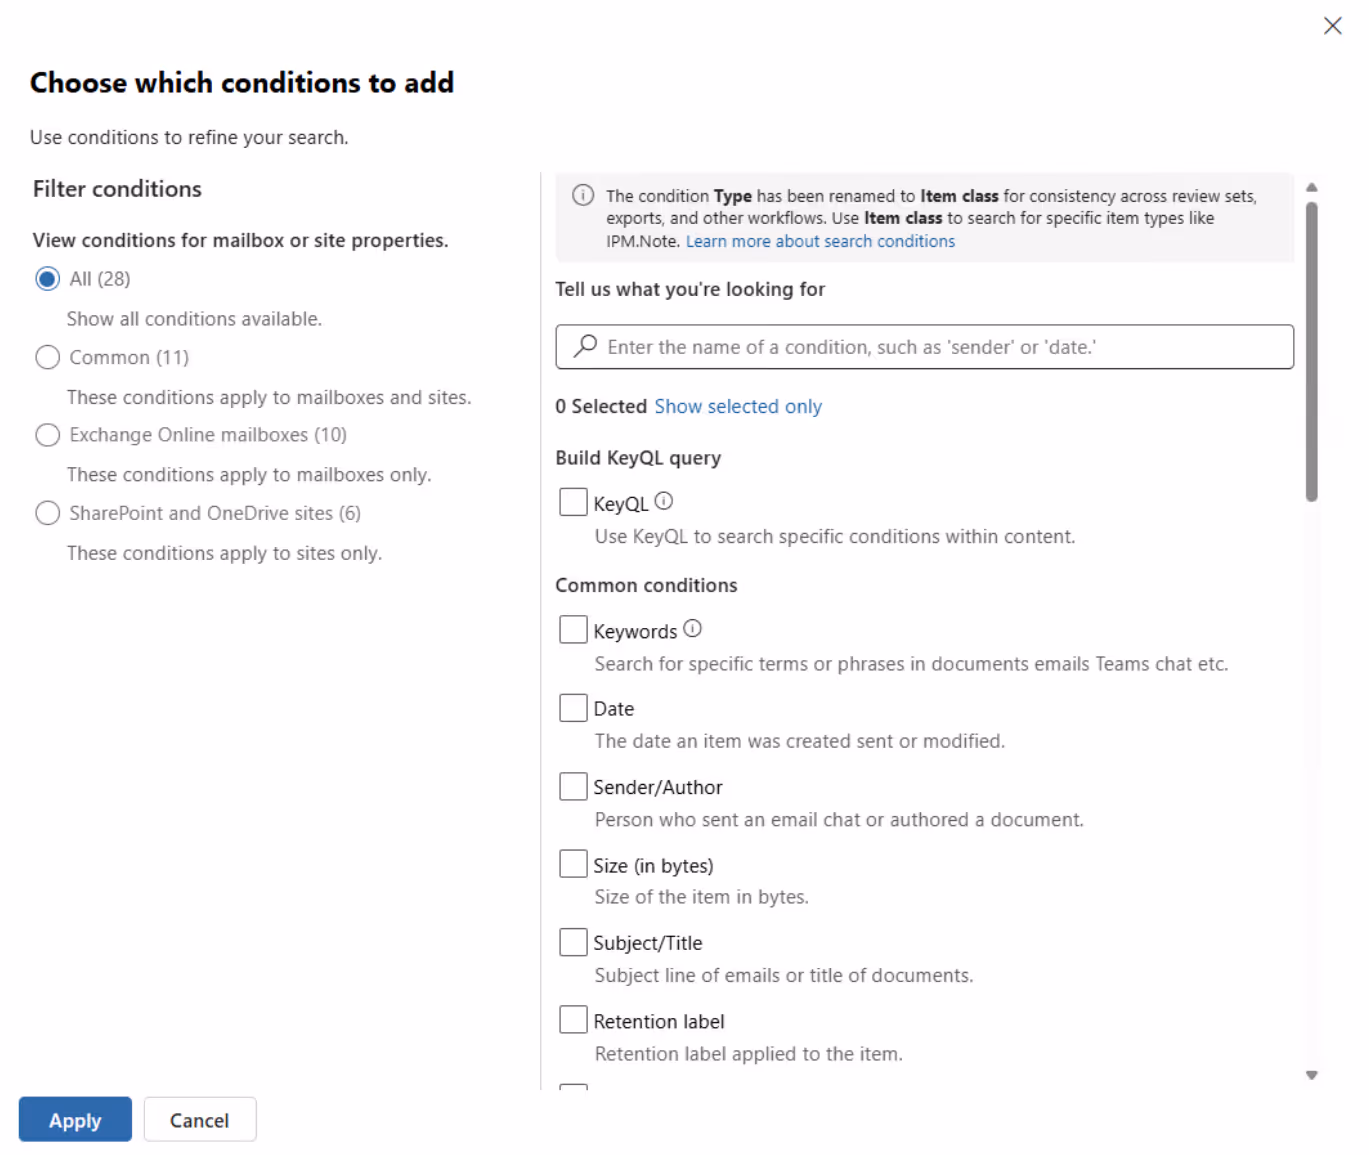
In this case, I've chosen sensitive information types in combination with SharePoint and OneDrive:

You can recreate the same search configuration but with Exchange Online mailboxes for location e-mails and attachments with sensitive data.
You’re in control of the amount of hits and confidence level per sensitive information type:
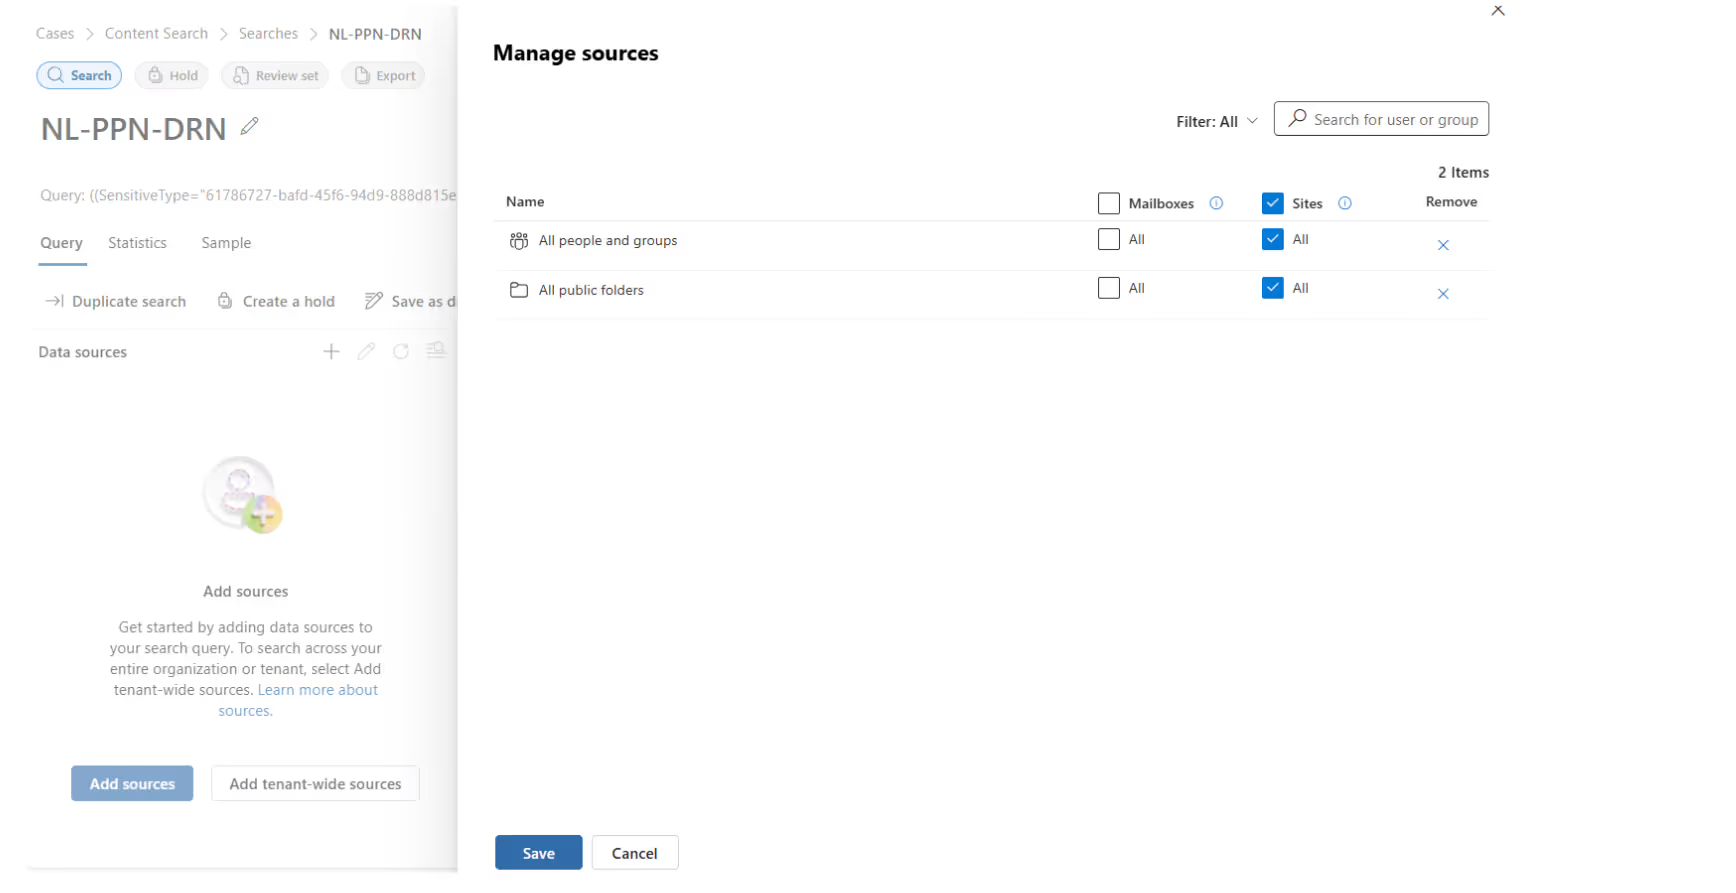
Next, select the data sources with the Add tenant-wide sources. Let’s focus on sites:
Click on Run query and wait for the results. Depending on how much data your organization has stored in Microsoft 365, this might take some time.
Once complete, you’ll see an overview of files containing your defined sensitive information:
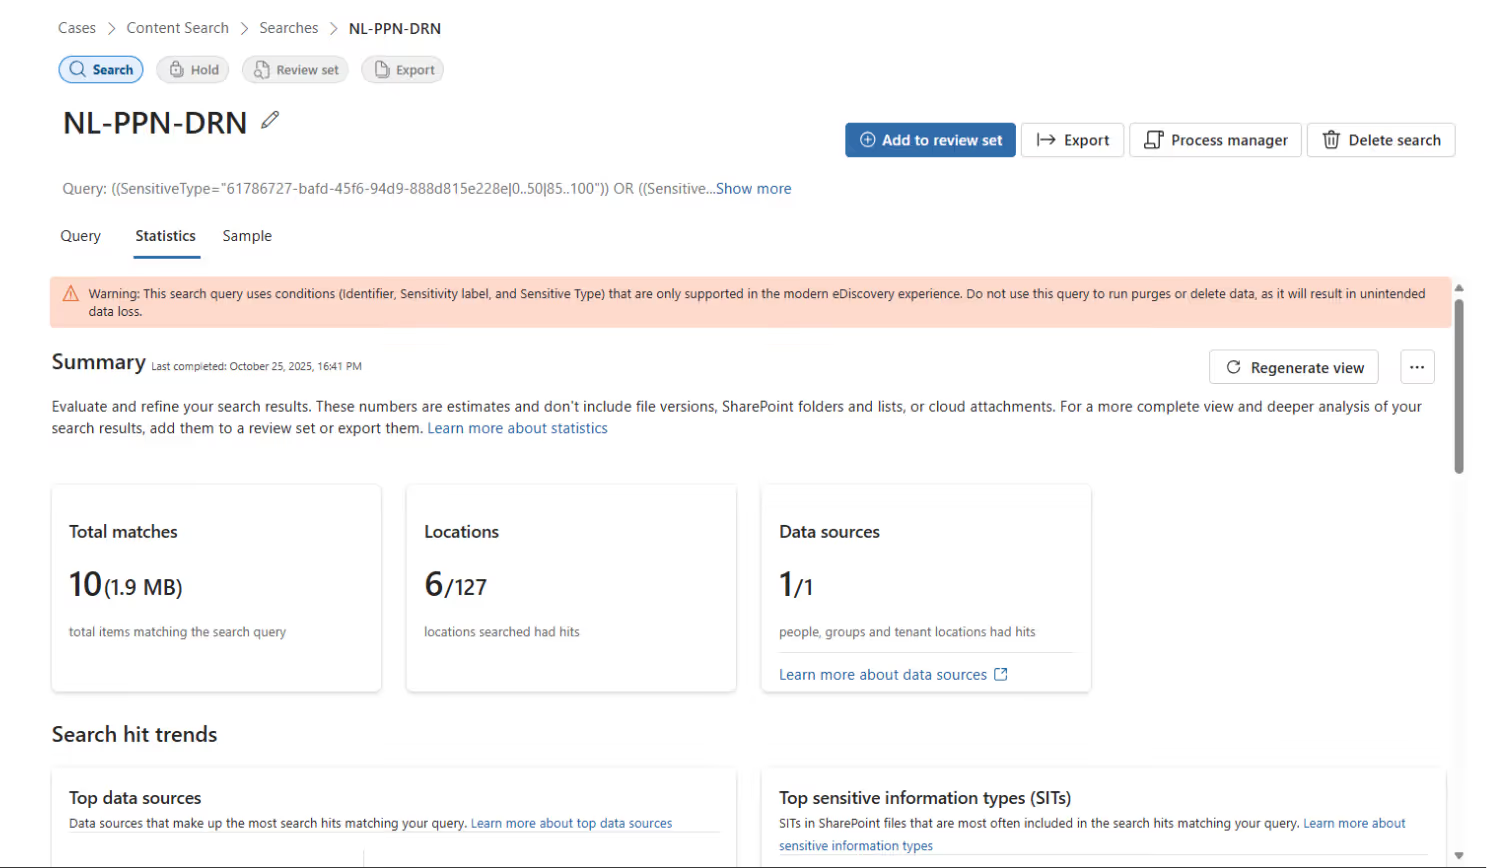
These results give you a clear indication of your current data security posture and where sensitive data might be exposed.
Export the results to a .csv file for deeper analysis. This helps you identify which departments or storage locations (like SharePoint sites or OneDrive folders) contain sensitive data that shouldn’t be there.

Keep in mind that Microsoft Purview isn’t perfect. Before taking action, verify findings carefully, especially if you plan to review actual document content. That process should be approved by HR, Security, or Compliance teams.
If approved, you can use Data Explorer to investigate further:
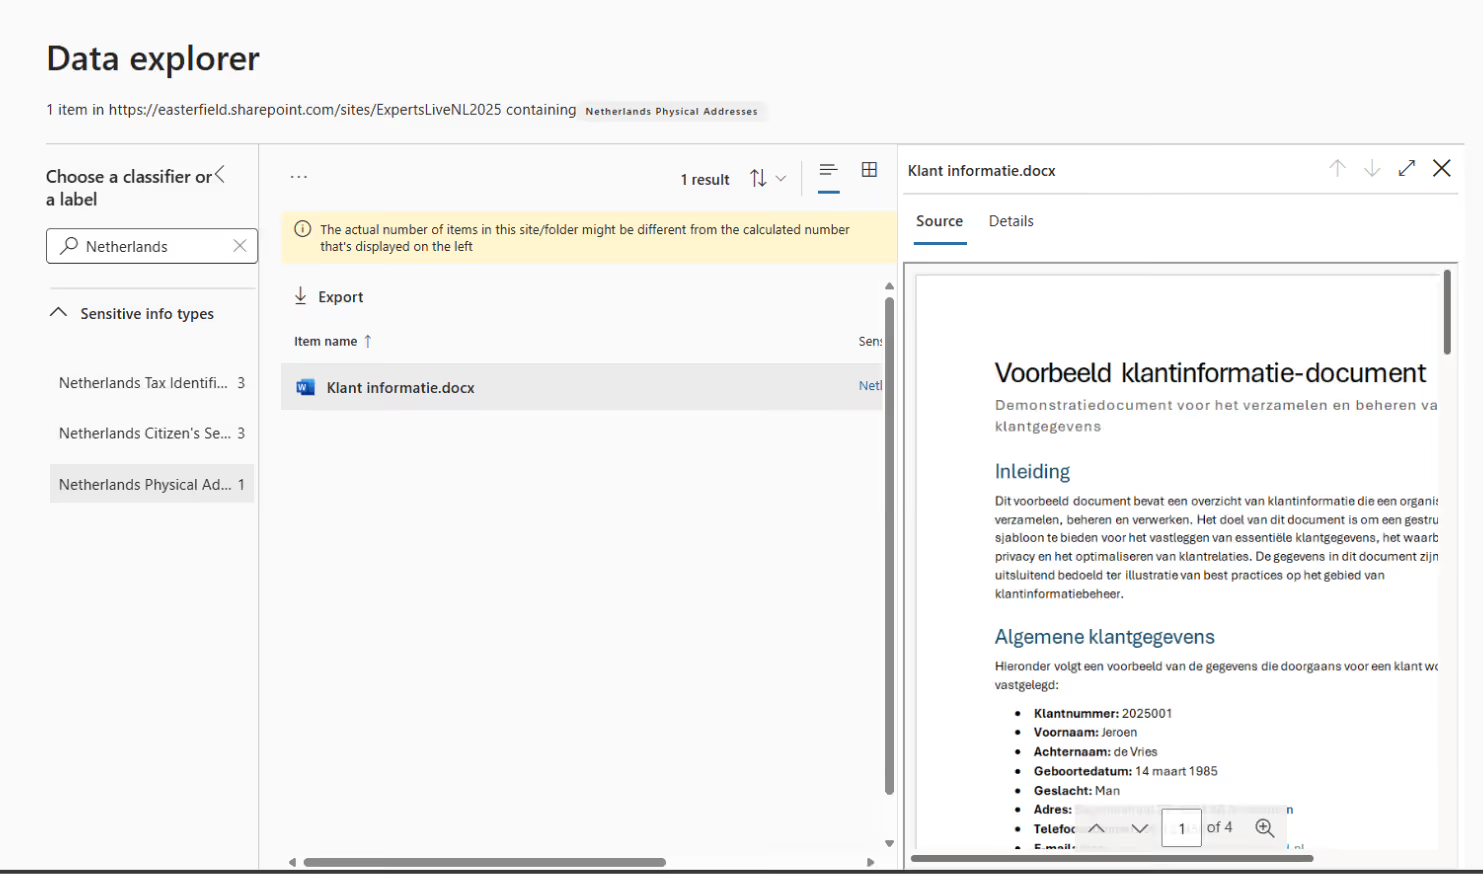
This exercise can help shine a light on just how much sensitive data is scattered across Microsoft 365. Neat, right? Let’s move on to the next step.
Monitor how sensitive data is being used
Finding sensitive data is one thing. Understanding how it moves is another. That’s where Data Loss Prevention (DLP) comes in.
A DLP policy helps you monitor and control how sensitive data is shared, especially with people outside your organization.
1. Head to Data Loss Prevention in the Purview admin center.

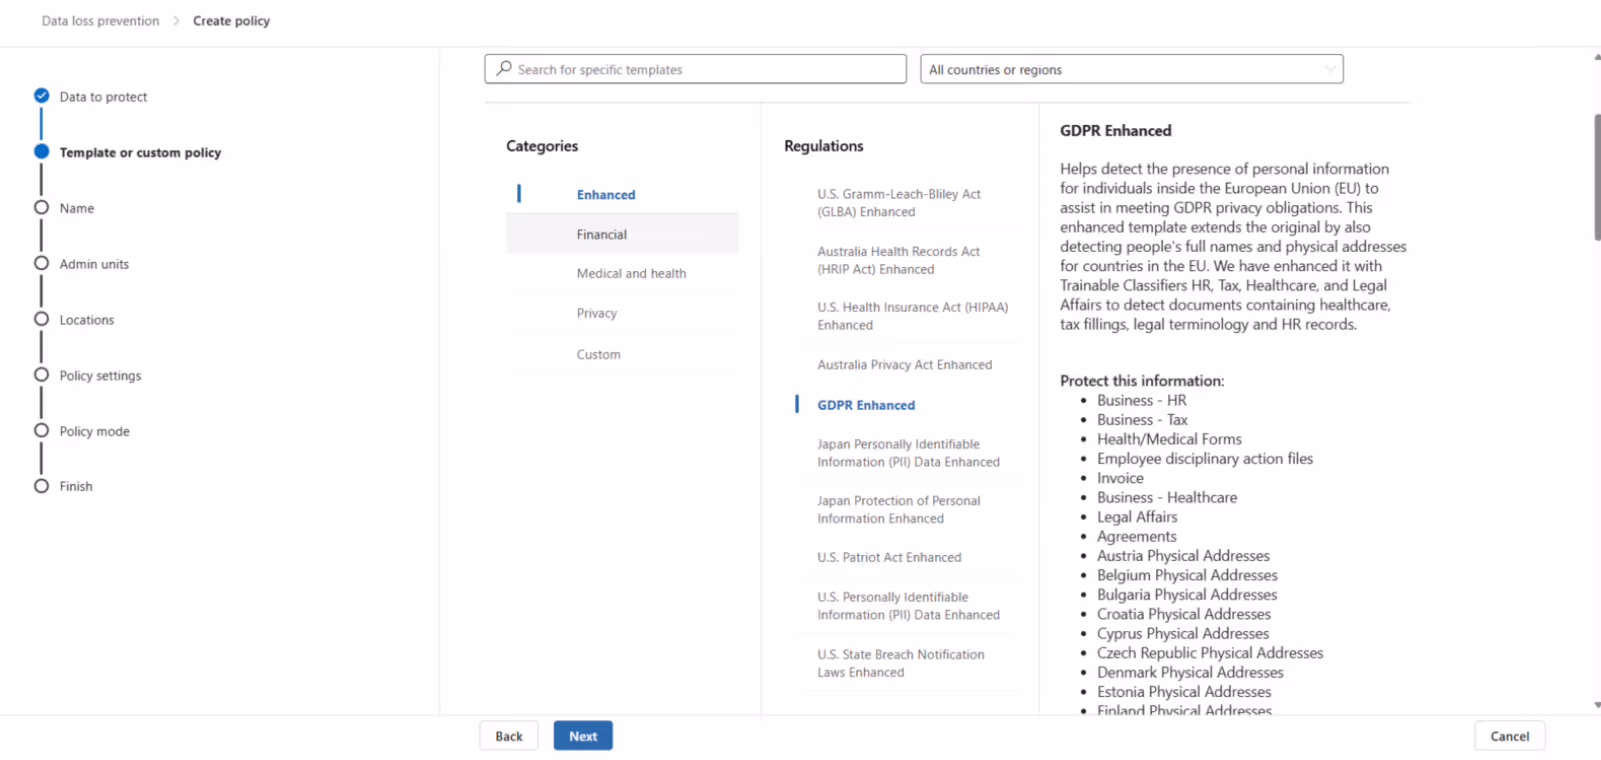
2. Under Policies, click Create policy. You can start with one of Microsoft’s templates or build a custom policy. Microsoft’s templates give you a head start with predefined rules and conditions. I usually create custom policies.
3. After giving the policy a name, the next step is deciding on the location for monitoring the activity involving your sensitive information types:
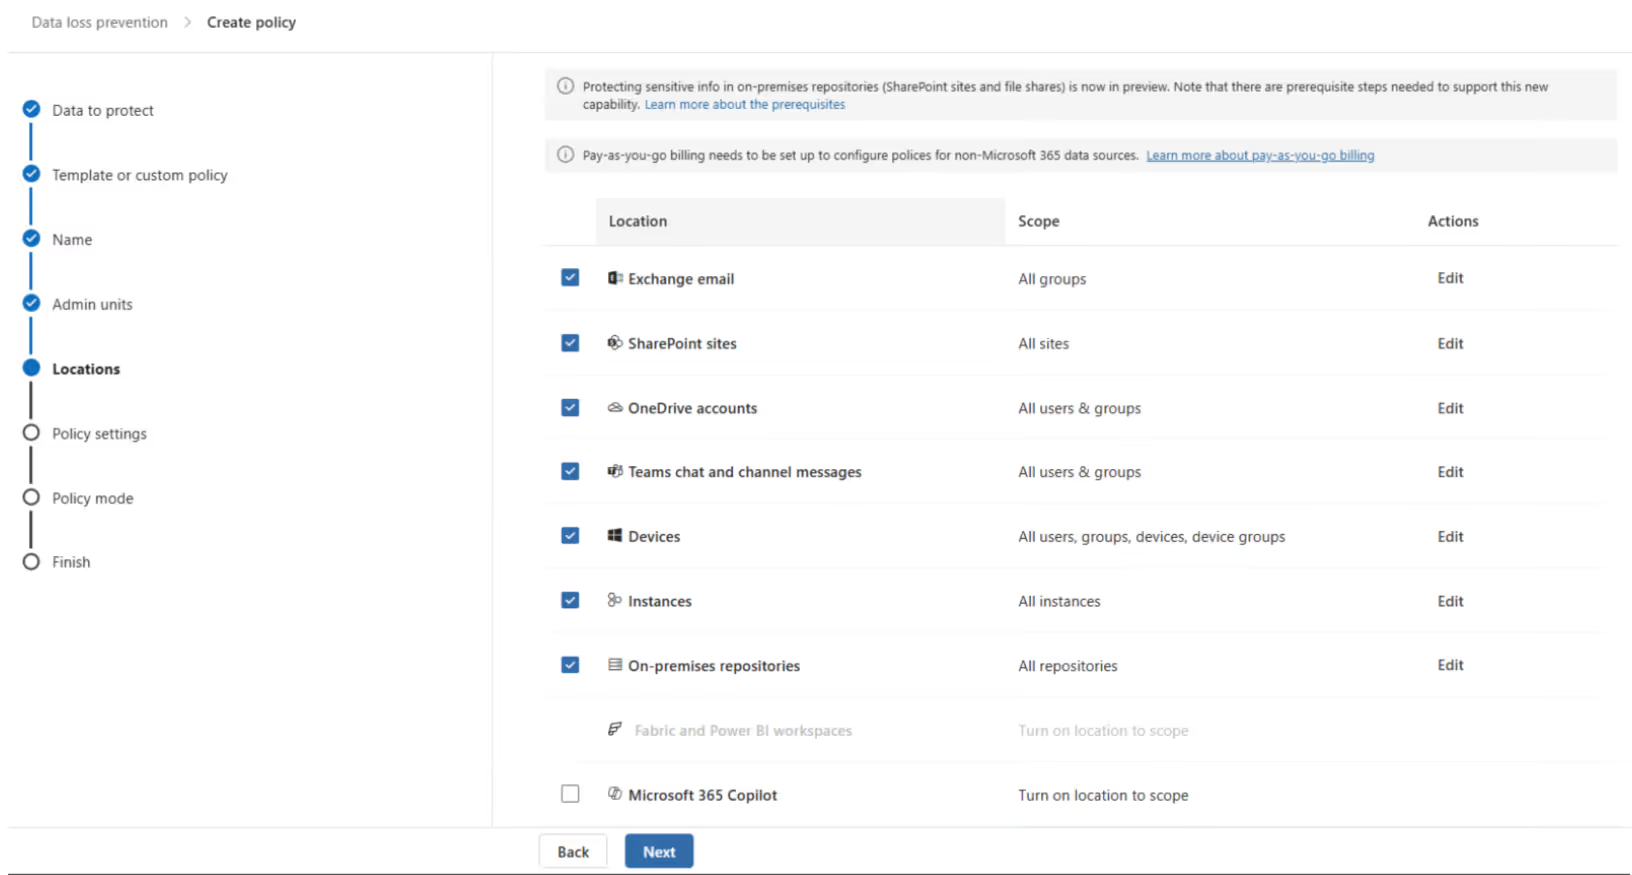
For example, you could start by monitoring activity across these locations:
- Exchange email
- SharePoint and OneDrive (for files)
- Teams (for chats and channel messages)
- Devices, instances, and on-premises
I recommend creating a separate policy for each location because it’s easier to manage that way.

4. At this stage, it's important that you deselect options like actions, user notifications, overrides, and incident reports. You’re only monitoring activity, not enforcing it yet.
5. Run the policy in simulation mode for about two weeks. Afterward, open Activity Explorer to review what’s been happening with your sensitive data.
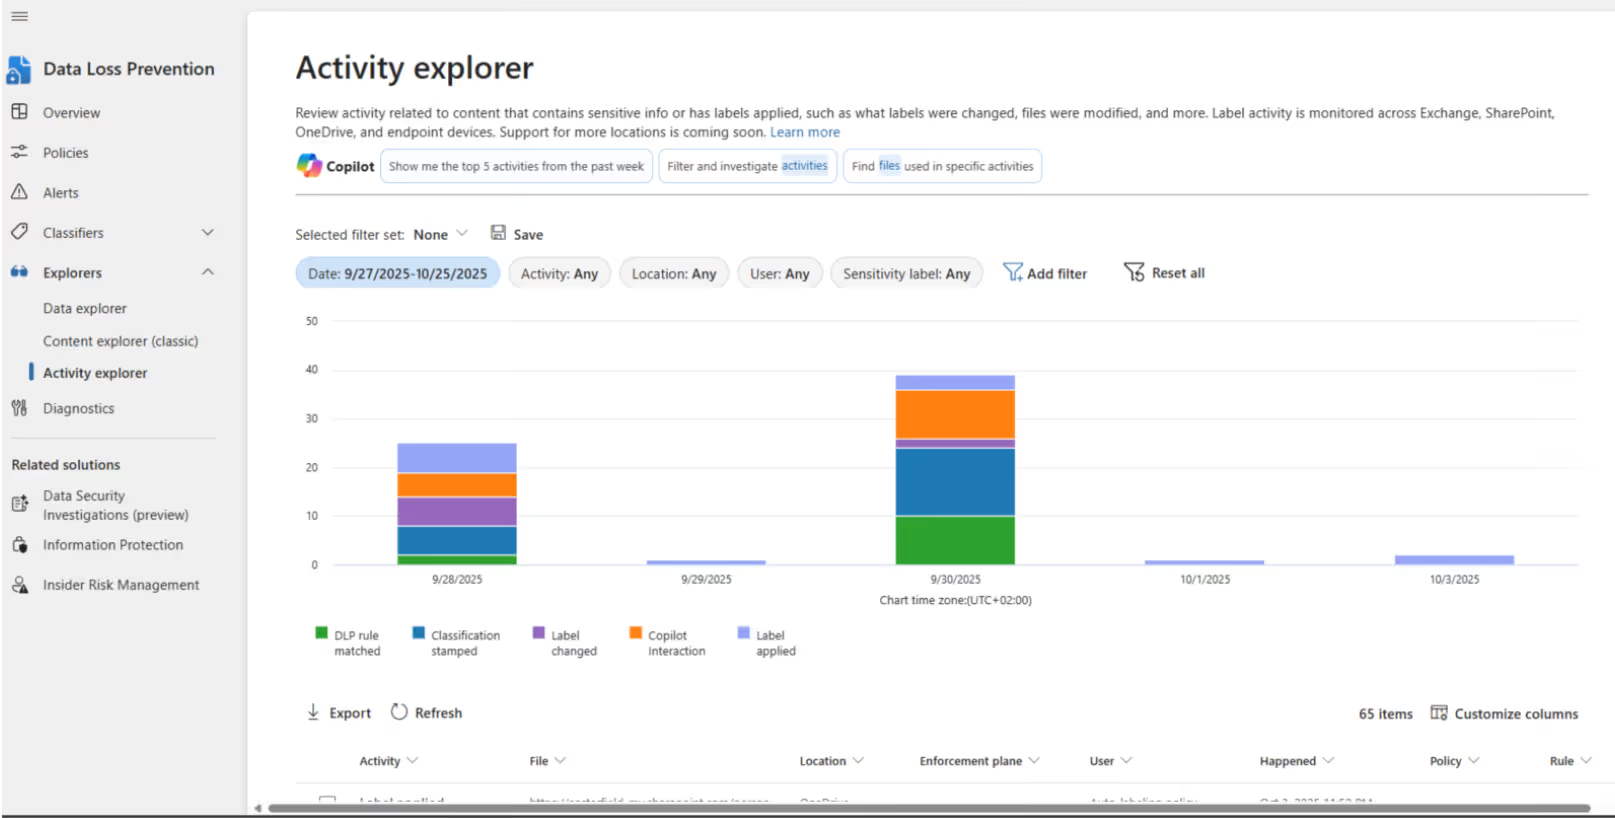
6. After two weeks, use the filters to show all the activity related to your DLP policy and export those findings to Excel or Power BI for reporting and analysis.
Now you have data-driven insight into how sensitive information is handled day to day. That’s valuable evidence to bring to your next stakeholder meeting; it turns abstract risk into measurable reality.
Evaluate results and align stakeholders
Once your Content Search and DLP monitoring are complete, it’s time to review your findings and bring them to the right people.
It’s a good idea to prepare a presentation:
This group of stakeholders should take collective ownership of your data protection strategy:
- IT manages the technical setup
- Compliance defines the policies and ensures alignment with regulations
Once everyone agrees on the scope and goals, you’re ready to move from discovery to protection.
Stage 2: Protection
Define your classification and protection policies
Your data security policy should include a clear classification and protection model that works for your organization. For more guidance, follow Microsoft’s documentation on the Secure by Default model.
Here’s a simple baseline to get started:
Internal is usually the standard classification for everyone. But some teams—like the Board of Directors, HR, or Research & Development—might need their own when most of their data (about 90% or more) is sensitive.
Once your classifications are in place, define protection policies that align with them.
This framework will guide how you configure sensitivity labels in Microsoft Purview. You’re almost there! Let’s keep going.
Create and configure sensitivity labels
Now that your policies are set, it’s time to turn them into labels that users can apply in everyday work.
Start by creating parent and sub-labels that map to your classification and protection rules. For example:
Use auto-labeling to show what sensitivity labels can really do. Pick one or two sensitive info types per department—like HR contracts or resumes—and link them to a built-in or custom sensitive information type or a trainable classifier.
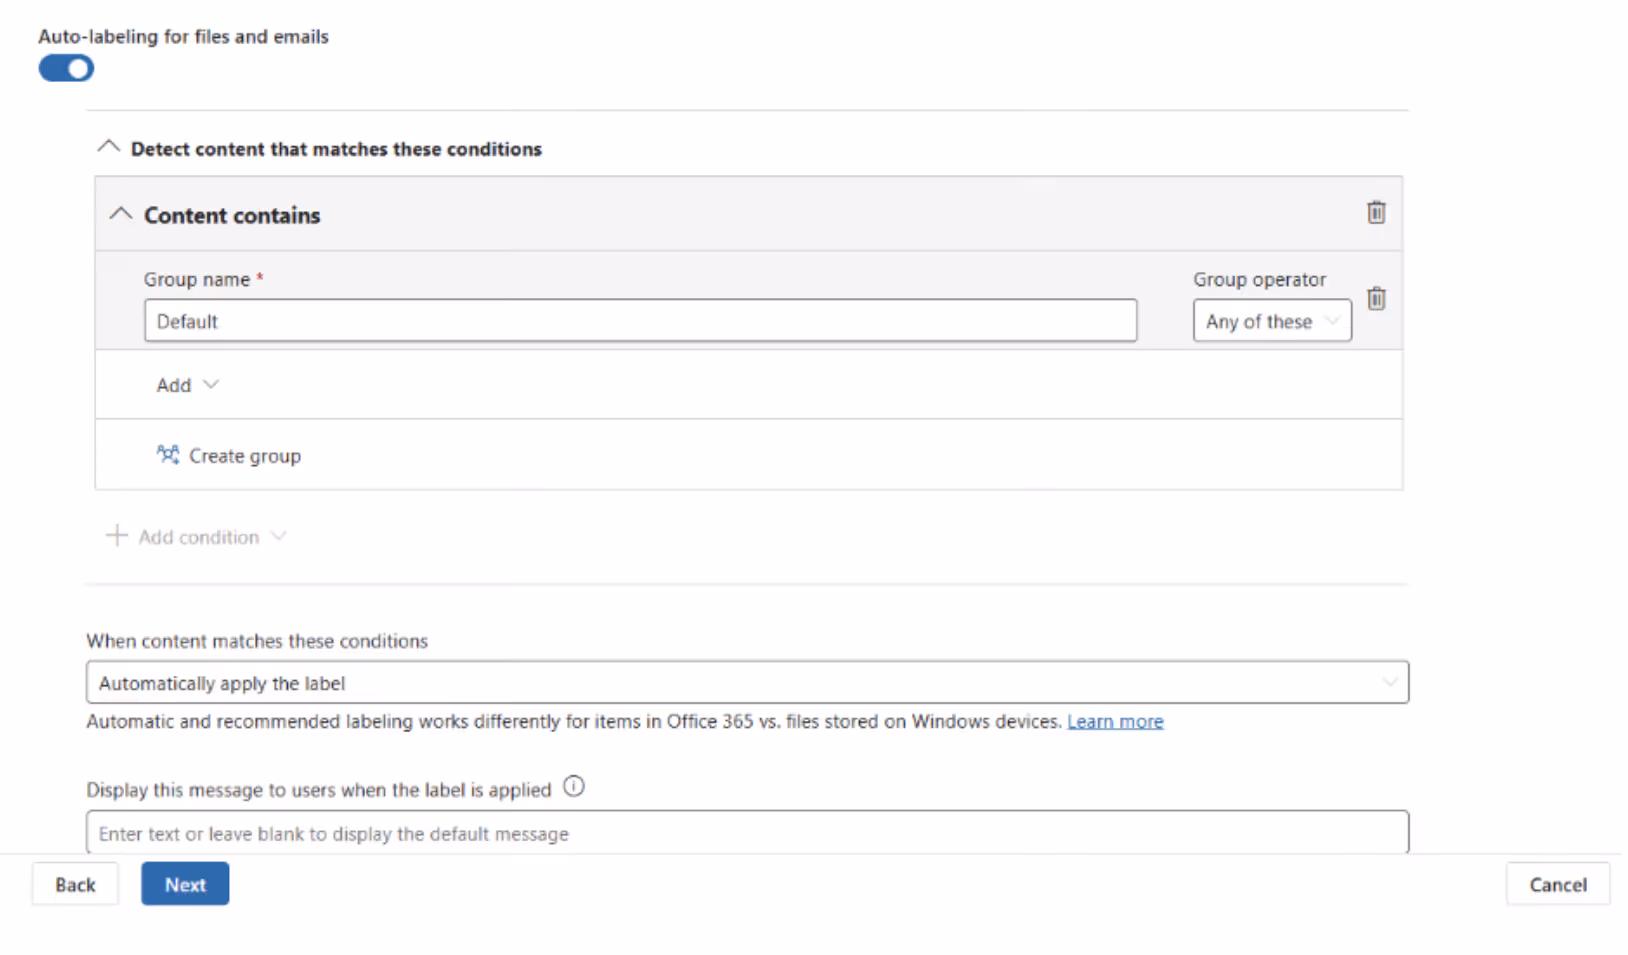
Use the recommendation setting instead of automatically applying labels.
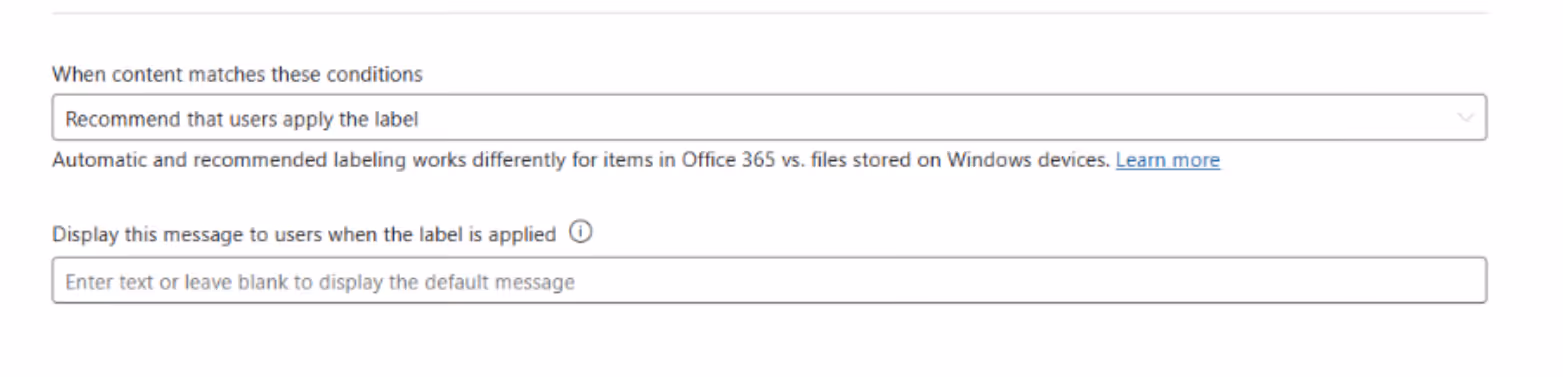
If a document or email doesn’t actually contain sensitive information, auto-labeling can frustrate colleagues when labels are applied incorrectly. Addressing this helps reduce one of the key pain points behind slow or unsuccessful Purview adoption.
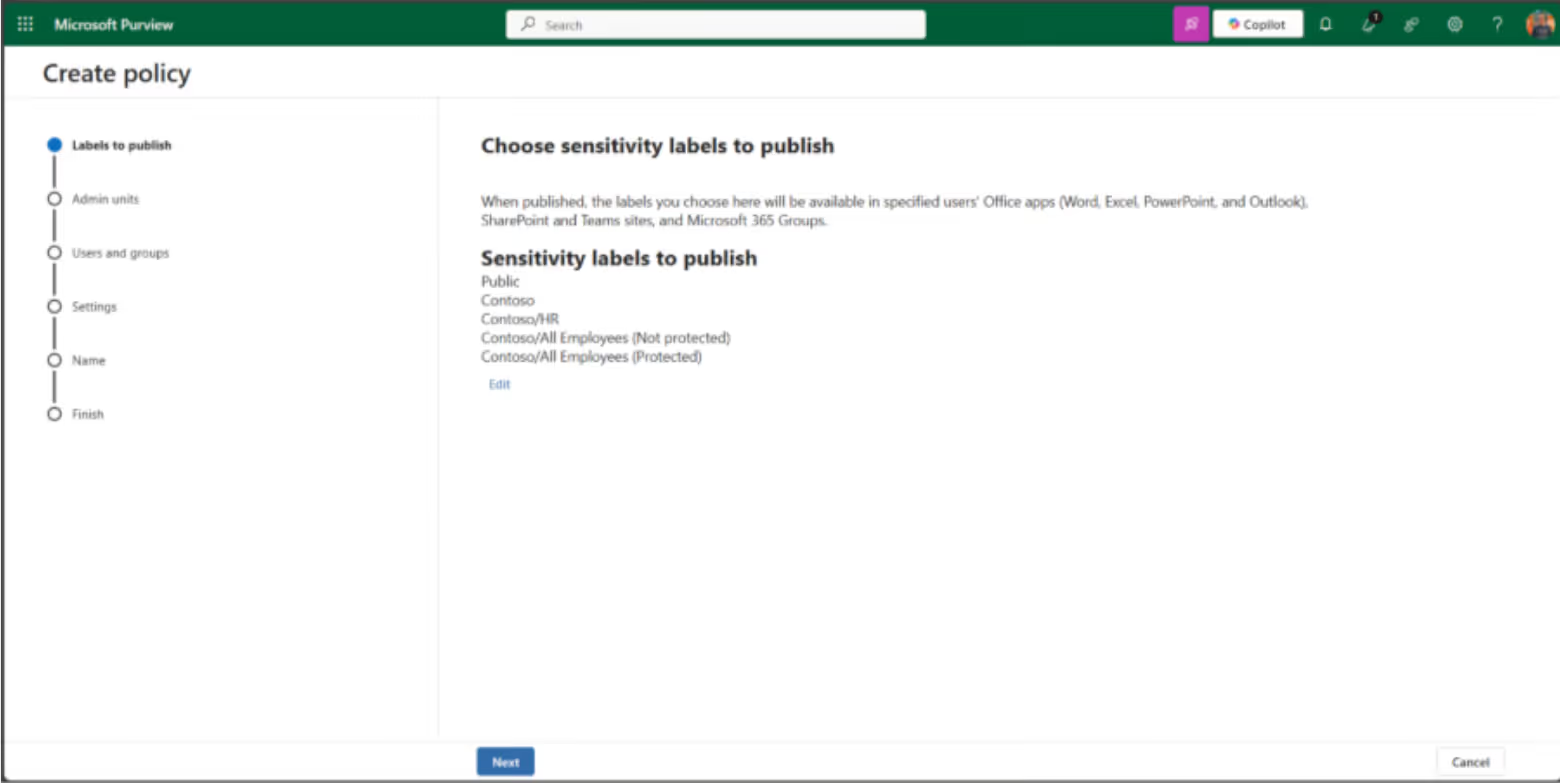
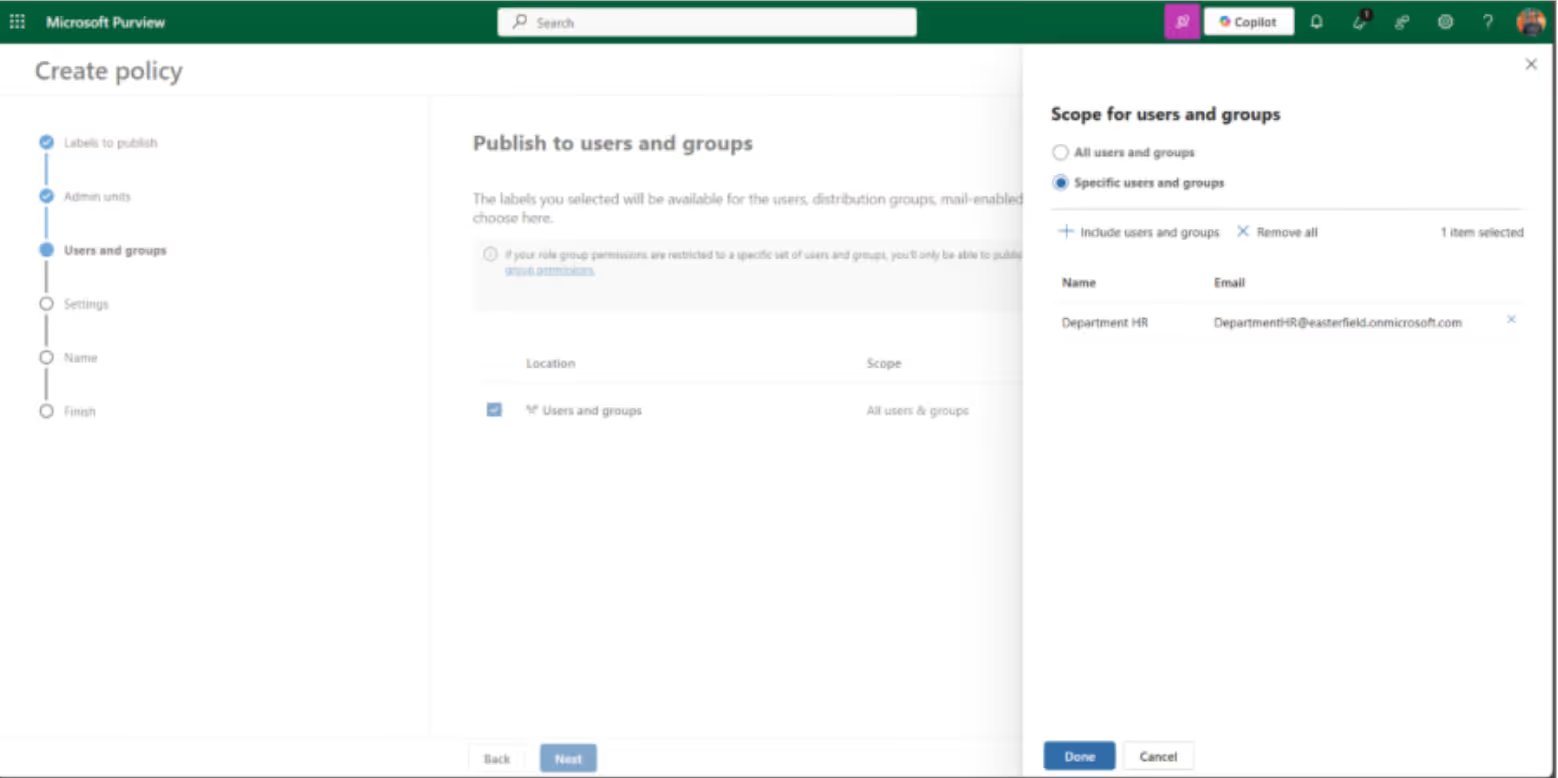
Next, publish these labels to a pilot group only—ideally the same stakeholders you’ve already involved.

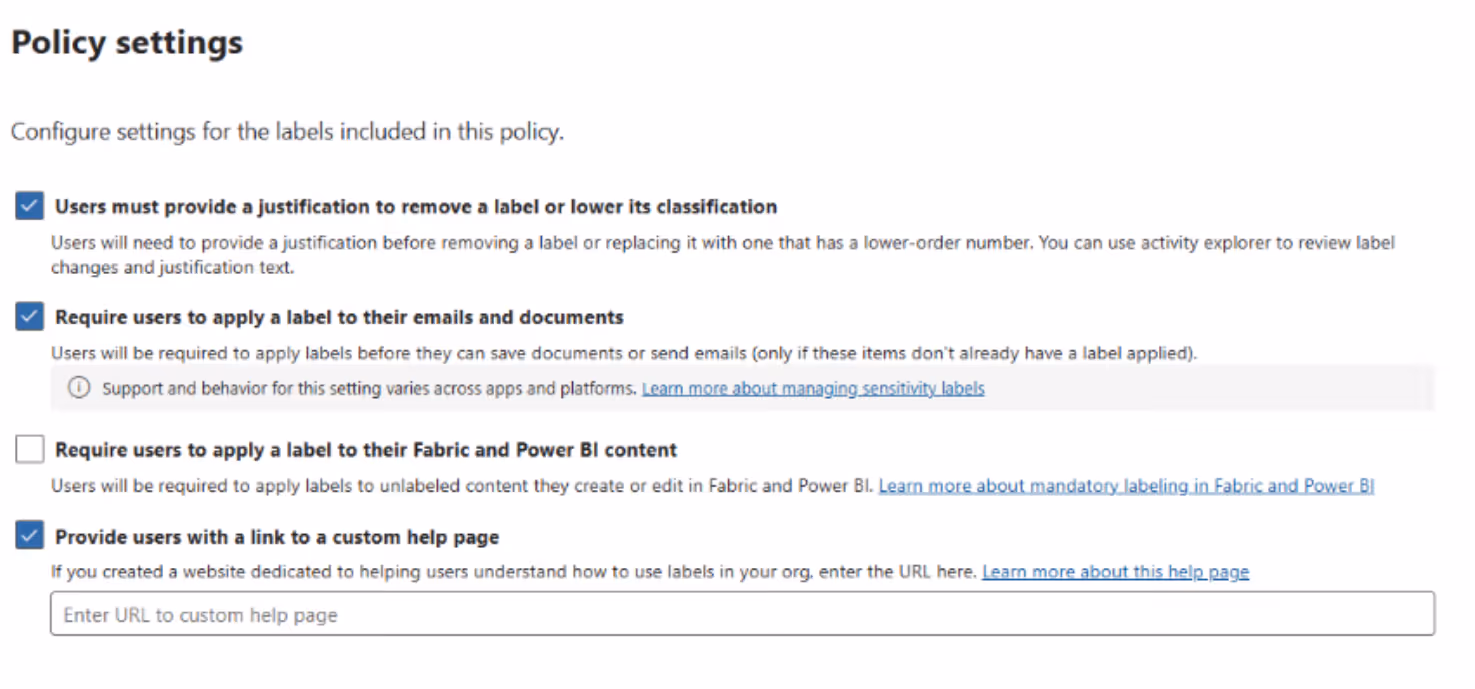
After publishing the labels, check in with your pilot members to confirm that the labels are available and working as expected. The following three options are highly recommended:

Run your pilot
Your pilot should run for at least two months. During this time, monitor adoption and gather feedback from users.
Provide short training sessions to help participants understand how labels fit into their daily work. Hands-on exercises are best, like:
- Manually classifying an email and sharing it internally and externally
- Manually and automatically classifying an Office file (Word, Excel)
- How to save a file with a label to a PDF
Offer an internal FAQ or SharePoint page that explains what each label means and where to go for help.
After two months, meet with your pilot team to evaluate the results. If the feedback is positive and your configuration works well, you’re ready to plan your full rollout.
Stage 3: Rollout
At this point, you have two clear options:
Option 1: Organization-wide rollout
Roll out labels to everyone all at once. It keeps things consistent but just make sure you have solid communication and support lined up.
Before rollout, prepare a short internal campaign that answers:
- What’s our data security policy?
- Why does it matter to me?
- What are sensitivity labels and how do they work?
- How will this change my day-to-day work?
- Who can I contact for questions or if something goes wrong?
You can even add a help link to each sensitivity label so users can access support:
Option 2: Department-by-department rollout
If you’d rather ease into things, roll out your pilot one or two departments at a time.
Start with the teams handling your most sensitive data like HR, Legal, and Finance, and recruit a couple of go-to users from each to act as your point people.
Gather feedback, make adjustments, and keep the rollout moving. This steady approach builds momentum, surfaces real-world issues early, and helps fine-tune your policies as you go.
Add department-specific labels
After your pilot, you’ll have a solid baseline of sensitivity labels that reflect the technical side of your data security policy.
For most organizations, that baseline includes something like:
- Public
- Internal
- All employees (not protected)
- All employees (protected)
- Specific people (protected)
- External (protected)
- External (not protected)
That’s a great start—but some departments may need extra protection.
For example, your HR team often works with highly confidential data. In those cases, you can create a dedicated label policy just for those departments.
Each new file or email automatically receives a default encrypted label available only to team members in that group. This guarantees their sensitive content is protected by default without extra effort.
Here’s what that might look like:
You’ll assign this new label policy directly to the department’s Microsoft 365 group or user.
⚠️ Heads up: This approach only works well when at least 90% of the department’s data is sensitive. Because this label restricts access to the department, employees will need to manually switch labels when sharing content externally or with other teams. That can create friction if not clearly communicated—so make sure your key users and department leads understand the impact before rolling out departmental labels.
Encrypt or not to encrypt?
Before rolling out sensitivity labels across your organization, you need to decide whether to enable encryption.
Encryption is one of the most powerful features of Microsoft Purview. It ensures that only authorized people can access labeled data—no matter where it travels. But like every strong control, it comes with impact. During the creation or editing of a sensitivity label:
1. Select the authorized people or groups
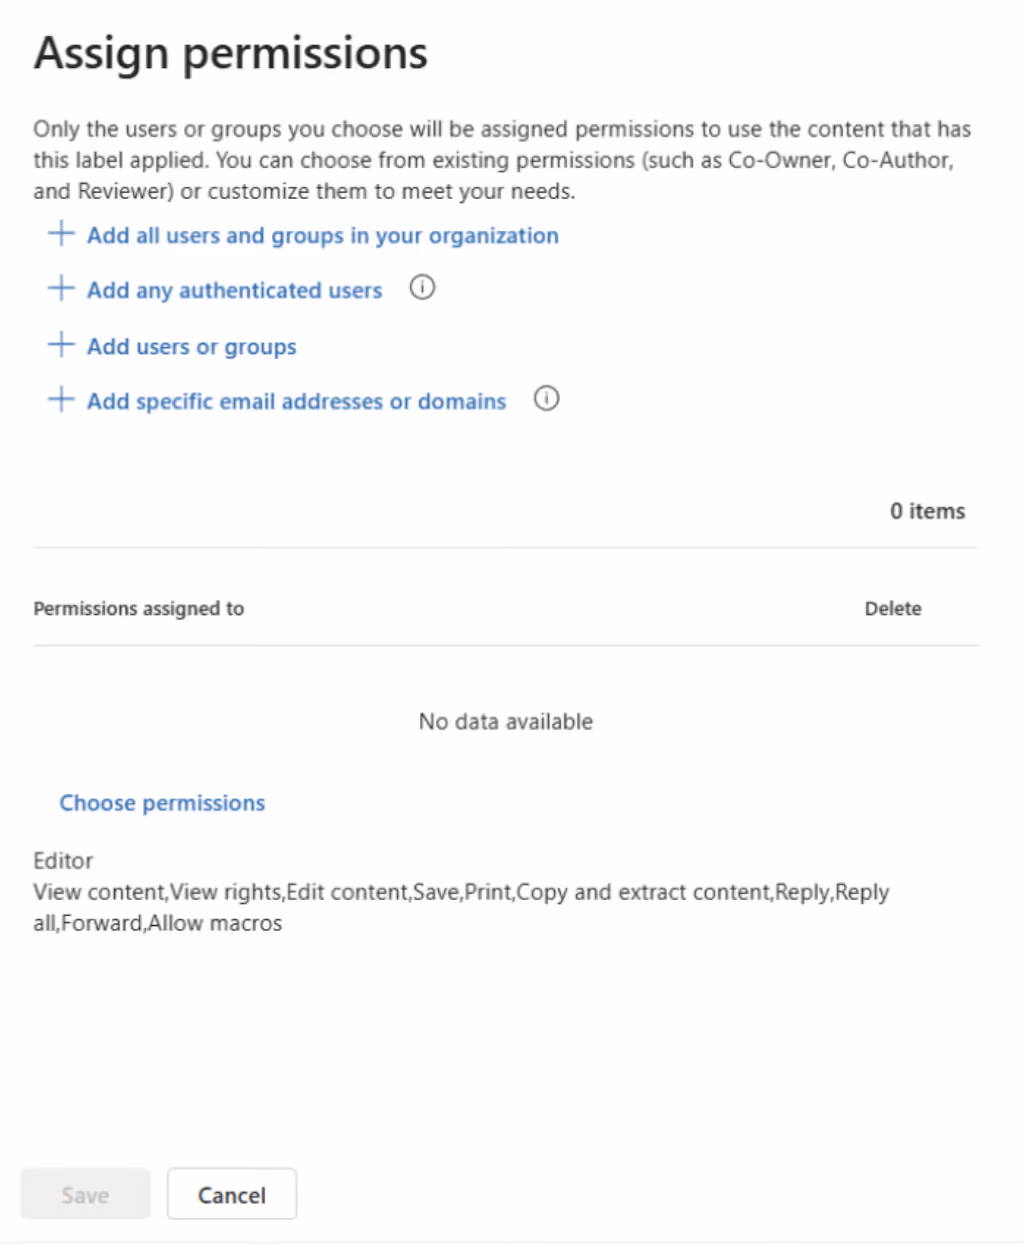
2. Select the appropriate permissions for the authorized people or groups

Data with an encryption can only be opened by people with one of the following accounts:
- Microsoft 365 work or school accounts
- These are Azure Active Directory (Microsoft Entra ID) accounts from your organization.
- Required for both applying and accessing sensitivity labels.
- Guest accounts in Azure AD
- External users can access encrypted content if they are added as guests in your organization's Azure AD.
- They must be granted appropriate permissions via the sensitivity label.
- Microsoft accounts
- In some scenarios, users with personal Microsoft accounts (e.g., Outlook.com, Hotmail.com) can access encrypted content if explicitly granted access.
- This depends on how the label is configured (e.g., user-defined permissions).
- Federated or B2B accounts
- Users from trusted partner organizations using Azure AD B2B collaboration can access encrypted content if permissions are granted.
Start by testing encryption in your back-office systems. Some applications and services might not support encrypted files, which can break automated processes or integrations. If that’s the case, you have two options:
- Apply labels without encryption for now and enable it later, once compatibility is confirmed.
- Enable encryption from the start, accepting that certain systems might need to be excluded or adjusted.
If you choose to turn encryption on later, remember: it won’t automatically apply to existing labeled content. You’ll need to reapply the label manually or use one of these methods:
Let’s be honest, none of these options are ideal when you’ve labelled many files. The most important part is that your employees are already labeling their content. The awareness is there—the protection can follow.
In most cases the data just sits in SharePoint, OneDrive or Exchange and doesn’t go anywhere. To assess how many files contain a specific label, you can use on the following tools:
- Content Search
- Data Explorer
- Audit
- PowerShell
To help manage exceptions, configure the Super User feature. It ensures that authorized people and services can always read and inspect the data that has been encrypted for your organization. If necessary, the encryption can then be removed or changed.
Monitor your progress and assign ownership
No matter which rollout scenario you choose, monitoring is a critical part of your data protection journey. You need visibility into how sensitivity labels are used and whether your data security policies are being followed.
1. Start by identifying who should be responsible for monitoring. This task belongs to policy stakeholders, not IT. IT’s role is to handle technical configurations, but it’s up to Compliance and Security to make sure your organization is meeting its data protection objectives.
2. Use Privileged Identity Management (PIM) to grant temporary access to the monitoring role—typically the Information Protection Analyst role in Microsoft Purview.
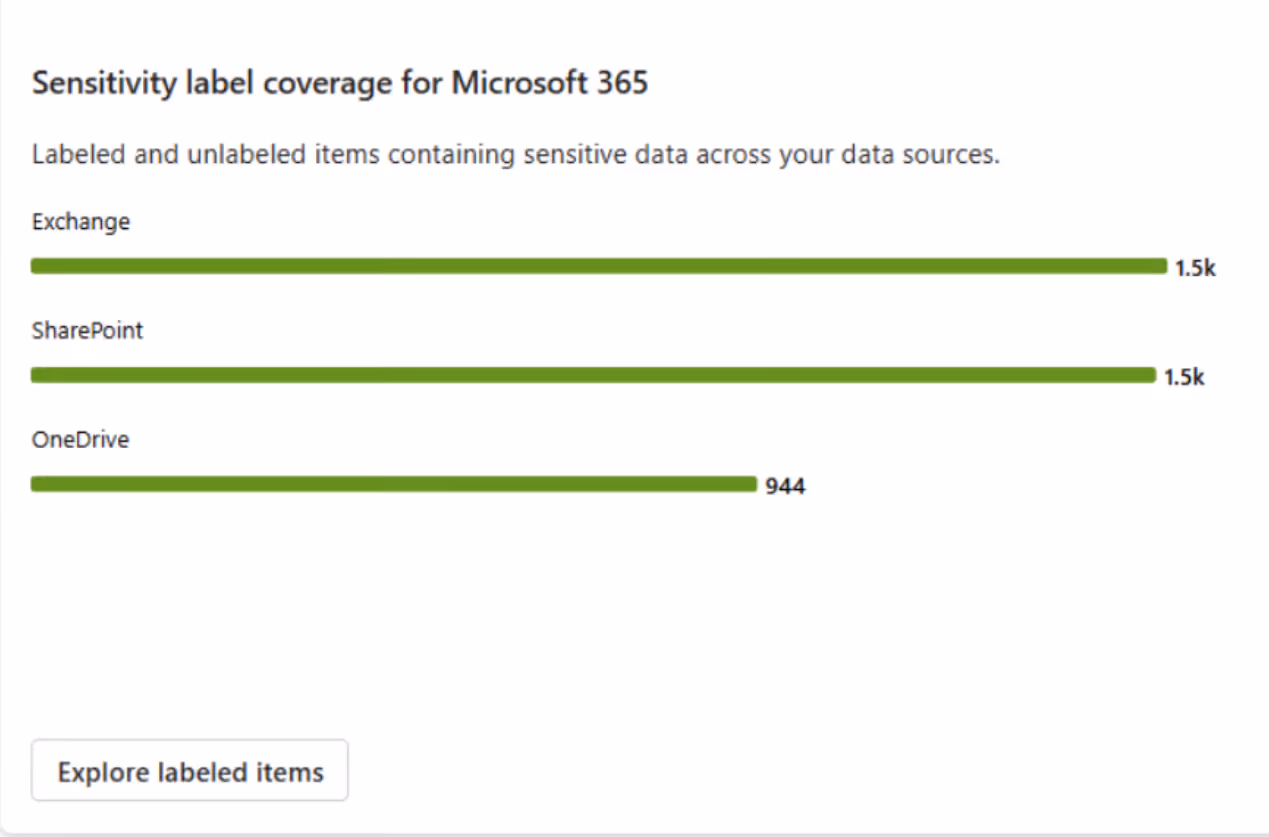
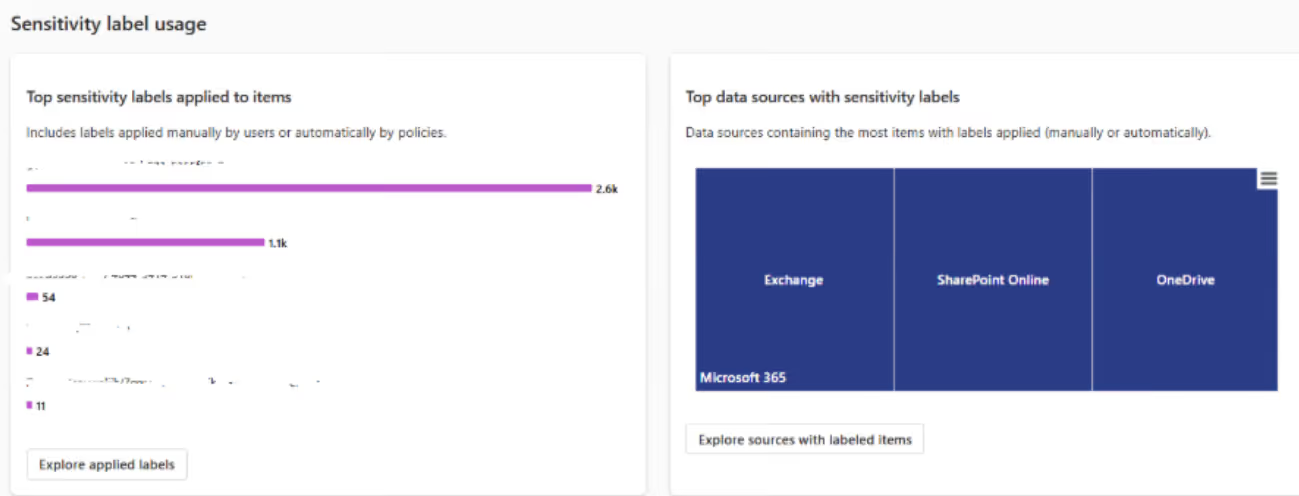
3. Once access is granted, stakeholders can monitor labeling activity through the Reports section in the Purview portal. These reports give a quick snapshot of how sensitivity labels are being applied and which ones are used most frequently. Here’s an example:
4. Combine these insights with the Activity Explorer, which lets you filter and review label-related activities in detail—like when labels were applied, downgraded, or removed.

By regularly reviewing the reports and activities, you can adjust your data security policy or sensitivity labels, or plan additional training or awareness sessions.
Final thoughts
Getting started with Microsoft Purview is about turning awareness into action. We know the risks—shadow AI, oversharing, and uncontrolled data growth. But we have the steps to fix them: find your data, classify it, protect it, and help your people make security a natural part of their work.


.avif)
.avif)