

.svg)

.avif)
The simplest way to migrate to Microsoft 365
Move your content efficiently with minimal downtime & maximum data fidelity!
Book demo%20(1).avif)
Master Hacks: Migrate like a pro
Check out our video series to help you turn migration projects into masterpieces!
Table of contents
Is a cloud migration on your roadmap? Before you start your Microsoft 365 migration journey, follow these migration steps to experience zero hiccups after the move.

If you’re about to start a migration process, congrats! Something great awaits you on the other side. However, there’s a lot to consider before and during your journey to the cloud.
We’ve created a Microsoft 365 migration checklist that leverages our knowledge gained from helping organizations complete data migrations of all shapes and sizes. It will help you save time, avoid errors, and get the most out of the platform once you get there.
How to run a super smooth migration project
Data migration to the cloud can be a real headache. There are complexities involved, particularly when migrating to SharePoint Online on Microsoft 365. Luckily, you can take a few proactive steps beforehand to help simplify the migration process.
To start, sit down with your team and stakeholders and ask:
- Where and how will you move the content to the new environment?
- How will you provide users access?
- How will you migrate custom code, workflows, taxonomy, and branding?
Once you understand your unique requirements, it’s time for the planning and testing phase, which takes up about 90% of the work involved in the migration process.
An effective data migration requires planning out every tiny little detail, including:
- How you will manage user accounts, including tasks like user provisioning and permission assignment.
- Choosing deployment strategies like hybrid deployment vs. private deployment.
- How you’ll inventory data from your existing environment.
- Choosing between cutover vs. staged vs. hybrid migration for your migration method.
Below, let‘s dive deeper into the various details involved in successfully migrating from on-prem SharePoint to SharePoint Online.
Part of a Microsoft 365 migration is ensuring the smooth transfer of OneDrive data between tenants. Learn how to achieve a seamless OneDrive tenant-to-tenant migration with our comprehensive tutorial.
1. Take inventory at the start of your migration process: Find out which user accounts own which content
The first task on your Microsoft 365 checklist will be auditing your current environment. Of course, this will involve assessing what data and resources your organization needs to migrate, including why and when.
But more importantly, it’s a good time to determine what can stay behind! Transitioning to a new Microsoft 365 environment gives you an opportunity to get rid of data taking up unnecessary space and move forward with a shiny new workspace that’s easier to navigate.
What to do?
- List everything: Start by listing everything within your current environment that should be included in your data migration. Don’t leave any stone left unturned! You don’t want any skeletons to turn up after.
- Check for duplication: Redundant elements in your Microsoft 365 environment confuses your end users, takes up unnecessary storage space, increases security risks, and complicates compliance management. To avoid that outcome, eliminate duplicate content and teams before you begin the migration process.
- Archive data: Archive any unneeded data to free up storage space for more important data in the future. Ex: Teams or channels, files, sites, etc.
- Check your security settings: Configure proper licensing and security settings to protect your data during and after your data migration.
Ultimately, a well-structured cloud migration plan will be your best bet to stay on track. ShareGate’s auditing tool can help you automate that plan and manage the entire inventorying process. No more wasting time on manual audits!
2. Clean up before your Microsoft 365 migration: Moving data is the goal, but only keep what you need
Once you inventory your content, it’s time to begin the clean-up process. The level of cleaning required will depend on your how old your existing environment is. The older the data, the more work involved.
What to do?
- Optimize your SharePoint and OneDrive configuration settings: This will help enhance collaboration and streamline document management.
- Set up your email services in Microsoft 365 using Exchange Online: You’ll experience better email functionality! This may require planning a shift from using an on-premises Exchange server.
- Double-check: All data, users, and teams no longer in use
- Configure your Teams settings: Focus on helping your users collaborate and communicate seamlessly.
- Involve your end users: Ask them to identify data that doesn’t need to move during the migration process.
It’s also worth considering how you might make your content’s navigation and structure more user-focused to reflect how they search for and use information.
3. Get your new home ready
Once you’re ready to move to your new environment, it’s time to set up everything in your destination!
During this important step, you’ll perform several key tasks that are critical to the new environment: strengthening its security, optimizing governance, running a test migration, and following other best practices to make your life easier post-migration.
What to do?
- Create your new environment’s architecture: You will give your content a structure to help your team easily navigate their new environment after the migration process.
- Establish the necessary cloud security guardrails: Setting up cloud security guardrails helps you avoid security issues post-migration, whether that’s figuring out how you will authenticate users or determining your protocols for mobile device management.
- Map a plan of your content’s metadata: Metadata is at the heart of efficient searching in every Microsoft application, from Teams and SharePoint to OneDrive and Exchange Online. It provides context to data, and when it’s organized, it makes it easier for users to quickly access relevant information.
- Set up SharePoint to import user profiles from specific sources: You will personalize the user experience in the destination by automatically updating user profiles with their pictures, department, role, and other related information. You’ll also increase security and simplify administration by helping IT teams identify authorized users.
- Configure your new search topology: In the future, it’ll be easier to scale if search traffic increases, since IT teams can more efficiently add new search servers to the topology. A well-configured search topology also increases search performance, since you can more efficiently distribute the search workload across multiple servers.
- Create a governance plan: This is all about outlining the policies that guide your team’s M365 use. You'll need to classify business information and define roles and responsibilities. That information can help you establish security strategies and processes and create workspace collaboration templates, helping you manage your organization’s data across its lifecycle. Importantly, you’ll also need to review external access and configure guest access settings to keep your data secure during collaboration.
- Run a test migration: Engage in thorough testing and pilot rollouts to check for possible errors in your go-live plan. If any issue arises, you can fix the problem at the source before you officially start the data migration.
4. Prepare your users
If your end users aren’t fully equipped and exposed to their new work environment, you’ll wind up dealing with endless support tickets.
What to do?
Create a communication plan: Explain how the migration will affect them individually. You should also clarify specifically how end users across the organizational hierarchy should use their new Microsoft products, such as Teams, SharePoint, Planner, and Viva Engage. Importantly, include a framework for user training in the plan!
Want more ideas on how to develop an effective plan? Dive deeper into the best practices for better communication between IT and end users.
5. Migrate to Microsoft 365
The moment has come for the final step of your Microsoft 365 migration process: the actual data migration.
Depending on your environment’s complexity and your migration method, this phase may require careful coordination, continuous monitoring and access to robust analytics to ensure success.
The migration event itself will be far less daunting if you previously planned well, and if you use a trusted third-party Microsoft 365 and SharePoint migration tool like ShareGate that offers robust features to accelerate your migration. With ShareGate, you can transform smarter with a high-performance, end-to-end solution that guides you through every stage of your migration journey.

The business productivity solutions company Avvenire saved 15% of their project time using ShareGate to manage their migration process. Their team could comprehensively tackle every element pre-migration, resulting in more effective planning and execution.
Read the full story of Avvenire’s experience using ShareGate, which includes an interview with their Application Development Manager about his experiences.
What to do?
Choose your migration tool:
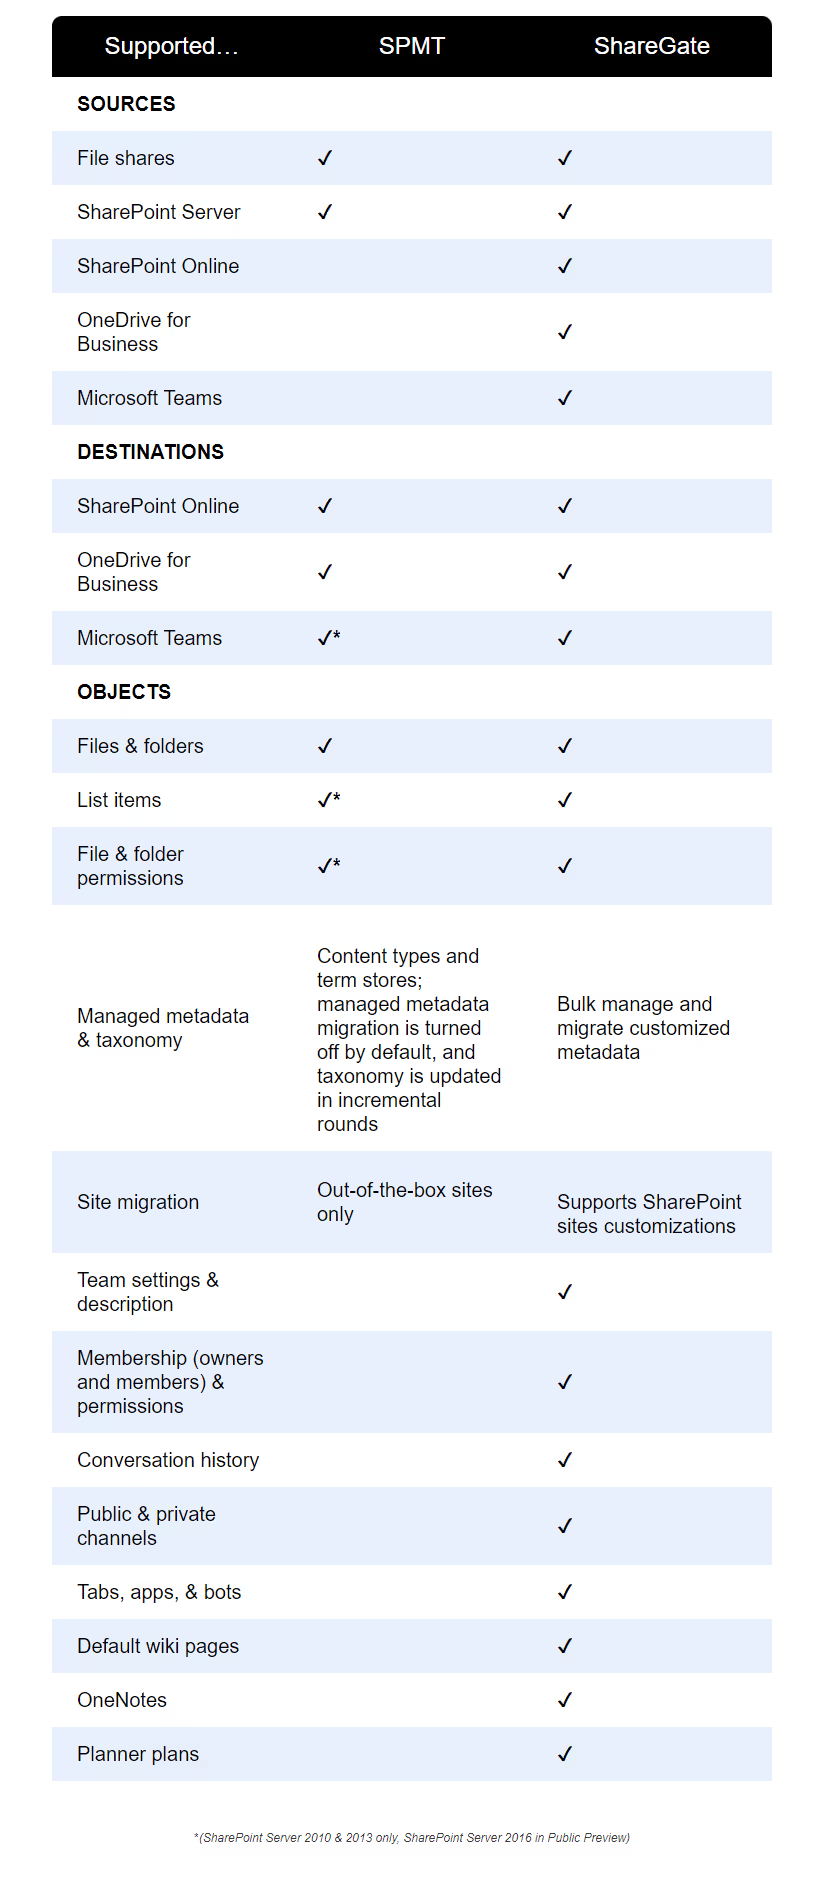
Microsoft has its built-in SharePoint Migration Tool (SPMT). But how effective is it compared to third-party tools like ShareGate that can automate and simplify your data migration?
Here’s a full list comparing the key differences between Microsoft’s SharePoint Migration tool vs. ShareGate.
Choose your migration method:
To move data from one environment to another, you can run a cutover migration, phased migration, hybrid migration, sequenced migration or concurrent migration, among other approaches.
Your most suitable migration method will depend on various factors, such as data complexity and timeline.
Remember: the lift and shift is only one part of the journey! Many organizations underestimate how long a migration will actually take because they don’t consider the other elements at play: the planning, getting business alignment, etc.
And that miscalculation can be costly!
Our data shows that customers who purchase a one-year ShareGate license take an average of 21 months to complete their migrations.
ShareGate
If they had accurately estimated their timelines, they may have opted for the two-year license and saved money.
That’s why we recommend doing concurrent migrations, aka running multiple migrations simultaneously on different workstations. Unlike with a sequenced migration that moves data in stages, you can segment your workloads and better manage resources while avoiding any issues from stalling the process. You have more control over the lift and shift stage, letting you regain lost time.
Involve your users in the migration
You’ve already learned about the importance of informing users when the migration will take place. When you do, let them know that during the actual data transfer, any organizational content in migration will be read-only. This is to prevent changes from migrating and help them properly access and validate their content afterward. Once users have validated their content, they can access it and work normally again.
Additionally, when monitoring the performance of your migration process during and after implementation, collect and review user feedback to identify areas for improvement.
These small but important steps will make them feel included – which gives you the best shot at success! You’ll have completed your Microsoft 365 migration and gained kudos from the whole organization for your valuable work.
Now that you know how to implement your migration plan step by step, here are two ways to ensure a smooth Teams tenant-to-tenant migration.
The best Microsoft 365 migration process starts with being prepared

Almost ready to tackle your Microsoft 365 migration? Here’s the recap on how to set yourself up for success:
Take inventory: Determine which user accounts own which content.
Clean up: Migrating data is the goal, but remember, only keep what you need!
Get your new home ready: Set everything up before pressing the migrate button.
Prepare your users: A communication plan helps you prepare end-users for the upcoming changes.
Migrate to Microsoft 365: Good planning makes this a breeze! Also, use a trusted third-party migration tool like ShareGate to do the heavy lifting for you.
Remember, each step is integral to the migration process, helping you experience an effective data migration to the cloud and avoid most common post-migration issues.
ShareGate’s Microsoft 365 migration tool is known to rid IT teams of post-migration headaches.
With just a single trusted tool, you can simplify your Microsoft 365 migration from day one and accelerate the project from planning through to adoption.
Happy migration!
Microsoft 365 migration FAQs
Got a Microsoft 365 migration project on your mind? We know it can seem like a big move, but never fear! This FAQ section answers all your burning questions and will get you through the process with zero hiccups.
What is the best migration tool for Microsoft 365?
There’s no single “best” tool for executing a data migration in Microsoft 365. The ideal choice depends on your specific needs and data volume. However, consider using a trusted third-party migration tool like ShareGate for a smooth and efficient process.
ShareGate offers you a rapid and frictionless migration software that just works. Its comprehensive suite of features is designed to simplify and accelerate M365 migrations. These include:
- Automated workflows: Streamline repetitive tasks like user mailbox migration with Exchange Online and content migration on SharePoint.
- Granular control: Easily select specific data for migration and transfer only necessary information.
- Detailed reporting: Track migration progress and identify potential issues for prompt resolution.
- Security and compliance: Access thorough security and compliance settings to keep your data safe throughout your migration.
Using ShareGate will significantly reduce the complexity of your M365 migration and ensure a successful transition.
How long does it take to migrate emails to Microsoft 365?
The migration time for emails from an on-premises Exchange server to Exchange Online can vary, depending on the number of mailboxes, mailbox size, and your internet bandwidth. Smaller migrations can be completed in a few hours, while larger migrations might take days or weeks.
What happens when ShareGate hits API limits during migration?
When ShareGate hits Microsoft throttling, it doesn't stop. It slows down, waits it out, and ramps back up once the pressure drops. You'll see a banner on the task screen so you always know what's happening. Migration progress is preserved.
Microsoft 365 migration checklist
Moving your business data to Microsoft 365 is a significant undertaking. It needs careful planning and execution to make sure everything goes smoothly.
To help you out, we created a checklist that outlines the best practices for a Microsoft 365 migration. It includes everything you need to know, including the most important steps and the smartest ways to approach them, and elements you can’t forget:
- Start with a comprehensive audit of your current environment to determine which user accounts own which content.
- Identify which data needs to migrate and establish a plan for user provisioning in the new environment.
- Ensure proper licensing and configure security settings to safeguard your data during and after migration.
- Streamline the migration process by decluttering unnecessary data and removing duplicate content.
- Optimize SharePoint and OneDrive settings to enhance collaboration and streamline document management.
- Configure Teams settings for easy communication and collaboration among users.
- Develop a M365 migration project plan outlining deployment strategies, migration timelines, and resource allocation.
- Ensure your target environment seamlessly integrates with existing systems and applications to maintain business continuity.
- Conduct thorough testing and pilot rollouts to identify any potential issues before the full migration.
- Set up a clear communication plan to inform users about the migration process, its benefits, and any expected changes.
- Evaluate different migration methods based on your business requirements and choose the most suitable approach, such as cutover migration, staged migration, hybrid migration, sequenced migration, or concurrent migration.
- Develop a step-by-step migration plan for Exchange Online, to experience minimal disruption to your email services.
- Use third-party migration tools like ShareGate to automate and streamline the migration process, reducing manual effort and minimizing errors.
- Implement robust backup and recovery mechanisms to protect data during migration and beyond.
- Gather feedback from users once the migration finishes to promptly address any concerns and improve the overall user experience.


.avif)


