.svg)

%20(1).avif)
Master Hacks: Migrate like a pro
Check out our video series to help you turn migration projects into masterpieces!
Table of contents
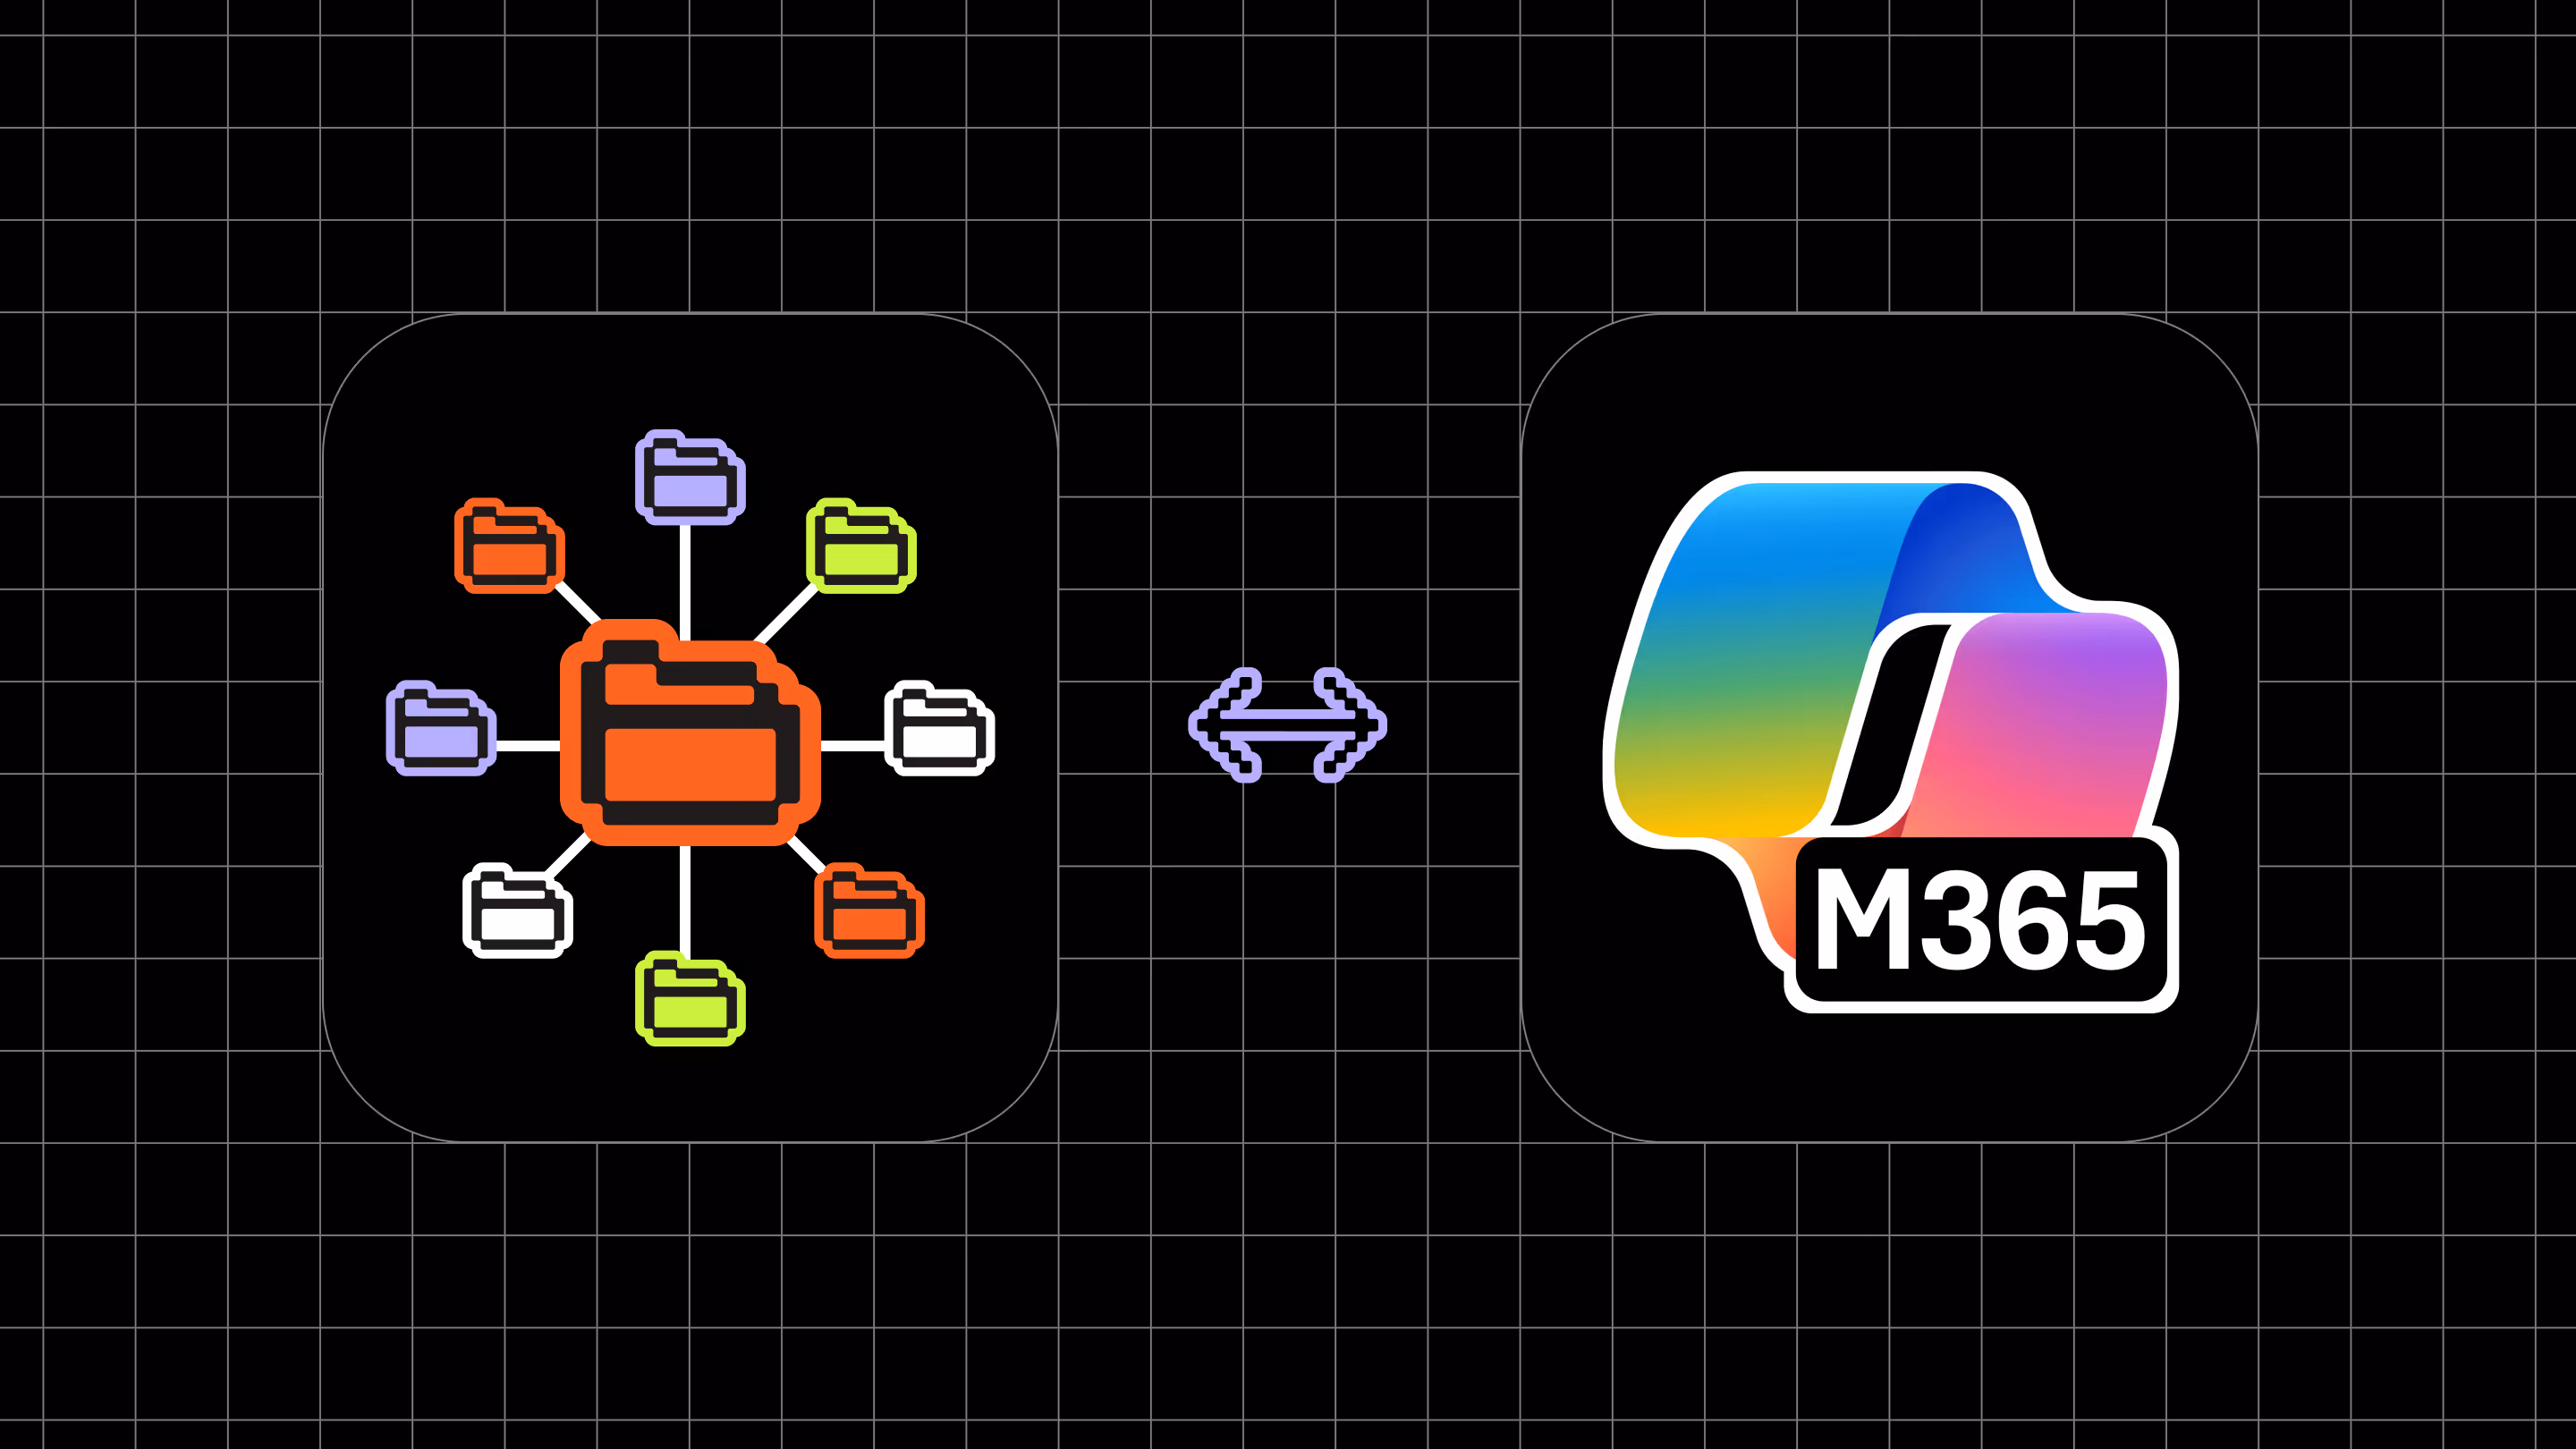
In Part 1 of this SharePoint 2016/2019 migration series, we first covered 6 steps to prepare your migrations. In Part 2, we modernized legacy SharePoint environments. Now in Part 3, we’re putting practical guardrails in place so your fresh SharePoint—online or SPSE—stays organized, secure, and compliant.
Migrating to SharePoint Online or SharePoint Server Subscription Edition (SPSE) is only the beginning. What really determines long-term success is how you manage the environment after the move. This is where governance, security, and structure come into play.
Let's look at how to lock in a clean information architecture, right-size permissions, classify and protect sensitive content, and set up monitoring that ensures your environment stays healthy over time. Our focus is on SharePoint Online (Microsoft 365), with notes on SPSE where it makes a difference.
Download our eBook for key takeaways on how to manage, secure, and govern your SharePoint environment.
Why governance and security can’t wait
A freshly migrated tenant can slide into sprawl fast: sites multiply, permissions drift, and people lose track of where things live. Governance—your rules, roles, and processes—prevents that. Establish an effective SharePoint governance plan immediately so bad habits never take root.
Security and compliance deserve the same urgency. You’ve just landed a valuable and sensitive copy of company data in the cloud. Without proper controls, you could face anything from a cluttered environment to a costly data breach. An unaudited SharePoint repository poses serious risks; At best, disorganized content. At worst, exposure of confidential data. That’s why your governance plan should address not just compliance requirements, but also day-to-day security hygiene: who has access to what, how external sharing is managed, and how to spot risky user behavior.
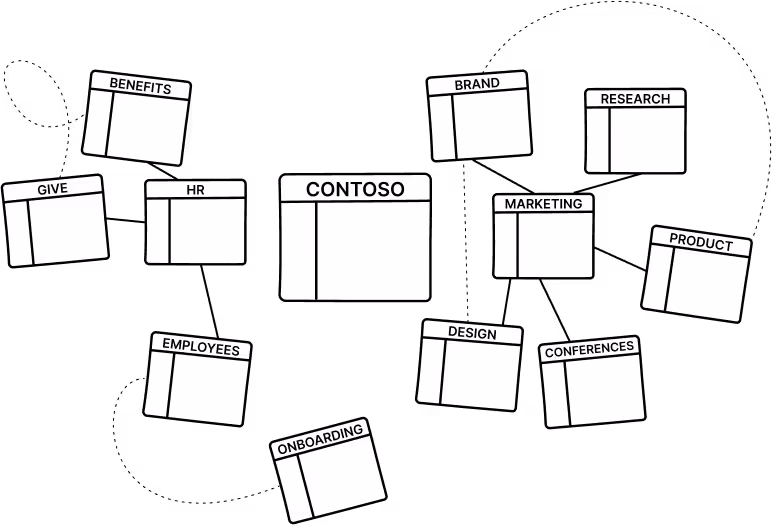
Use the fresh start to fix your information architecture
I already covered four key areas to modernizing sites and user experience in Part 2 of the series. Here, I’ll go over how flattening site hierarchies and clarifying purpose set the stage for better governance, simpler policies, and a smoother user experience.
Modern SharePoint favors a flat structure: separate site collections (often group-connected) stitched together with hub sites.
This isn’t just cosmetic—targeted policies and retention are far easier when one site’s settings don’t cascade across a deep subsite tree.
In a flat model, you can apply retention policies or settings to a specific site without affecting an entire collection. In the old subsite model, many governance policies, like retention or classification, applied to all subsites in a site collection, even if you only wanted it in one area.
By reorganizing into distinct site collections per team, project, or department (and linking them with hubs), you prevent one site’s settings from unintentionally impacting others.
Don't forget every Team you create also creates a Teams‑connected SharePoint site (and private/shared channels create their own channel sites). Plan hubs and navigation with that site growth in mind.
Practical steps:
- Archive or consolidate redundant sites that came over during migration.
- Define hubs (e.g., by division) and attach project/department sites with clear purpose statements.
- Tidy navigation so people know where to put/create content on day one.
Result: fewer surprises, simpler policy scope, and a user experience that actually makes sense.
Permission hygiene: Clean house and implement best practices
Alongside site structure, permissions and access management need immediate attention post-migration. It’s common to carry over old structures “as-is”—ad-hoc SharePoint groups, unique permissions everywhere, and even over-provisioned access. Post-migration is the right time to rationalize and clean things up so you align with the principle of least privilege and modern best practices.
Leverage Microsoft 365 Groups for team sites
In SharePoint Online, every modern Team site can be backed by a Microsoft 365 group—a unified security group that controls access across SharePoint, Teams, Outlook, Planner, and more. Whenever you create a new Team site from the SharePoint home or Teams, an M365 Group is automatically created.
Instead of juggling separate SharePoint groups and AD groups like in the past, use M365 Groups to manage team spaces. This ensures consistency: the same people who access the Team’s files also have the SharePoint site, Planner, and Outlook permissions—through one group.
For communication sites or sites that aren’t group-connected, you can still manage with SharePoint groups, but consider using Entra security groups for consistency.
Avoid broken inheritance and limit unique permissions
One of the cardinal rules of SharePoint governance: keep the permission model simple. Only break inheritance when absolutely necessary—and document the reasons if you do.
During migration, many unique permissions may have been carried over. Now’s the time to evaluate whether they’re really needed. Minimize unique permissions so sites, libraries, and lists inherit from the parent. Too many exceptions make it hard to audit and troubleshoot later.
A group-based approach helps here: instead of assigning permissions individually, create roles like “Project X Members” or “Project X Visitors.” This keeps things simple and auditable.
Implement the principle of least privilege
Make sure users only have the lowest level of access needed to do their job. Post-migration is the perfect time to review rights:
- Does everyone really need Edit on a site, or would Read be enough for some?
- Do you have too many Owners, which can lead to uncontrolled sharing or changes to settings?
Regular reviews and trimming excessive rights reduces the risk of accidental or malicious data exposure.
Automate it: Using ShareGate can greatly help here or a mix of scripts and Entra ID access reviews for Microsoft 365 groups/Teams (especially guests) while requiring owners to attest access quarterly along with SharePoint Advanced Management’s site ownership policies so sites don’t remain ownerless.
These reviews also tie into content labeling—sensitive sites may need even tighter restrictions and enforcement.
Don’t forget external access settings
By default, SharePoint Online often has external sharing enabled. Immediately after migration, decide where external sharing should be allowed and what policies apply.
- In the SharePoint Admin Center, you can restrict sharing to trusted domains or require guest accounts.
- M365 Groups/Teams also have guest access settings you’ll want to align.
- A good practice: designate certain hubs (e.g., an “Extranet” hub) where external sharing is permitted, and lock down other hubs that contain sensitive internal content.
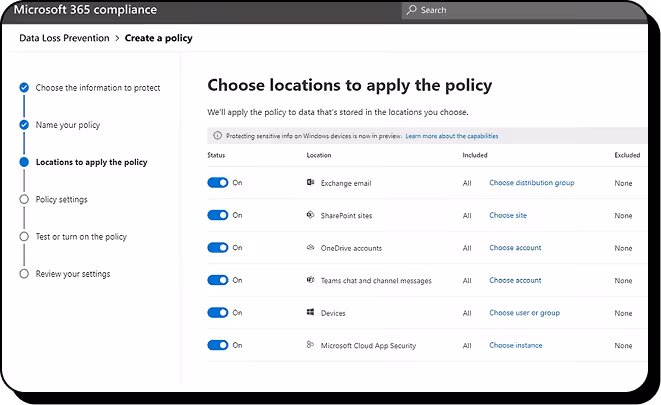
- To strengthen this further, use Microsoft Purview Data Loss Prevention (DLP) to catch oversharing of sensitive information.
- For high‑risk tenants, enable Mark new files sensitive by default to protect new uploads until DLP evaluates them once you have effective labelling and DLP in place.
Keep the model clean and verifiable
By addressing permissions early, you prevent permission sprawl that only worsens over time. Six months from now, you should still know exactly how access is structured—not be left guessing.
- Document your model. Write down your permission approach and exceptions.
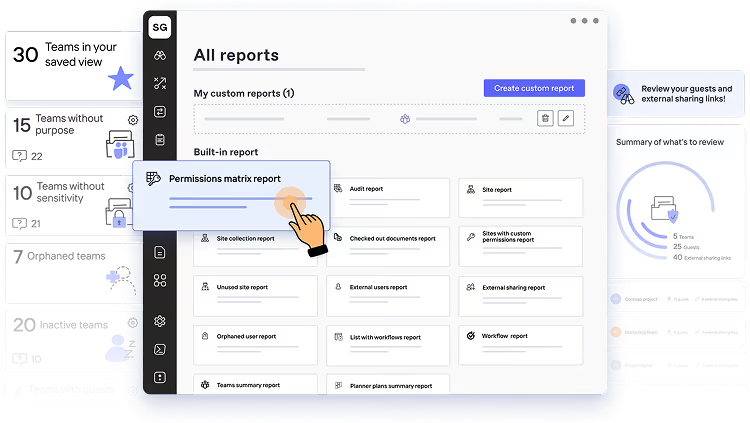
- Verify regularly. Use SharePoint admin center usage and sharing reports (Active files, external sharing, site storage), Data access governance reports (SAM), Microsoft 365 usage analytics in Power BI for cross‑workload trends, and ShareGate to streamline, provide more detailed reporting and simplify remediation actions.
With SharePoint Advanced Management and ShareGate, much of this permission cleanup and ongoing monitoring is more accessible and achievable than ever before.
Classify and protect content with labels (sensitivity and retention)
Migrating to Microsoft 365 gives you access to governance capabilities that were either limited—or clunky—in on-premises SharePoint. Chief among these are Microsoft Purview’s information protection tools, which help you classify and protect content at scale. The post-migration window is the perfect time to establish sensitivity and retention labels as part of your governance baseline.
Sensitivity labels: Security and compliance made practical
Sensitivity labels let you classify content (documents, emails, or entire sites) by confidentiality level and automatically enforce protection. Think of them as both visual markers and policy enforcers.
Examples include:
- Public
- Confidential
- Highly Confidential
Key benefits:
- User awareness. A visible tag like Confidential at the top of a document reminds users to handle it carefully.
- Automated protection. Labels can enforce encryption, apply watermarks, or block external sharing—ensuring security travels with the document.
- Consistent classification. Admins can assign default sensitivity labels at the site level, including Teams and Microsoft 365 Group sites. For example, a Highly Confidential site label might automatically block external sharing or unmanaged device access.
These labels not only protect sensitive files but also help governance scale naturally into tools like Microsoft 365 Copilot, ensuring sensitive data doesn’t surface where it shouldn’t.
Tip: Start small—manually label critical libraries or ask site owners to label their sites. Over time, use auto-labeling policies to suggest or apply labels automatically (e.g., if a document contains a credit card number, tag it as Sensitive).
👉 Unlock secure collaboration: 5 tips for securing sensitive data in SharePoint
Retention labels: Lifecycle management without the clutter
If sensitivity labels control how content is used, retention labels define how long it lives. They’re your safeguard against SharePoint turning into a permanent dumping ground.
What retention labels can do:
- Compliance. Enforce regulations like “keep for 7 years, then delete.” Items with a retention label are preserved—even if a user tries to delete them.
- Auto-apply rules. Configure retention labels to apply based on metadata or content type (e.g., everything in a “Records” library).
- Default labels. Ensure new files inherit lifecycle rules by setting defaults on a library or folder.
- Records management. Mark certain items as Records so they can’t be modified or deleted—useful for contracts or financial statements.
- DLP integration. Combine with sensitivity labels in Purview DLP policies. Example: “If a Confidential document is shared outside, block it.”
👉 Learn about retention policies and labels in Microsoft Purview in Microsoft’s documentation.
Why labels matter now
By establishing both sensitivity and retention labels immediately post-migration, you create good data habits from day one. Every piece of content should have:
- A defined home (site/collection)
- A defined audience (permissions)
- A defined classification and lifecycle (labels)
The result? A secure, compliant, and clutter-free SharePoint that evolves with your business.
SPSE note
Purview’s automation (auto-labeling, retention policies, DLP) is cloud-first. In SPSE, you’ll rely on:
- Classic Information Management Policies for lifecycle, using Information Management Policies/Records Center in SPSE (e.g., “delete items after 5 years”).
- On‑premises DLP is available via Microsoft Purview DLP for on‑premises repositories, which relies on the Purview Information Protection (MIP) scanner.
- Purview Information Protection Scanner for DLP on on-premises libraries or labeling/encryption at rest.
- Manual classification and audits to keep sensitive data under control.
Even without Purview’s cloud capabilities, the principle stands: classify your content, enforce lifecycle rules, and regularly review compliance, it’s just more challenging and often not as robust in SPSE as it is in Microsoft 365.
Apply governance templates and automation
Once your structure, permissions, and labels are in good shape, the next step is to standardize how new sites are created. A migration often leaves you with a patchwork of inconsistent settings, but this is the perfect moment to apply order and automation.
Site templates and site scripts for consistency
SharePoint Online lets you define custom site templates (formerly called site designs) with JSON-based site scripts. These templates automatically apply a baseline set of actions—like creating standard libraries, applying a theme, adding metadata columns, or even setting a compliance label.
Why it matters: Every new Team site (or Communication site) starts off compliant with your rules—no one has to remember to configure it manually. For example, you could ensure:
- Every department site uses the same branding and navigation.
- Every project site has a “Documents” library, a “Projects” list, and a default sensitivity label.
This isn’t just a time-saver; it enforces consistency across the environment and makes governance practical.
PnP provisioning for advanced scenarios
For more complex builds, look at the open-source PnP (Patterns & Practices) provisioning engine. With PnP, you can capture a site’s structure—content types, columns, pages, even web parts—and stamp that configuration across many sites using PowerShell.
When to use PnP:
- You need to replicate intricate layouts or customizations that site scripts can’t handle.
- You’re migrating from on-prem and want to reproduce a “golden template site” in the cloud.
- You want to bulk-apply your governance baseline (standard libraries, retention labels, homepage setup) across all migrated sites.
Bonus: you can even extract a PnP template from an already configured site, turning a well-built site into a repeatable standard.
Practical ways to put this into action
- Create core templates. For example:
- Internal Team Site → for collaboration inside a department.
- Public Project Site → for cross-company initiatives with external sharing enabled, plus an “External” banner.
- Mix site scripts + PnP. Trigger a PnP template from a site script for complex builds (by calling a flow/azure function or webhook that runs your PnP PowerShell).
- Enable self-service responsibly. Wrap templates into a request-and-provisioning process so end users can request sites that are automatically born compliant.
Why it’s worth it
By automating site creation, you:
- Cut down manual setup work.
- Reduce drift and inconsistencies.
- Bake in governance policies upfront (like naming conventions or expiration settings).
- Avoid messy cleanups later.
In short: every new site starts life in alignment with your governance plan, not as a blank slate waiting for mistakes.
More quick wins
There are other powerful tenant-level levers you can use to help such as ones that prevent inconsistent site names and abandoned team/sites. Here are three controls that can help, but should be carefully considered when implementing:
- Group naming policy: Entra ID → enforce prefixes/suffixes and blocked words for Microsoft 365 groups (applies to team‑connected sites).
- Group expiration: auto‑expire inactive Microsoft 365 groups with owner renewal prompts (restorable for 30 days). Start with 180/365‑day thresholds.
- Site creation defaults: set default container sensitivity label for new teams/groups and default file sensitivity label for collaboration libraries.
Take control with governance and security tools
Governance isn’t “set it and forget it.” It’s an ongoing process of monitoring, adjusting, and enforcing rules. Microsoft 365 and third-party tools give you what you need to keep your environment secure and compliant.
Built-in Microsoft 365 admin tools
Microsoft 365 offers built-in admin tools and reports to track your environment’s health and usage. In the SharePoint admin center, you can view site storage, active files, and inactive sites.
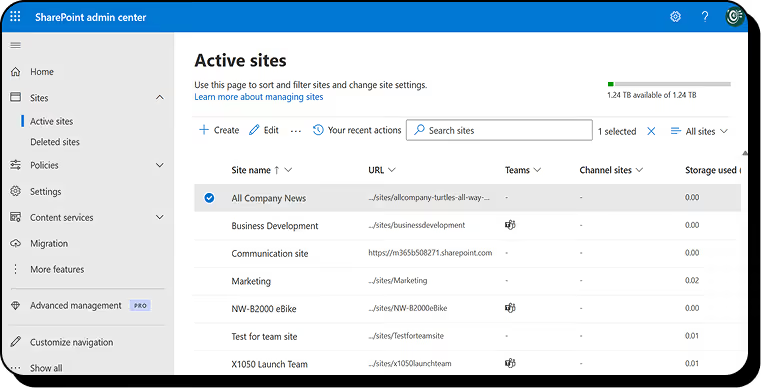
In the Microsoft 365 admin center’s reports > usage section, you’ll find analytics across SharePoint, OneDrive, Teams, and more—for example, file activity, popular sites, and sharing activity. These reports help you gauge adoption and spot risks, such as a site with unusually high external sharing. Use insights to take action: archive inactive sites or verify that sharing activity complies with policy.
SharePoint Advanced Management gives you tools to automate governance and address common issues:
- AI insights: A Microsoft-hosted large language model analyzes usage and governance reports, flags patterns such as overshared or inactive sites, and suggests recommended actions.
- Site ownership policies: Scheduled rules identify sites with too few or inactive owners. Notifications are sent to existing owners and, if unanswered, escalated to admins to assign replacements.
- Inactive sites policy: Define inactivity thresholds (e.g., time period, template type, sensitivity label). Owners are notified, and after a grace period the site can be locked, archived, or deleted automatically.
- Site access review: Oversharing reports can be delegated to site owners, who review and remove excess permissions with minimal IT involvement.
- Block download policy: Enforce browser-only access for chosen SharePoint or OneDrive sites, preventing downloads, printing, or syncing—no Entra conditional access required.
- Data access governance reports: Out-of-the-box reports highlight oversharing, sensitivity labels, and external access to surface risky sites.
- App insights: List every non-Microsoft app registered in Entra ID that accesses SharePoint, showing permissions used and helping admins audit or revoke risky integrations.
- Site-scoped conditional access: Bind Entra ID authentication contexts to a site so that MFA or device compliance checks trigger only when that site is opened.
- Restricted access control (sites): Limit an entire site to a Microsoft 365 or Entra security group. Others may see items in search results but access is blocked.
- Restricted access control (OneDrive): Similarly restrict a user’s OneDrive to a chosen security group, removing access from anyone else—even prior collaborators.
Microsoft Purview audit logs and alerts
Auditing is your safety net. In the Microsoft Purview compliance center, the unified audit log captures activities like file access, downloads, permission changes, or user additions across SharePoint/OneDrive/Teams. For example, to answer “Who accessed this confidential document?”, you can run a search and get detailed results.
Set up alert policies for critical events, such as mass deletions or sensitivity labels being downgraded. This ensures IT is notified immediately when a policy is violated or suspicious activity occurs.
Be sure to understand how long Microsoft retains the audit log as the default (standard) retention period is only 180 days where audit (premium) is one year by default.
Microsoft Purview DLP and compliance policies
Data loss prevention (DLP) automatically detects sensitive information in SharePoint and OneDrive, such as credit card numbers or health records. If a user tries to share or download this information unsafely, DLP can block the action or warn them.
Because DLP policies can be based on sensitivity labels and content conditions, they enforce rules like “no external sharing of documents labeled secret” in real time. Compliance policies also extend governance with retention rules to clean up old content or eDiscovery holds to preserve data for legal reasons.
Entra conditional access and MFA
Conditional access policies in Entra ID (formerly Azure AD) are indispensable for securing SharePoint Online. They enforce conditions on how users access content—for example, blocking or limiting access from unmanaged devices.
Common configurations include:
- Requiring MFA for admins and privileged accounts
- Limiting unmanaged devices to web-only access
- Blocking access to high-sensitivity sites from personal devices
- Applying location-based restrictions or session timeouts
These measures add another layer of security beyond SharePoint itself, helping reduce the risk of unauthorized access or data leakage.
ShareGate and other third-party tools
Third-party tools like ShareGate extend Microsoft’s governance capabilities. ShareGate provides flexible reporting and monitoring, such as identifying which files are shared externally, listing sites with guest access, and enabling remediation directly from the tool. These reports save time, involve site owners in governance, and fill gaps left by Microsoft’s built-in tools.
Power BI for custom analytics
For deeper analytics, Power BI lets you create custom dashboards by combining Microsoft 365 usage data, audit log exports, and more. Microsoft even provides a usage analytics template that visualizes adoption trends, sensitive document labeling, or external sharing patterns. Power BI isn’t an enforcement tool but helps governance committees spot trends and make data-driven adjustments.
Ongoing monitoring and continuous improvement
Governance doesn’t end after a migration project—it’s a continuous process. Establish a cadence to review your environment and adapt to new risks or features.
- Governance committee reviews: Form a cross-functional team (IT, compliance, business) to meet regularly, review reports, discuss risks, and adjust policies.
- Regular audits and cleanup: Use audit logs and reports to check permissions, sensitive content, and site activity. Verify site ownership, handle inactive sites, and ensure classification accuracy.
- User training and communication: Educate users on site structures, sensitivity labels, and sharing policies. Many governance failures are unintentional—regular reminders and clear processes help reduce mistakes.
- Adapt to new features: Microsoft 365 is evergreen. Stay informed about updates and adjust your governance plan as new capabilities or business needs emerge.
- Plan for long-term storage and recovery: Move inactive sites to a low‑cost archive tier while preserving security/compliance/search and enable granular restore for SharePoint/OneDrive with defined RPO/RTO.
Bottom line: By treating Microsoft 365 management, security, and governance as an ongoing phase rather than a one-time task, you ensure your migration delivers long-term value. With the right tools and regular reviews, your environment stays secure, compliant, and organized—empowering users to work productively without chaos.
Considerations for SharePoint Server Subscription Edition (on-premises)
Throughout this guide, we emphasized SharePoint Online’s tools and capabilities. If you have migrated to SharePoint Server Subscription Edition (SPSE) or are maintaining a hybrid environment, many of the same governance principles apply—with some differences in implementation.
No native hub sites
SPSE does not support hub sites, which are a cloud-only feature. However, you should still flatten your architecture into separate site collections per unit of work. Manage navigation using traditional methods such as managed metadata navigation, custom code, or simple links between sites. The principle of avoiding deep subsites remains critical for flexibility and future cloud-readiness.
Limited integration with Microsoft 365 groups
On-premises SharePoint uses Entra/Active Directory (AD) security groups and SharePoint groups—there is no full Microsoft 365 group concept. In hybrid scenarios with Microsoft Entra Connect, groups may sync, but permissions in SPSE are typically managed via Entra/AD or SharePoint groups. Best practices remain the same: bundle users into Entra/AD groups for site access, minimize unique item permissions, and apply least privilege. You won’t get built-in Teams or Planner integration, but you can still simplify permissions by avoiding excessive custom SharePoint groups.
Labeling and data loss prevention (DLP)
SPSE does not include Microsoft Purview’s labeling or DLP features natively.
- Sensitivity labeling: You can use Microsoft Purview Information Protection and its scanner to classify and protect on-premises content. Actions include blocking all users, blocking non-explicit users, inheriting restrictive parent permissions, or quarantining sensitive files. If you need more advanced coverage, consider third-party solutions or enforce strong manual classification policies.
- Retention: SPSE supports built-in site collection retention through information management policies on content types, or Records Center schedules. While less granular than Purview, you can still automate retention, such as expiring library documents or purging recycle bins after a set number of days.
Auditing on-premises
SPSE provides classic audit logs at the site collection level, which you can enable to track events and export into reports (often in Excel). Enable auditing on critical site collections through Central Administration or PowerShell. Logs are not unified like in the cloud (each site collection is separate), but they still provide useful forensic data. Admins can also use scripts or third-party tools to parse and analyze patterns in these logs.
Conditional access analogs
In an on-premises setup, “conditional access” often means network-level controls such as VPN enforcement or IP restrictions via corporate firewalls. If SPSE is integrated with Entra ID for authentication, you may be able to apply some conditional access policies, but that requires advanced setup or with network controls (VPN, reverse proxy) for similar results. At minimum, ensure strong authentication methods are in place, such as multi-factor authentication (MFA).
ShareGate for SPSE
ShareGate supports on-premises environments as well as the cloud. You can use it to run governance and activity reports, monitor permissions, and streamline audits within SPSE. This makes it a valuable tool for consistent reporting across hybrid environments.
What else to consider after migration
“Manage, secure, and govern” is a critical phase in the SharePoint migration journey. After the heavy lift of moving content, this is where you solidify the foundations so your new environment thrives. Establishing strong governance early prevents the same issues—such as sprawl, weak permissions, or unclassified content—that likely prompted cleanup in the first place.
In this phase, you flatten and improve your information architecture, tighten permissions using best practices, classify and protect content, and use Microsoft 365 or third-party tools to enforce policies and monitor activity. The goal is balance: enable collaboration and innovation while keeping the platform secure, organized, and compliant.
Governance is not about locking everything down or adding bureaucracy. It’s about sensible rules that guide usage. As one governance guide put it, “you wouldn’t have a school without rules—the place would be a mess,” and the same goes for SharePoint. Put those rules in place and use technology to uphold them without hindering productivity.
With Part 3 of our series completed, your SharePoint Online or SPSE environment should be in a steady state: content is organized, permissions are accurate, and policies are enforced. This sets the stage for the final part of the migration guide, where the focus shifts to adoption, optimization, and continuous improvement. By investing now in governance, you ensure a sustainable platform that empowers your organization for years to come.
Stay tuned for Part 4, where we’ll cover optimization and accelerating change—helping your organization not only manage SharePoint effectively but also unlock its full potential for productivity and innovation.


.avif)